Service Mesh 전략 by 윤종연 차장님
About Istio
Istio는 Kubernetes에서 마이크로서비스 아키텍처에서 서비스 간 통신과 관리를 담당하는 서비스 메시 플랫폼입니다. Istio는 사이드카 프록시를 사용하여 네트워크 트래픽을 제어하고 보안 기능을 제공하며, 트래픽 라우팅, 부하 분산, 장애 복구, 트래픽 모니터링 등의 기능을 수행합니다. 이를 통해 개발자는 서비스 간 통신을 표준화하고 중앙에서 관리할 수 있으며, 애플리케이션의 안정성과 보안을 강화할 수 있습니다.
Unterstand Istio Architecture
배포된 모든 Application과 함께 Proxy “SideCar”를 추가함으로써 Istio를 사용하면 App의 인식, 트래팩 관리, 놀라운 관찰 가능성 및 강력한 보안 기능을 네트워크에 프로그래밍 할 수 있습니다.
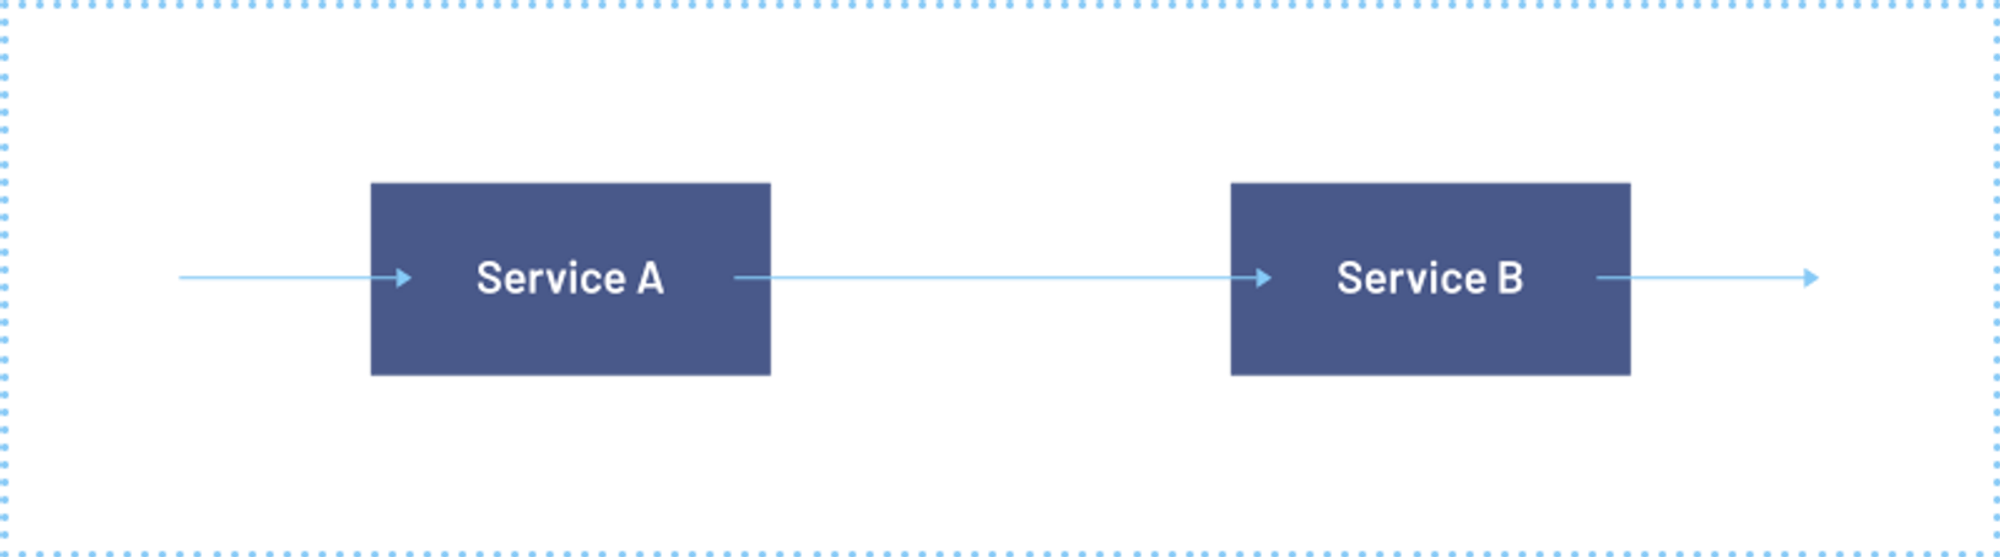
Istio 사용 전
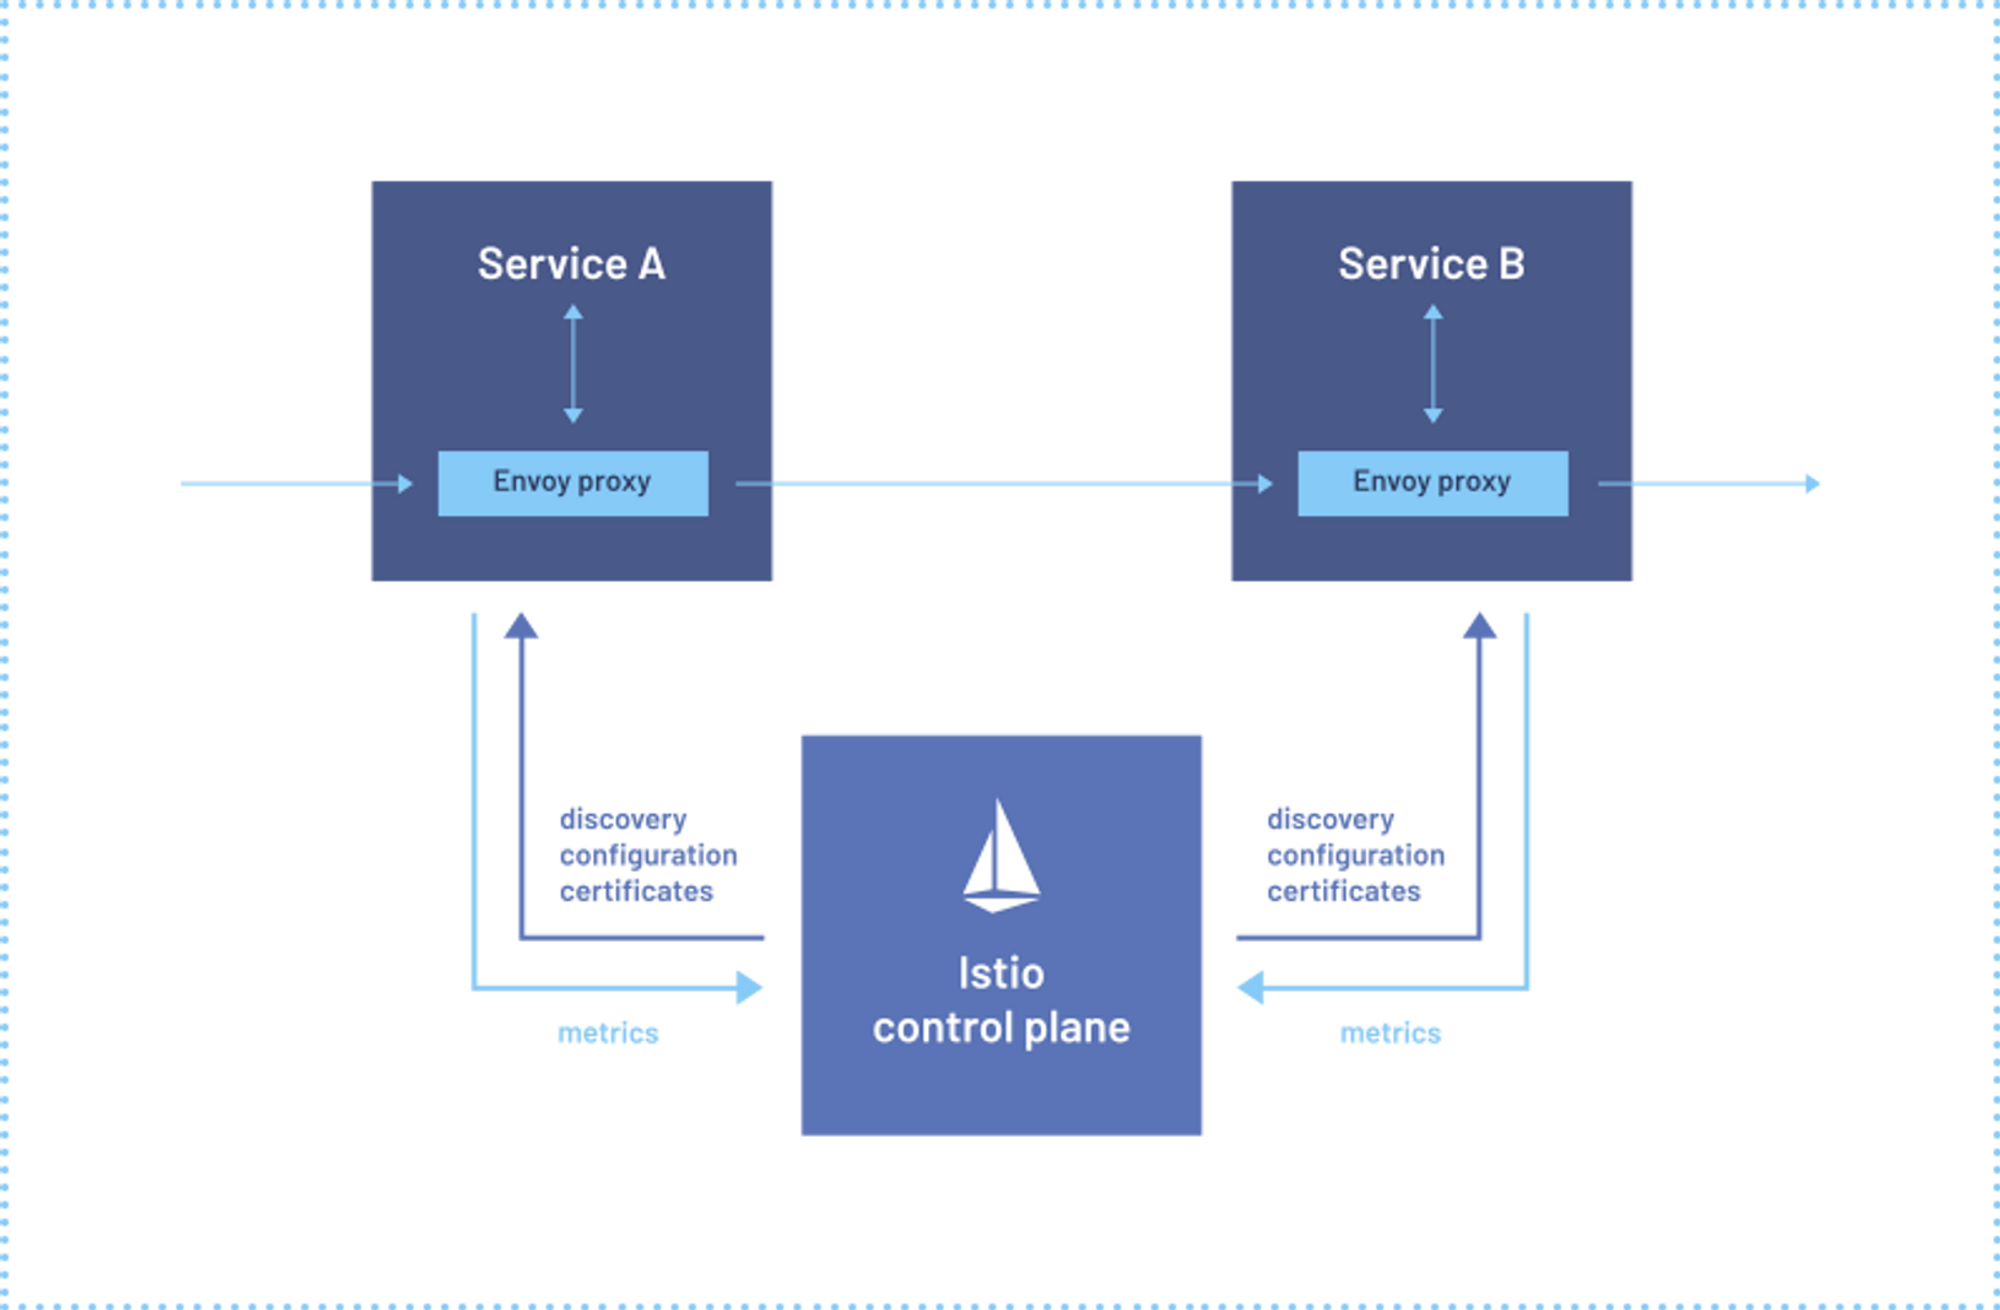
Istio 사용 후
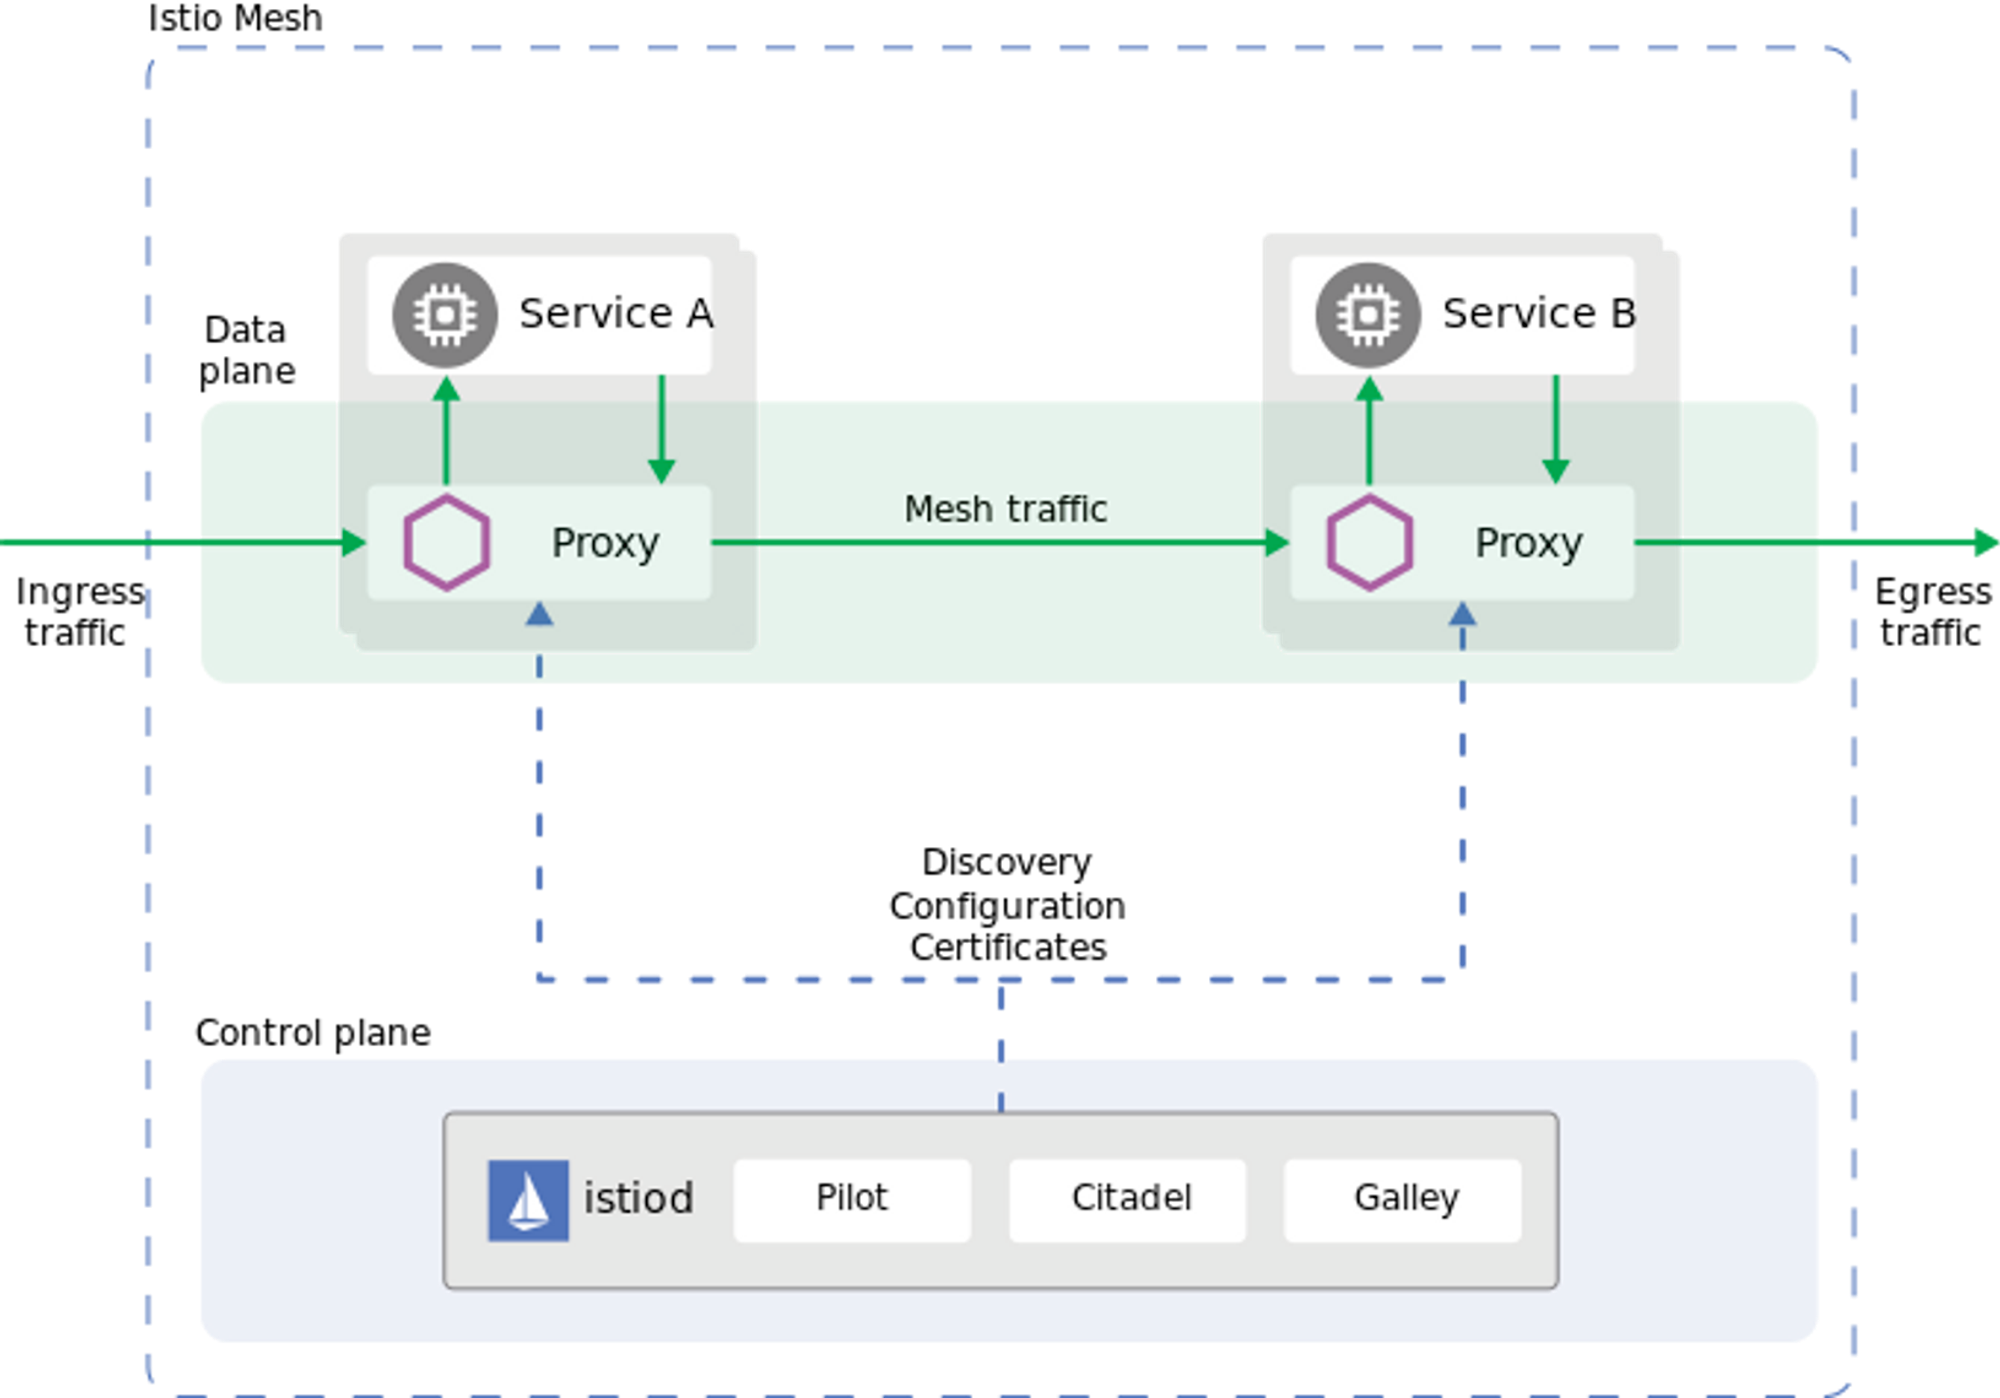
Istio에는 데이터 평면과 제어 평면이라는 두 가지 구성 요소가 있습니다. 데이터 플레인은 서비스 간의 통신입니다. 서비스 메시가 없으면 네트워크는 전송되는 트래픽을 이해하지 못하며 트래픽의 유형이나 발신자 또는 수신자를 기반으로 결정을 내릴 수 없습니다. 서비스 메시는 프록시를 사용하여 모든 네트워크 트래픽을 가로채서 설정한 구성을 기반으로 광범위한 애플리케이션 인식 기능을 허용합니다. Envoy 프록시는 클러스터에서 시작하는 각 서비스와 함께 배포되거나 VM에서 실행되는 서비스와 함께 실행됩니다. 컨트롤 플레인은 원하는 구성과 서비스 보기를 가져와서 프록시 서버를 동적으로 프로그래밍 하여 규칙이나 환경이 변경되면 업데이트합니다.
목차
Install
Istio
Add-Ons
Demo Update Strategy BlueGreen
Demo Update Strategy Canary
Install Istio
Requirement
Istio 1.18.0 버전(현재 최신버전) 은 Kubernetes(1.24, 1.25, 1.26, 1.27) 버전에서 동작 한다.
How to Deployment
Istio 설치에서 다양하 모델로 설치 할 수 있는데 (single or multiple cluster, single or multiple network, single or multiple control plane, single or multiple mesh) 여기서는 Single Cluster, Network, Control plane, mesh 모두 싱글로 구성 하였다. 추 후 멀티로 구성 하는 것들도 진행을 해보는 것이 좋을 것같다 자세한 정보 참고 https://istio.io/latest/docs/ops/deployment/deployment-models/
구성
Component | Version |
istiod | v1.18.0 |
Egress | v1.18.0 |
Ingress | v1.18.0 |
Deploy Istio Components
Dowload CLI & Pre-Check
# Istio 다운로드 버전을 명시하여 다운로드
curl -L https://istio.io/downloadIstio | ISTIO_VERSION=1.18.0 TARGET_ARCH=x86_64 sh -
% Total % Received % Xferd Average Speed Time Time Time Current
Dload Upload Total Spent Left Speed
100 102 100 102 0 0 347 0 --:--:-- --:--:-- --:--:-- 346
100 4856 100 4856 0 0 10609 0 --:--:-- --:--:-- --:--:-- 10609
Downloading istio-1.18.0 from https://github.com/istio/istio/releases/download/1.18.0/istio-1.18.0-linux-amd64.tar.gz ...
Istio 1.18.0 Download Complete!
Istio has been successfully downloaded into the istio-1.18.0 folder on your system.
Next Steps:
See https://istio.io/latest/docs/setup/install/ to add Istio to your Kubernetes cluster.
To configure the istioctl client tool for your workstation,
add the /root/istio-1.18.0/bin directory to your environment path variable with:
export PATH="$PATH:/root/istio-1.18.0/bin"
Begin the Istio pre-installation check by running:
istioctl x precheck
Need more information? Visit https://istio.io/latest/docs/setup/install/
# 환경변수에 Path 등록 또는 istioctl 파일을 복사한다.
cp ~/istio-1.18.0/bin/istioctl /usr/local/bin/
# 선행 체크 실행 No issues 확인
istioctl x precheck
✔ No issues found when checking the cluster. Istio is safe to install or upgrade!
To get started, check out https://istio.io/latest/docs/setup/getting-started/
Bash
복사
2.
Setup Istio Profile
설치 과정으로 Istio는 설치에 Profile이란 것이 존재하며 다양한 프로파일에 기본으로 설치되고 되지 않는 Component 들이있으니 확인을 하고 설치하자 참고로 Production 환경에서 Demo Profile을 사용하지 않도록 하자. 여기서는 Prodoction 환경에서 권장하는 default 프로파일에 egress gateway를 추가하는 방법으로 설치를 할 것이다. 참고 https://istio.io/latest/docs/setup/additional-setup/config-profiles/
아래 그림은 default(좌) 와 demo(우) 의 비교이다. demo경우 resource 부분에 CPU 와 Memory 를 제한 하고 있어서 사용하지 말아야 하며 default의 경우 egressGateways같은 것이 false 로 비활성화 되어있기 때문에 필요시 변경해야 한다.

# Istio 설치 프로파일 리스트이며 이중에 기본적으로 Production 환경에서는 default 를 사용한다.
istioctl profile list
Istio configuration profiles:
ambient
default
demo
empty
external
minimal
openshift
preview
remote
# 그냥 default 프로파일을 설정하면 아래와 같이 3개가 설치되는 것을 볼 수 있다. egress는 빠져있다.
istioctl install --set profile=default
This will install the Istio 1.18.0 default profile with ["Istio core" "Istiod" "Ingress gateways"] components into the cluster. Proceed? (y/N)
# default 프로파일에 추가로 egressgateway 활성화와 함께 하는 방법1
vi manifests/profiles/default.yaml
apiVersion: install.istio.io/v1alpha1
kind: IstioOperator
metadata:
namespace: istio-system2
spec:
:
:
components:
egressGateways:
- name: istio-egressgateway
enabled: true # false를 true 로 바꿈
저장
# 수정한 파일로 지정하면 Egress 가 추가된것을 볼 수 있다.
istioctl install -f manifests/profiles/default.yaml
This will install the Istio 1.18.0 default profile with ["Istio core" "Istiod" "Ingress gateways" "Egress gateways"] components into the cluster. Proceed? (y/N) n
# default 프로파일에 추가로 egressgateway 활성화와 함께 하는 방법2
istioctl install --set profile=default --set components.egressGateways[0].name=istio-egressgateway --set components.egressGateways[0].enabled=true
This will install the Istio 1.18.0 default profile with ["Istio core" "Istiod" "Ingress gateways" "Egress gateways"] components into the cluster. Proceed? (y/N) n
Bash
복사
3.
Install Istio Components
# 위 yaml 파일 수정 버전으로 설치 Egress 추가된 것을 볼 수 있다.
istioctl install -f manifests/profiles/default.yaml
This will install the Istio 1.18.0 default profile with ["Istio core" "Istiod" "Ingress gateways" "Egress gateways"] components into the cluster. Proceed? (y/N) y
✔ Istio core installed
✔ Istiod installed
✔ Egress gateways installed
✔ Ingress gateways installed
✔ Installation complete
Making this installation the default for injection and validation.
# istioctl 명령 확인
istioctl version
client version: 1.18.0
control plane version: 1.18.0
data plane version: 1.18.0 (2 proxies)
# kubectl 명령 확인 여기서 ingressgateway 가 EXTERNAL-IP 를 받은 이유는 Metallb에서 자동으로 받아온 것이다. IP를 못받아오면 저기는 따로 구성을 해주어야 한다.
kubectl get all -n istio-system
NAME READY STATUS RESTARTS AGE
pod/istio-egressgateway-6964995f45-dbkr2 1/1 Running 0 7m32s
pod/istio-ingressgateway-56ffb9b986-vkftj 1/1 Running 0 7m32s
pod/istiod-66ff7c9bfd-ckbrx 1/1 Running 0 7m36s
NAME TYPE CLUSTER-IP EXTERNAL-IP PORT(S) AGE
service/authservice ClusterIP 10.233.53.168 <none> 8080/TCP 8d
service/istio-egressgateway ClusterIP 10.233.34.190 <none> 80/TCP,443/TCP 7m32s
service/istio-ingressgateway LoadBalancer 10.233.14.90 172.30.10.121 15021:31900/TCP,80:32141/TCP,443:31134/TCP 7m32s
service/istiod ClusterIP 10.233.6.197 <none> 15010/TCP,15012/TCP,443/TCP,15014/TCP 7m36s
NAME READY UP-TO-DATE AVAILABLE AGE
deployment.apps/istio-egressgateway 1/1 1 1 7m32s
deployment.apps/istio-ingressgateway 1/1 1 1 7m32s
deployment.apps/istiod 1/1 1 1 7m36s
NAME DESIRED CURRENT READY AGE
replicaset.apps/istio-egressgateway-6964995f45 1 1 1 7m32s
replicaset.apps/istio-ingressgateway-56ffb9b986 1 1 1 7m32s
replicaset.apps/istiod-66ff7c9bfd 1 1 1 7m36s
NAME REFERENCE TARGETS MINPODS MAXPODS REPLICAS AGE
horizontalpodautoscaler.autoscaling/istio-egressgateway Deployment/istio-egressgateway 4%/80% 1 5 1 7m32s
horizontalpodautoscaler.autoscaling/istio-ingressgateway Deployment/istio-ingressgateway 5%/80% 1 5 1 7m32s
horizontalpodautoscaler.autoscaling/istiod Deployment/istiod 1%/80% 1 5 1 7m36s
Bash
복사
4.
Uninstall Istio
# 위 yaml 파일 수정 버전으로 설치 Egress 추가된 것을 볼 수 있다.
istioctl install -f manifests/profiles/default.yaml
This will install the Istio 1.18.0 default profile with ["Istio core" "Istiod" "Ingress gateways" "Egress gateways"] components into the cluster. Proceed? (y/N) y
✔ Istio core installed
✔ Istiod installed
✔ Egress gateways installed
✔ Ingress gateways installed
✔ Installation complete
Making this installation the default for injection and validation.
# istioctl 명령 확인
istioctl version
client version: 1.18.0
control plane version: 1.18.0
data plane version: 1.18.0 (2 proxies)
# kubectl 명령 확인 여기서 ingressgateway 가 EXTERNAL-IP 를 받은 이유는 Metallb에서 자동으로 받아온 것이다. IP를 못받아오면 저기는 따로 구성을 해주어야 한다.
kubectl get all -n istio-system
NAME READY STATUS RESTARTS AGE
pod/istio-egressgateway-6964995f45-dbkr2 1/1 Running 0 7m32s
pod/istio-ingressgateway-56ffb9b986-vkftj 1/1 Running 0 7m32s
pod/istiod-66ff7c9bfd-ckbrx 1/1 Running 0 7m36s
NAME TYPE CLUSTER-IP EXTERNAL-IP PORT(S) AGE
service/authservice ClusterIP 10.233.53.168 <none> 8080/TCP 8d
service/istio-egressgateway ClusterIP 10.233.34.190 <none> 80/TCP,443/TCP 7m32s
service/istio-ingressgateway LoadBalancer 10.233.14.90 172.30.10.121 15021:31900/TCP,80:32141/TCP,443:31134/TCP 7m32s
service/istiod ClusterIP 10.233.6.197 <none> 15010/TCP,15012/TCP,443/TCP,15014/TCP 7m36s
NAME READY UP-TO-DATE AVAILABLE AGE
deployment.apps/istio-egressgateway 1/1 1 1 7m32s
deployment.apps/istio-ingressgateway 1/1 1 1 7m32s
deployment.apps/istiod 1/1 1 1 7m36s
NAME DESIRED CURRENT READY AGE
replicaset.apps/istio-egressgateway-6964995f45 1 1 1 7m32s
replicaset.apps/istio-ingressgateway-56ffb9b986 1 1 1 7m32s
replicaset.apps/istiod-66ff7c9bfd 1 1 1 7m36s
NAME REFERENCE TARGETS MINPODS MAXPODS REPLICAS AGE
horizontalpodautoscaler.autoscaling/istio-egressgateway Deployment/istio-egressgateway 4%/80% 1 5 1 7m32s
horizontalpodautoscaler.autoscaling/istio-ingressgateway Deployment/istio-ingressgateway 5%/80% 1 5 1 7m32s
horizontalpodautoscaler.autoscaling/istiod Deployment/istiod 1%/80% 1 5 1 7m36s
Bash
복사
5.
Install Istio Add-Ons
What is Addons
Istio는 다양한 애드온(add-on)을 제공하여 서비스 메시를 보완하고 확장하는 기능을 제공합니다. 이러한 애드온들은 Istio의 기본 기능을 보완하거나 추가 기능을 제공하여 서비스 메시의 관리, 보안, 관찰 등을 강화합니다. 몇 가지 주요한 애드온은 다음과 같습니다
Kiali | Istio는 다양한 애드온(add-on)을 제공하여 서비스 메시를 보완하고 확장하는 기능을 제공합니다. 이러한 애드온들은 Istio의 기본 기능을 보완하거나 추가 기능을 제공하여 서비스 메시의 관리, 보안, 관찰 등을 강화합니다. 몇 가지 주요한 애드온은 다음과 같습니다 |
Prometheus | 시계열 데이터베이스로서 메트릭을 수집하고 저장하는 역할을 합니다. Istio에서 생성하는 다양한 메트릭을 수집하여 모니터링 및 경고 기능을 구현할 수 있습니다 |
Grafana | Prometheus로부터 수집된 메트릭 데이터를 시각화하여 대시보드로 표시합니다. 다양한 그래프와 시각화 도구를 사용하여 서비스 메시의 성능과 상태를 모니터링할 수 있습니다. |
Jaeger | 분산 추적 시스템으로서 서비스 간의 요청 추적을 지원합니다. 서비스 간의 호출 흐름과 지연 시간 등을 추적하여 복잡한 서비스 메시의 디버깅과 성능 개선에 도움을 줍니다. |
Zipkin | 마이크로서비스 아키텍처에서 발생하는 분산 추적 정보를 수집하고 시각화하는 데 사용됩니다. Zipkin을 사용하여 각 서비스 간의 호출 흐름을 추적하고 지연 시간을 확인할 수 있습니다. |
Install Add-Ons
# 노드 셀럭터로 특정 노드로 띄우고 Grafana 연결을 위해서 파일 수정을 해야한다.
vi samples/addons/jaeger kiali prometheus grafana loki 의 yaml 파일을 모두 열어 모두 monitor 노드로 가도록 해주었다.
sepc:
containers:
nodeSelector:
#kubernetes.io/os: linux
node-role.kubernetes.io/monitor: enable
저장
# Kiali 에서 AddOn 중에 Grafana 와 연결 하기 위해 kiali.yaml 파일은 추가로 넣어 주었다.
# 외부 Grafana 대시보드 연결은 문서 참고 https://kiali.io/docs/configuration/p8s-jaeger-grafana/grafana/
vi samples/addons/kiali.yaml
external_services:
custom_dashboards:
enabled: true
istio:
root_namespace: istio-system
grafana:
url: "http://grafana:3000"
# 제공된 addons 폴더에 모든 yaml 파일을 설치한다. 위에 언급한 툴이 모두 설치 된다. istio-system에 사용 하려고 namespace 를 붙여서 설치
kubectl apply -f samples/addons -n istio-system
serviceaccount/grafana created
configmap/grafana created
service/grafana created
deployment.apps/grafana created
configmap/istio-grafana-dashboards created
configmap/istio-services-grafana-dashboards created
deployment.apps/jaeger created
service/tracing created
service/zipkin created
service/jaeger-collector created
serviceaccount/kiali created
configmap/kiali created
clusterrole.rbac.authorization.k8s.io/kiali-viewer created
clusterrole.rbac.authorization.k8s.io/kiali created
clusterrolebinding.rbac.authorization.k8s.io/kiali created
role.rbac.authorization.k8s.io/kiali-controlplane created
rolebinding.rbac.authorization.k8s.io/kiali-controlplane created
service/kiali created
deployment.apps/kiali created
serviceaccount/loki created
configmap/loki created
configmap/loki-runtime created
service/loki-memberlist created
service/loki-headless created
service/loki created
statefulset.apps/loki created
serviceaccount/prometheus created
configmap/prometheus created
clusterrole.rbac.authorization.k8s.io/prometheus created
clusterrolebinding.rbac.authorization.k8s.io/prometheus created
service/prometheus created
deployment.apps/prometheus created
# kiali 설치가 되었는지 확인 해본다. 이런 식으로 다른 것도 확인 가능하다.
kubectl rollout status deployment/kiali -n istio-system
deployment "kiali" successfully rolled out
# 확인 AddOn 들은 모두 Monitor Node 로 띄우도록 nodeSelector 설정을 해주었다.
kubectl get pod -n istio-system -o wide
NAME READY STATUS RESTARTS AGE IP NODE NOMINATED NODE READINESS GATES
grafana-5f98b97b64-xwjkd 1/1 Running 0 67m 10.233.121.180 kubemonitor02 <none> <none>
istio-egressgateway-5f7cfc6776-spcxc 1/1 Running 0 4m5s 10.233.125.197 kubeinfra03 <none> <none>
istio-ingressgateway-8679bf9545-8x6lq 1/1 Running 0 4m5s 10.233.125.211 kubeinfra03 <none> <none>
istiod-66ff7c9bfd-d6gpl 1/1 Running 0 4m9s 10.233.125.221 kubeinfra03 <none> <none>
jaeger-76cd7c7566-xts78 1/1 Running 0 67m 10.233.121.179 kubemonitor02 <none> <none>
kiali-7799445c94-6ms7t 1/1 Running 0 67m 10.233.86.133 kubemonitor03 <none> <none>
loki-0 1/1 Running 0 67m 10.233.86.134 kubemonitor03 <none> <none>
prometheus-67599c8d5c-cwp5r 2/2 Running 0 67m 10.233.121.61 kubemonitor01 <none> <none>
Bash
복사
Add-On zipkin
# Zipkin사용으로 Zipkin을 추가로 배포 해보려고 extra 디렉토리의 zipkin을 설치했다.
cat samples/addons/extras/zipkin.yaml
apiVersion: apps/v1
kind: Deployment
metadata:
name: zipkin
namespace: istio-system
labels:
app: zipkin
spec:
selector:
matchLabels:
app: zipkin
template:
metadata:
labels:
app: zipkin
sidecar.istio.io/inject: "false"
spec:
containers:
- name: zipkin
image: openzipkin/zipkin-slim:2.23.14
env:
- name: STORAGE_METHOD
value: "mem"
readinessProbe:
httpGet:
path: /health
port: 9411
initialDelaySeconds: 5
periodSeconds: 5
nodeSelector:
#kubernetes.io/os: linux
node-role.kubernetes.io/monitor: enable
---
apiVersion: v1
kind: Service
metadata:
name: tracing
namespace: istio-system
labels:
app: zipkin
spec:
type: ClusterIP
ports:
- name: http-query
port: 80
protocol: TCP
targetPort: 9411
selector:
app: zipkin
---
apiVersion: v1
kind: Service
metadata:
labels:
name: zipkin
name: zipkin
namespace: istio-system
spec:
ports:
- port: 9411
targetPort: 9411
name: http-query
selector:
app: zipkin
확인
kubectl apply -f samples/addons/extras/zipkin.yaml
deployment.apps/zipkin created
service/tracing configured
service/zipkin configured
kubectl get pod -n istio-system
NAME READY STATUS RESTARTS AGE
grafana-694697f484-zhlqd 1/1 Running 0 6d23h
istio-egressgateway-5f7cfc6776-spcxc 1/1 Running 0 6d23h
istio-ingressgateway-8679bf9545-8x6lq 1/1 Running 0 6d23h
istiod-66ff7c9bfd-d6gpl 1/1 Running 0 6d23h
jaeger-57cb5d5546-szbnn 1/1 Running 0 6d23h
kiali-855db86b7d-wwh97 1/1 Running 0 6d22h
loki-0 1/1 Running 0 7d
prometheus-79f95f68fc-g6f22 2/2 Running 0 6d23h
zipkin-977bc78bd-g26jh 1/1 Running 0 9s
Bash
복사
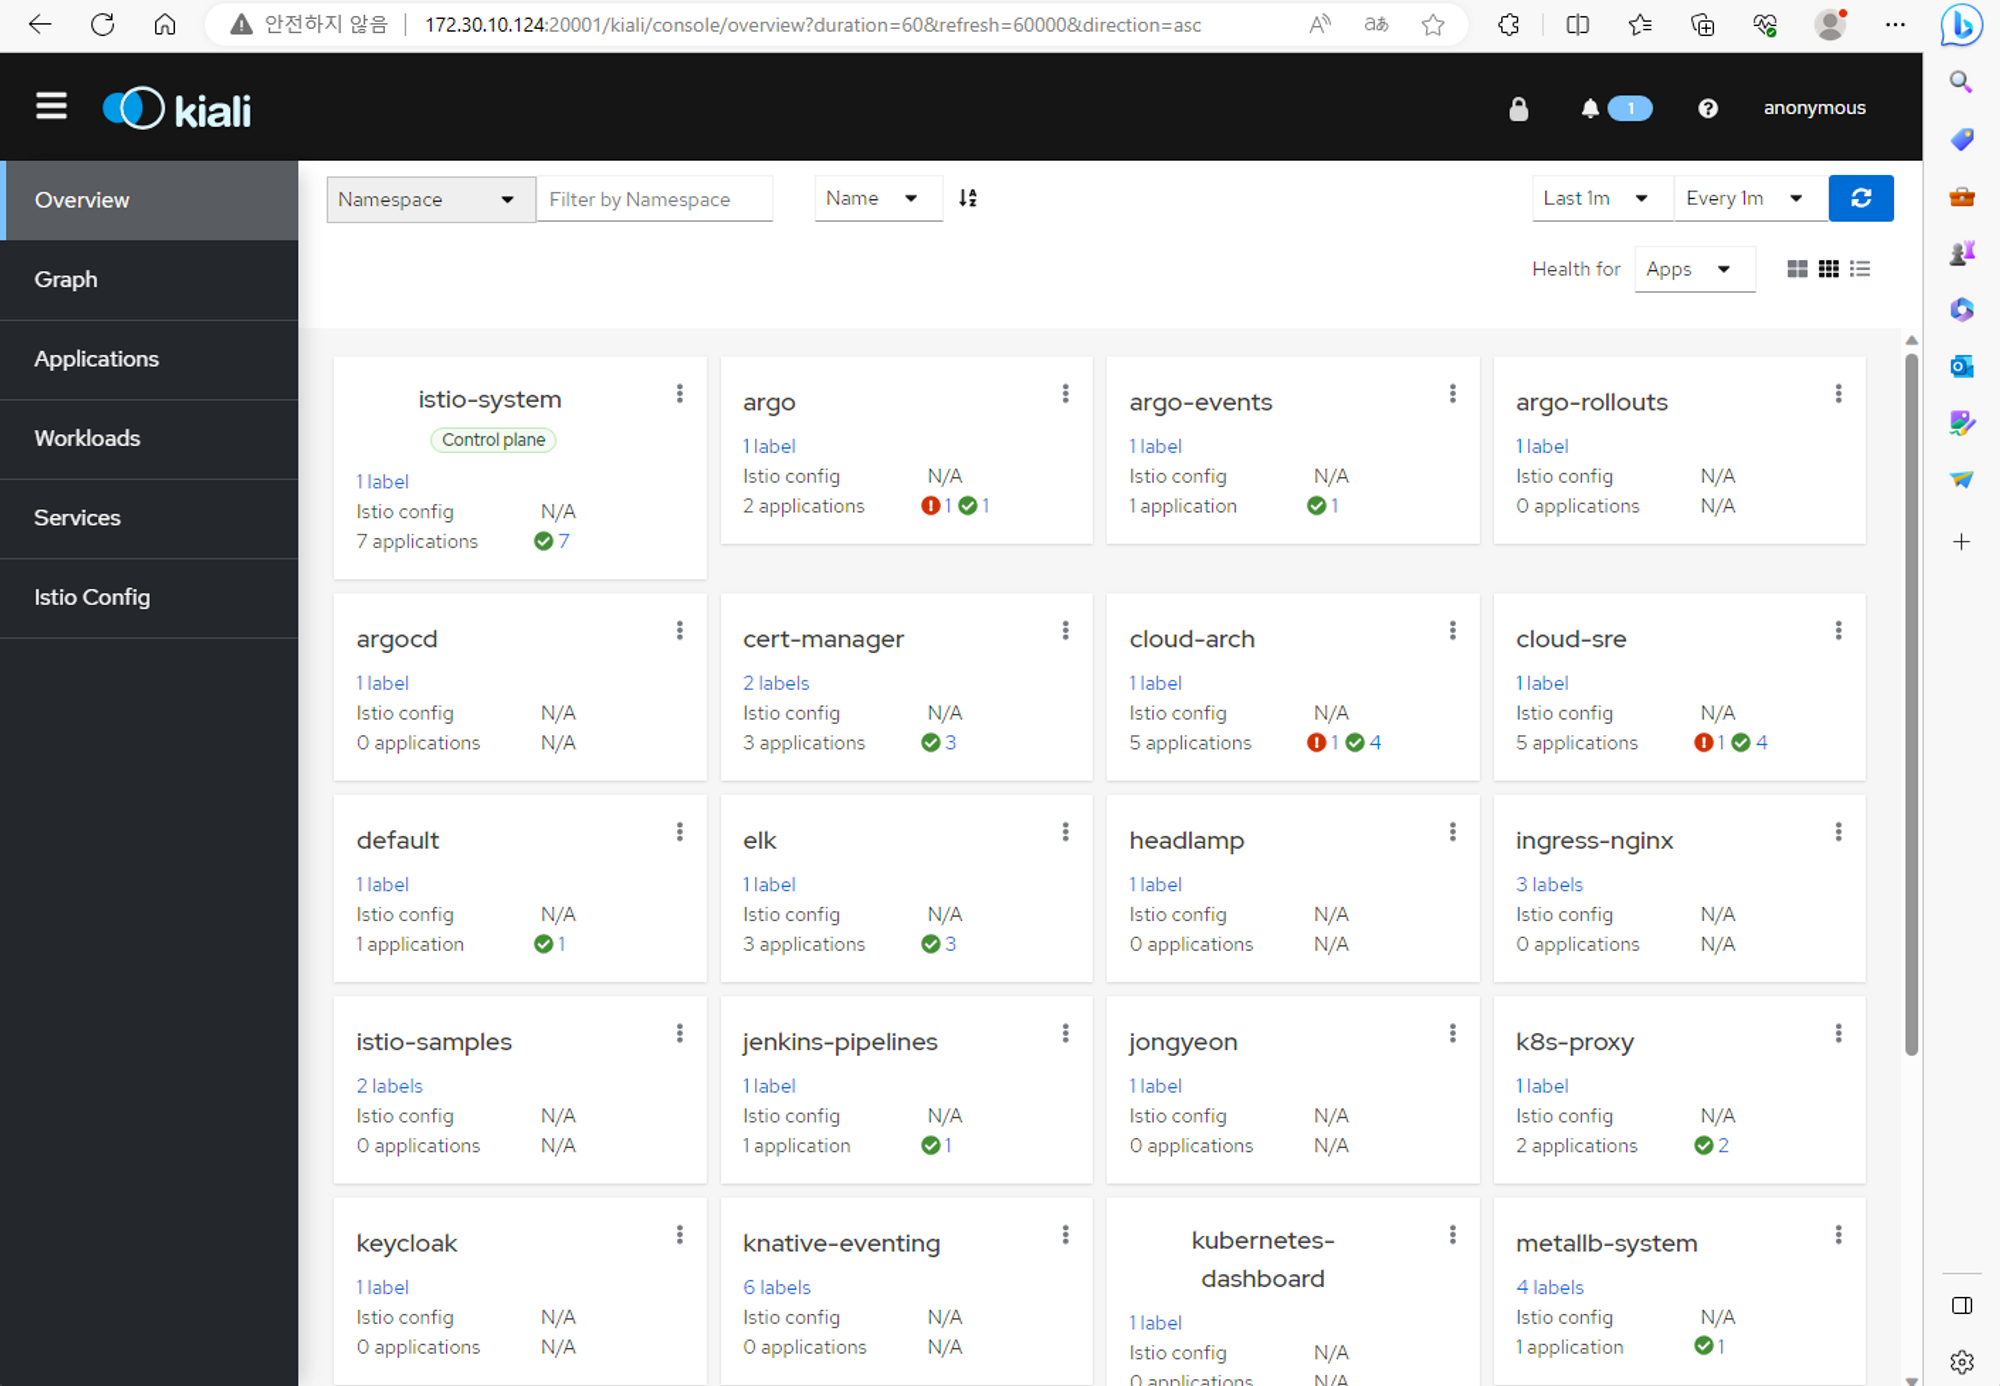
Kiali
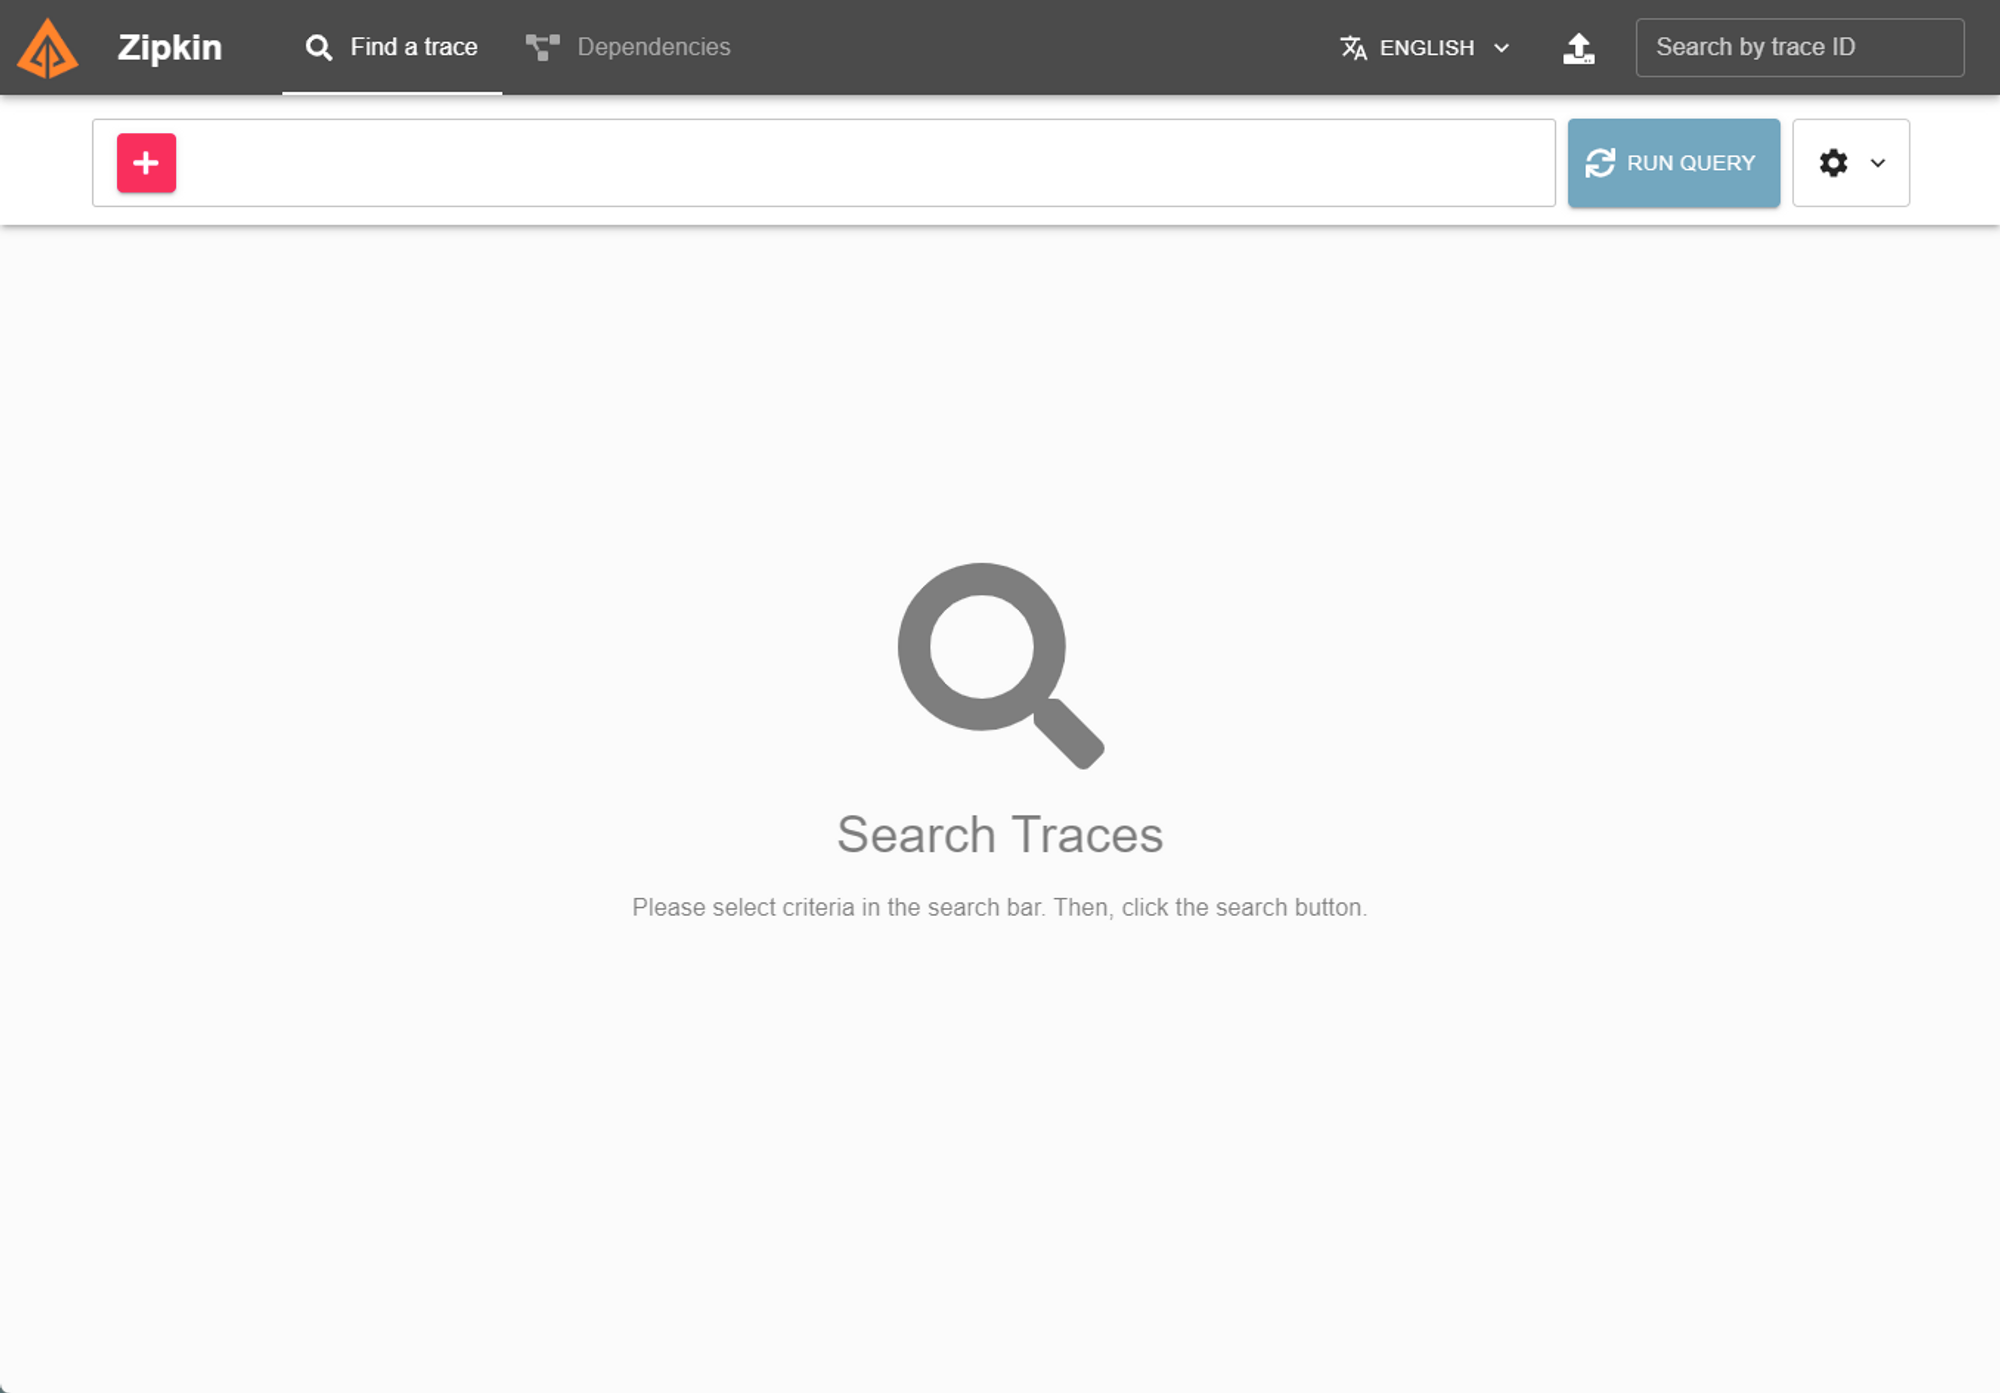
Zipkin
Deployment Sample Application with Update Strategy BlueGreen
위에서 Istio Controller 의 설치는 마무리가 되었다. 이제 Isto를 적용할 Namespace와 거기에 보여줄 Application 셋팅을 진행 해본다. 파이프라인은 기존 파이프라인을 재사용 하면 될 것이고 여기서는 SideCar가 어떻게 적용이 되고 그것이 Kiali Dashboard에 어떻게 표현되는지를 중점으로 보는 것이다. 배포경우 ArgoCD 를 이용해서 배포를 할 것인데 Sample Application 은 기존에 ArgoCD를 통해서 Blue-Green을 했던 단순한 Nginx Web Pod를 기반으로 재사용해서 해보기로 하였다.
Copy Sample Application
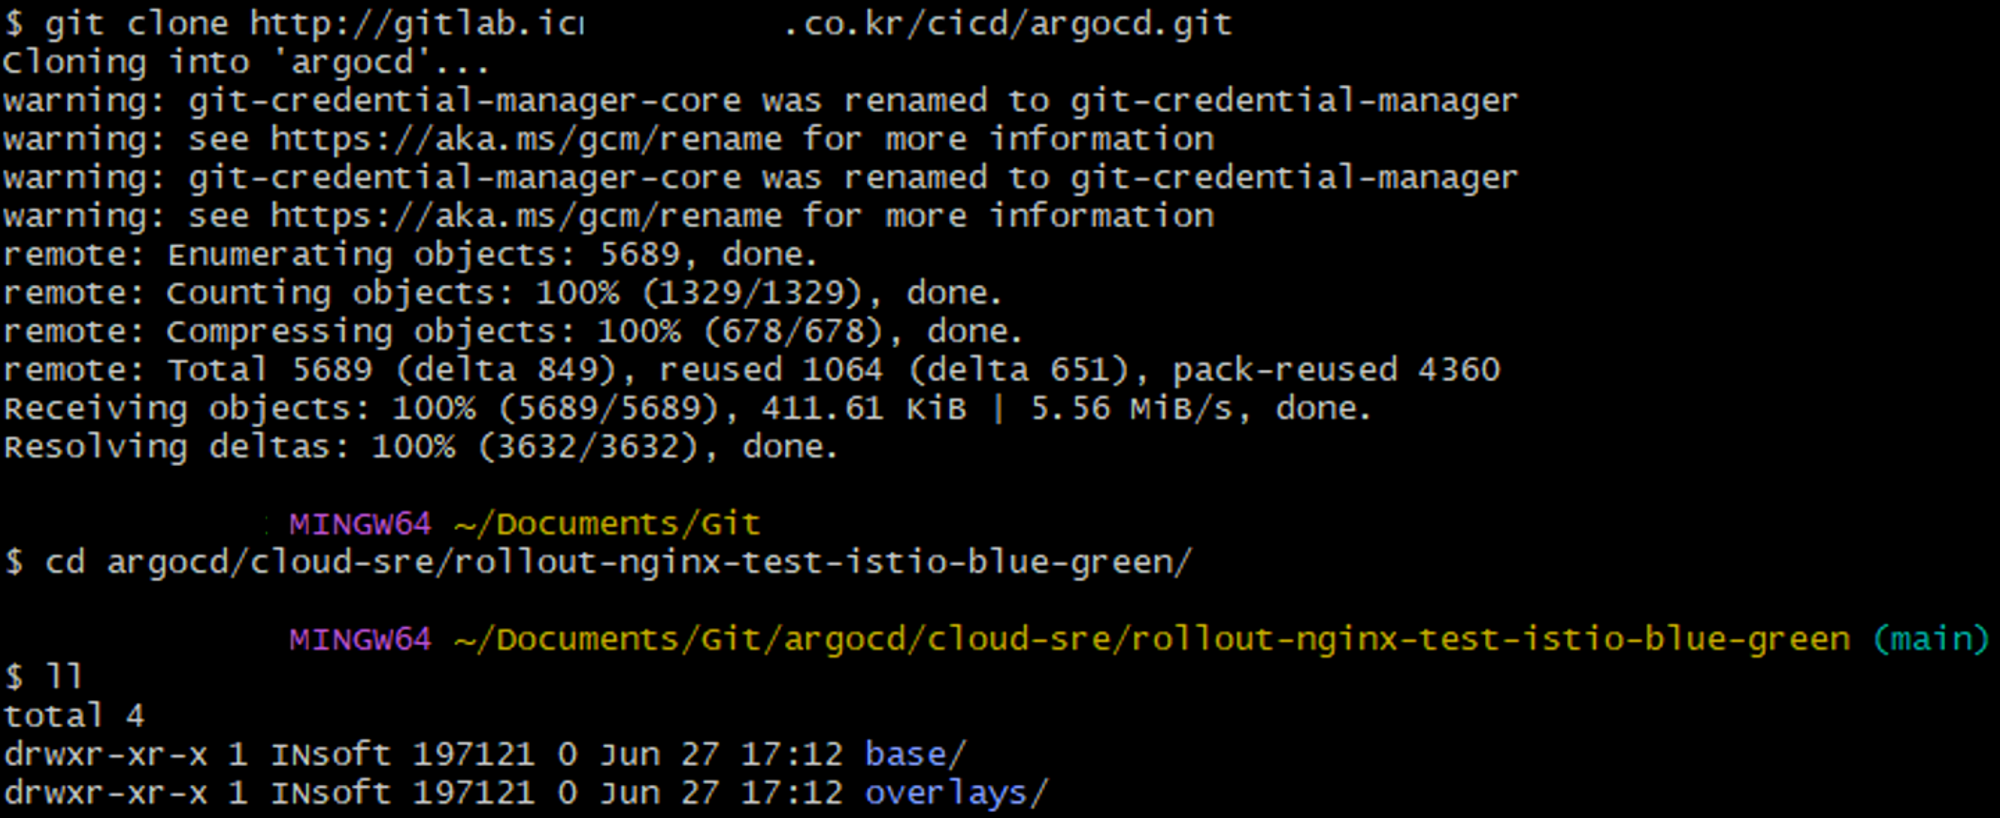
ArgoCD에서 기존에 사용했던 rollout-nginx-test를 통째로 복사하여 istio blue-green 용도로 사용 하기로 했다 복재는 rollout-nginx-test-istio-blue-green 이라는 디렉토리에 했다.
Create & Modify Manifest Files
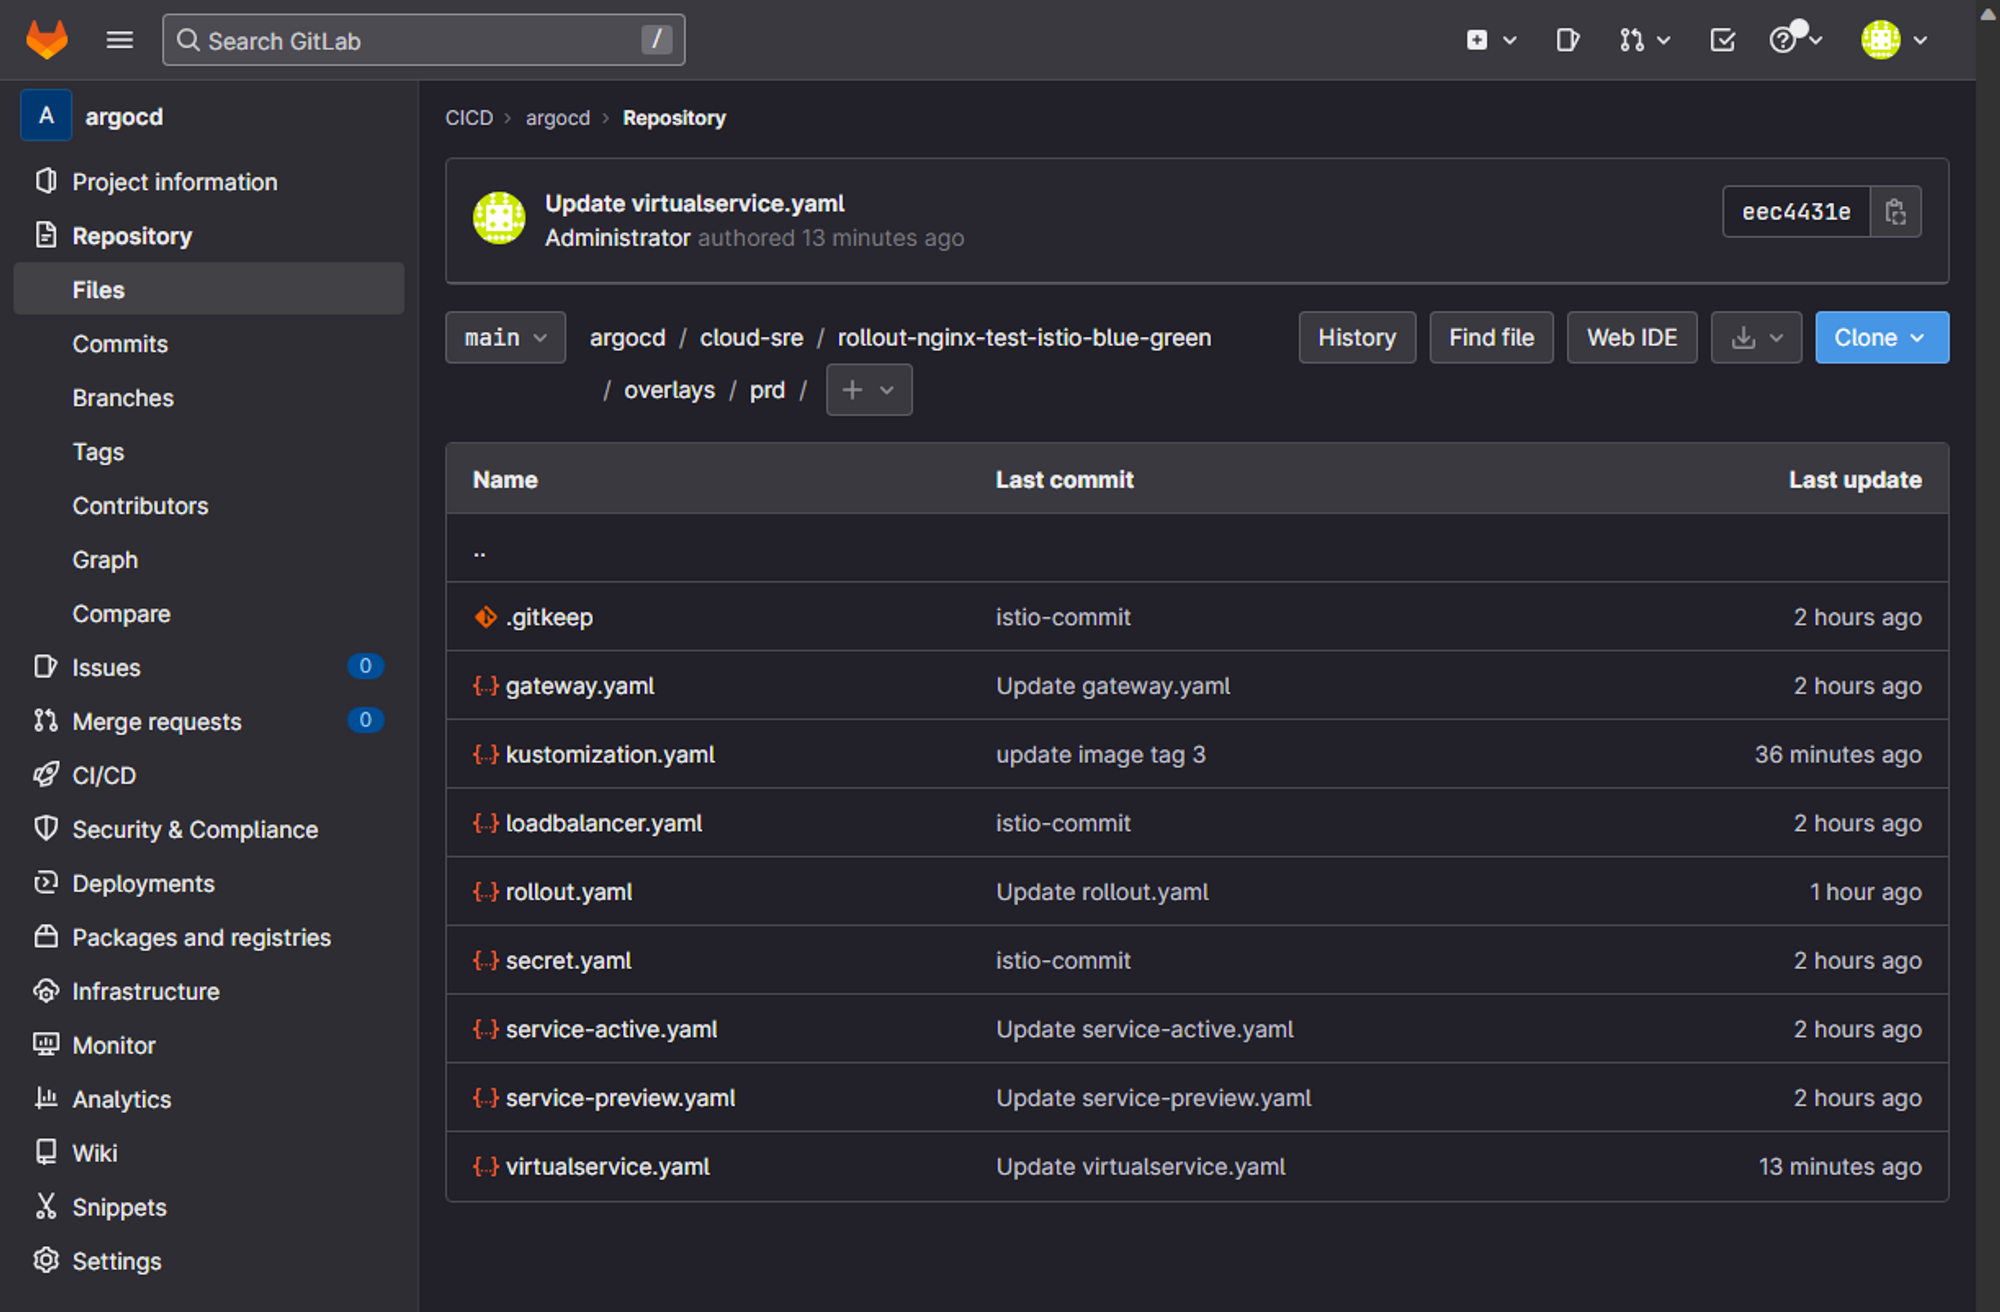
복사한 파일들중에 수정하고 생성된 파일들 있는데 생성한 파일은 gateway.yaml virtualservice.yaml 파일이다. 이며 kustomization.yaml 파일이 일부 수정이 되었고 나머지는 크게 바뀌지 않았다.
Gateway.yaml
apiVersion: networking.istio.io/v1alpha3
kind: Gateway
metadata:
name: nginx-test-blue-green-gateway
spec:
# The selector matches the ingress gateway pod labels.
# If you installed Istio using Helm following the standard documentation, this would be "istio=ingress"
selector:
istio: ingressgateway # use istio default controller
servers:
- port:
number: 80
name: http
protocol: HTTP
hosts:
- "cloud-sre-istio-blue-green.icnp.******.co.kr"
Bash
복사
VirtualService.yaml
apiVersion: networking.istio.io/v1alpha3
kind: VirtualService
metadata:
name: nginx-test-blue-green-virtualservice
spec:
hosts:
# 적용할 도메인 주소
- "cloud-sre-istio-blue-green.icnp.******.co.kr"
gateways:
# 통신할 게이트 웨이 개체명
- cloud-sre-istio-nginx-test-blue-green-gateway-prd
# 매치 조건 설정
http:
- match:
- uri:
exact: /v1
rewrite:
uri: /
route:
- destination:
# 실제 연결되는 Kubernetes의 service 명을 적어야 한다. 여기서는 Argo Rollout 의 Blue-Green에 사용하는 active service를 v1 에 매칭 시켰다.
host: cloud-sre-istio-nginx-test-blue-green-service-active-prd
#subset: v1
port:
number: 80
- match:
- uri:
exact: /v2
rewrite:
uri: /
route:
- destination:
# 실제 연결되는 Kubernetes의 service 명을 적어야 한다. 여기서는 Argo Rollout 의 Blue-Green에 사용하는 preview service를 v2 에 매칭 시켰다.
host: cloud-sre-istio-nginx-test-blue-green-service-preview-prd
port:
number: 80
Bash
복사
Rollout.yaml
apiVersion: argoproj.io/v1alpha1
kind: Rollout
metadata:
name: nginx-test-istio-blue-green
spec:
replicas: 2
revisionHistoryLimit: 2
selector:
matchLabels:
app: cloud-sre-istio-nginx-test-blue-green-prd
template:
metadata:
labels:
app: cloud-sre-istio-nginx-test-blue-green-prd
#version: v1
spec:
containers:
- name: nginx-test
image: harbor.icnp.******.co.kr/cloud-sre/main/rollout-nginx-test-istio-blue-green
imagePullPolicy: Always
ports:
- containerPort: 80
imagePullSecrets:
- name: cloud-sre-istio-secret-harbor-nginx-test-prd
strategy:
blueGreen:
activeService: cloud-sre-istio-nginx-test-blue-green-service-active-prd
previewService: cloud-sre-istio-nginx-test-blue-green-service-preview-prd
autoPromotionEnabled: false
Bash
복사
Kustomization.yaml
apiVersion: kustomize.config.k8s.io/v1beta1
kind: Kustomization
#- loadbalancer.yaml
resources:
- rollout.yaml
- service-active.yaml
- service-preview.yaml
- secret.yaml
# 추가 된 파일
- gateway.yaml
- virtualservice.yaml
namePrefix: cloud-sre-istio-
nameSuffix: -prd
# 배포될 객체의 네임스페이스스
namespace: cloud-sre-istio
#patches:
#- target:
#kind: Rollout
#name: cloud-sre-istio-nginx-test-rollout-prd
#patch: |-
#- op: replace
#path: /spec/template/metadata/labels/version
#value: v2
# patch하여 base와 결합될 yaml 파일 리스트트
#patchesStrategicMerge:
#- deployment.yaml
#- service.yaml
#- rollout.yaml
# 공통 적으로 들어가는 라벨로 모든 객체 service or deployment 위 metadata.labels에 들어간다. prefix나 suffix 안붙는다는것을 참고해라 Deployment 에서는 이 값이 그냥 박히기만 하지만 Rollout 에서는 반드시 매칭이 되어야 한다.
commonLabels:
app: cloud-sre-istio-nginx-test-blue-green-prd
images:
- name: harbor.icnp.******.co.kr/cloud-sre/main/rollout-nginx-test-istio-blue-green
newTag: "3"
Bash
복사
Service-active.yaml
apiVersion: v1
kind: Service
metadata:
name: nginx-test-blue-green-service-active
spec:
#selector:
#version: v1
ports:
- port: 80
protocol: TCP
targetPort: 80
type: ClusterIP
Bash
복사
Service-preview.yaml
apiVersion: v1
kind: Service
metadata:
name: nginx-test-blue-green-service-preview
spec:
#selector:
#version: v2
ports:
- port: 80
protocol: TCP
targetPort: 80
type: ClusterIP
Bash
복사
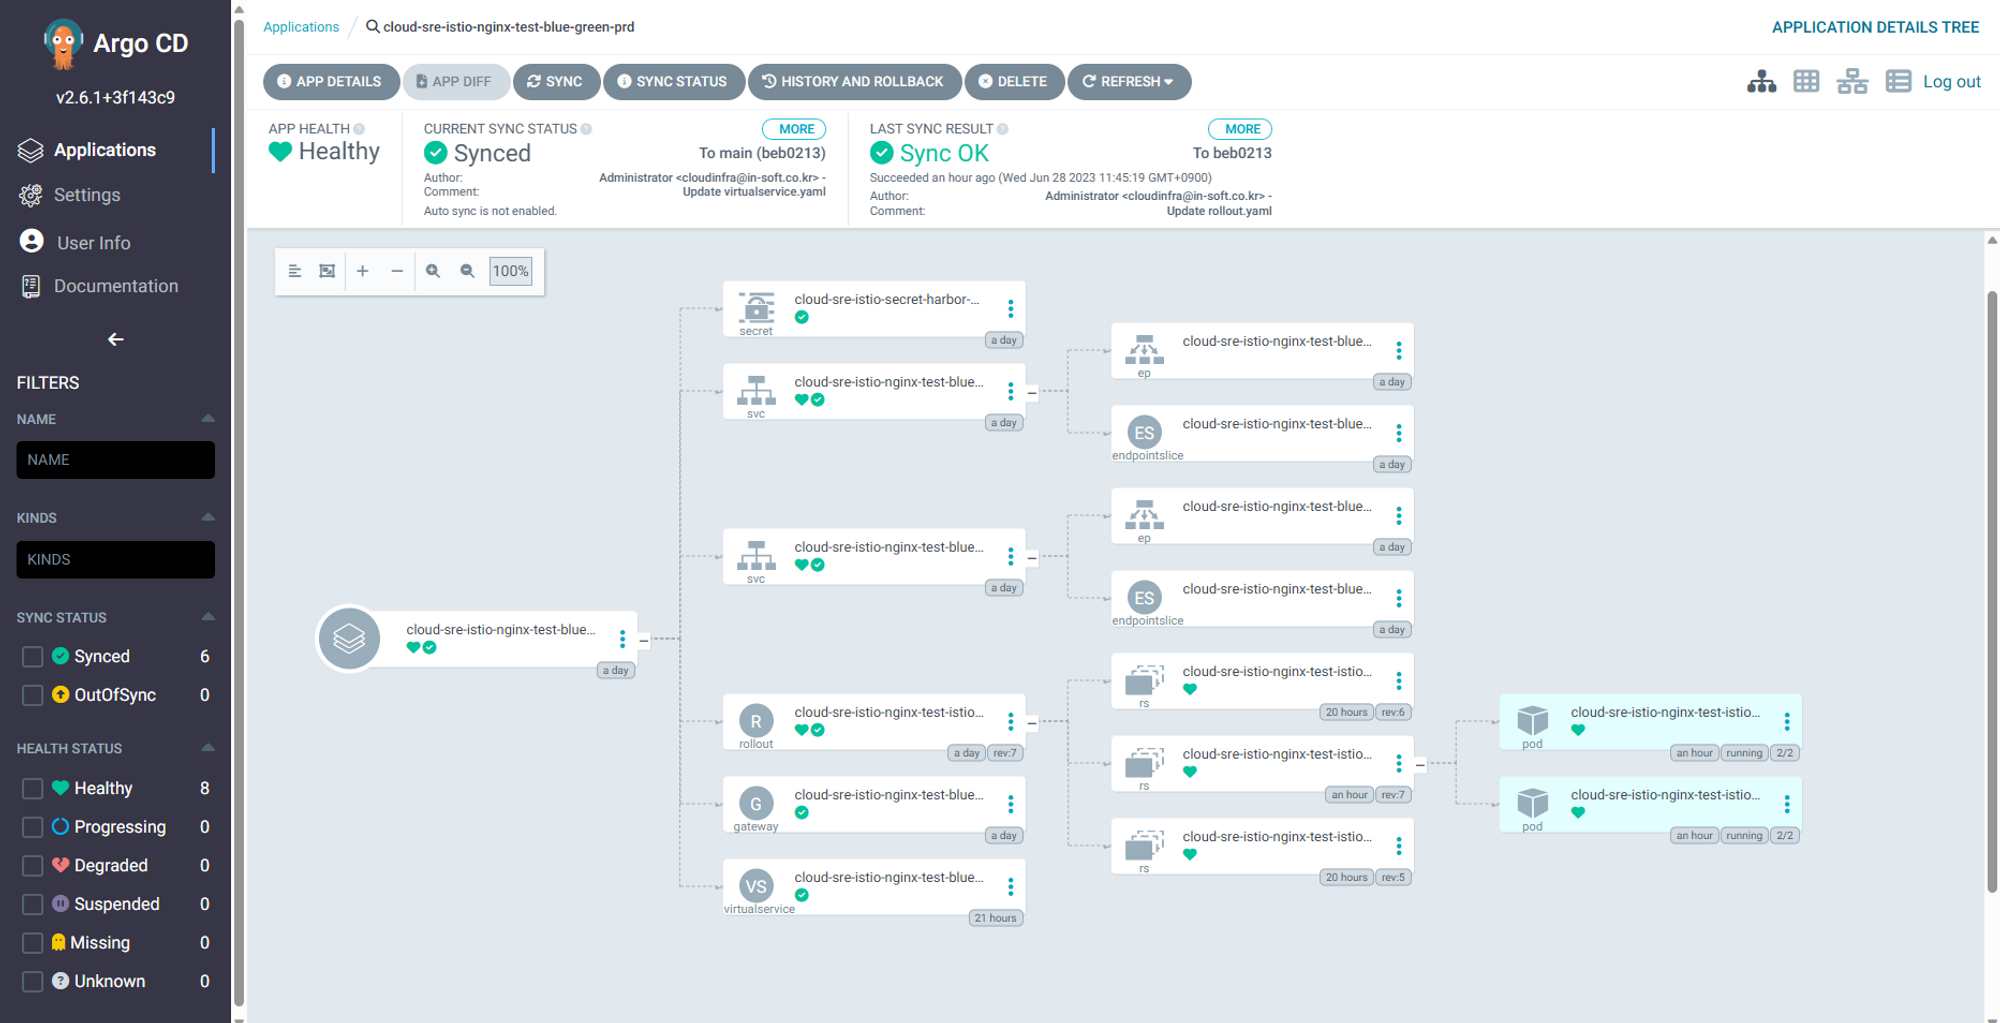
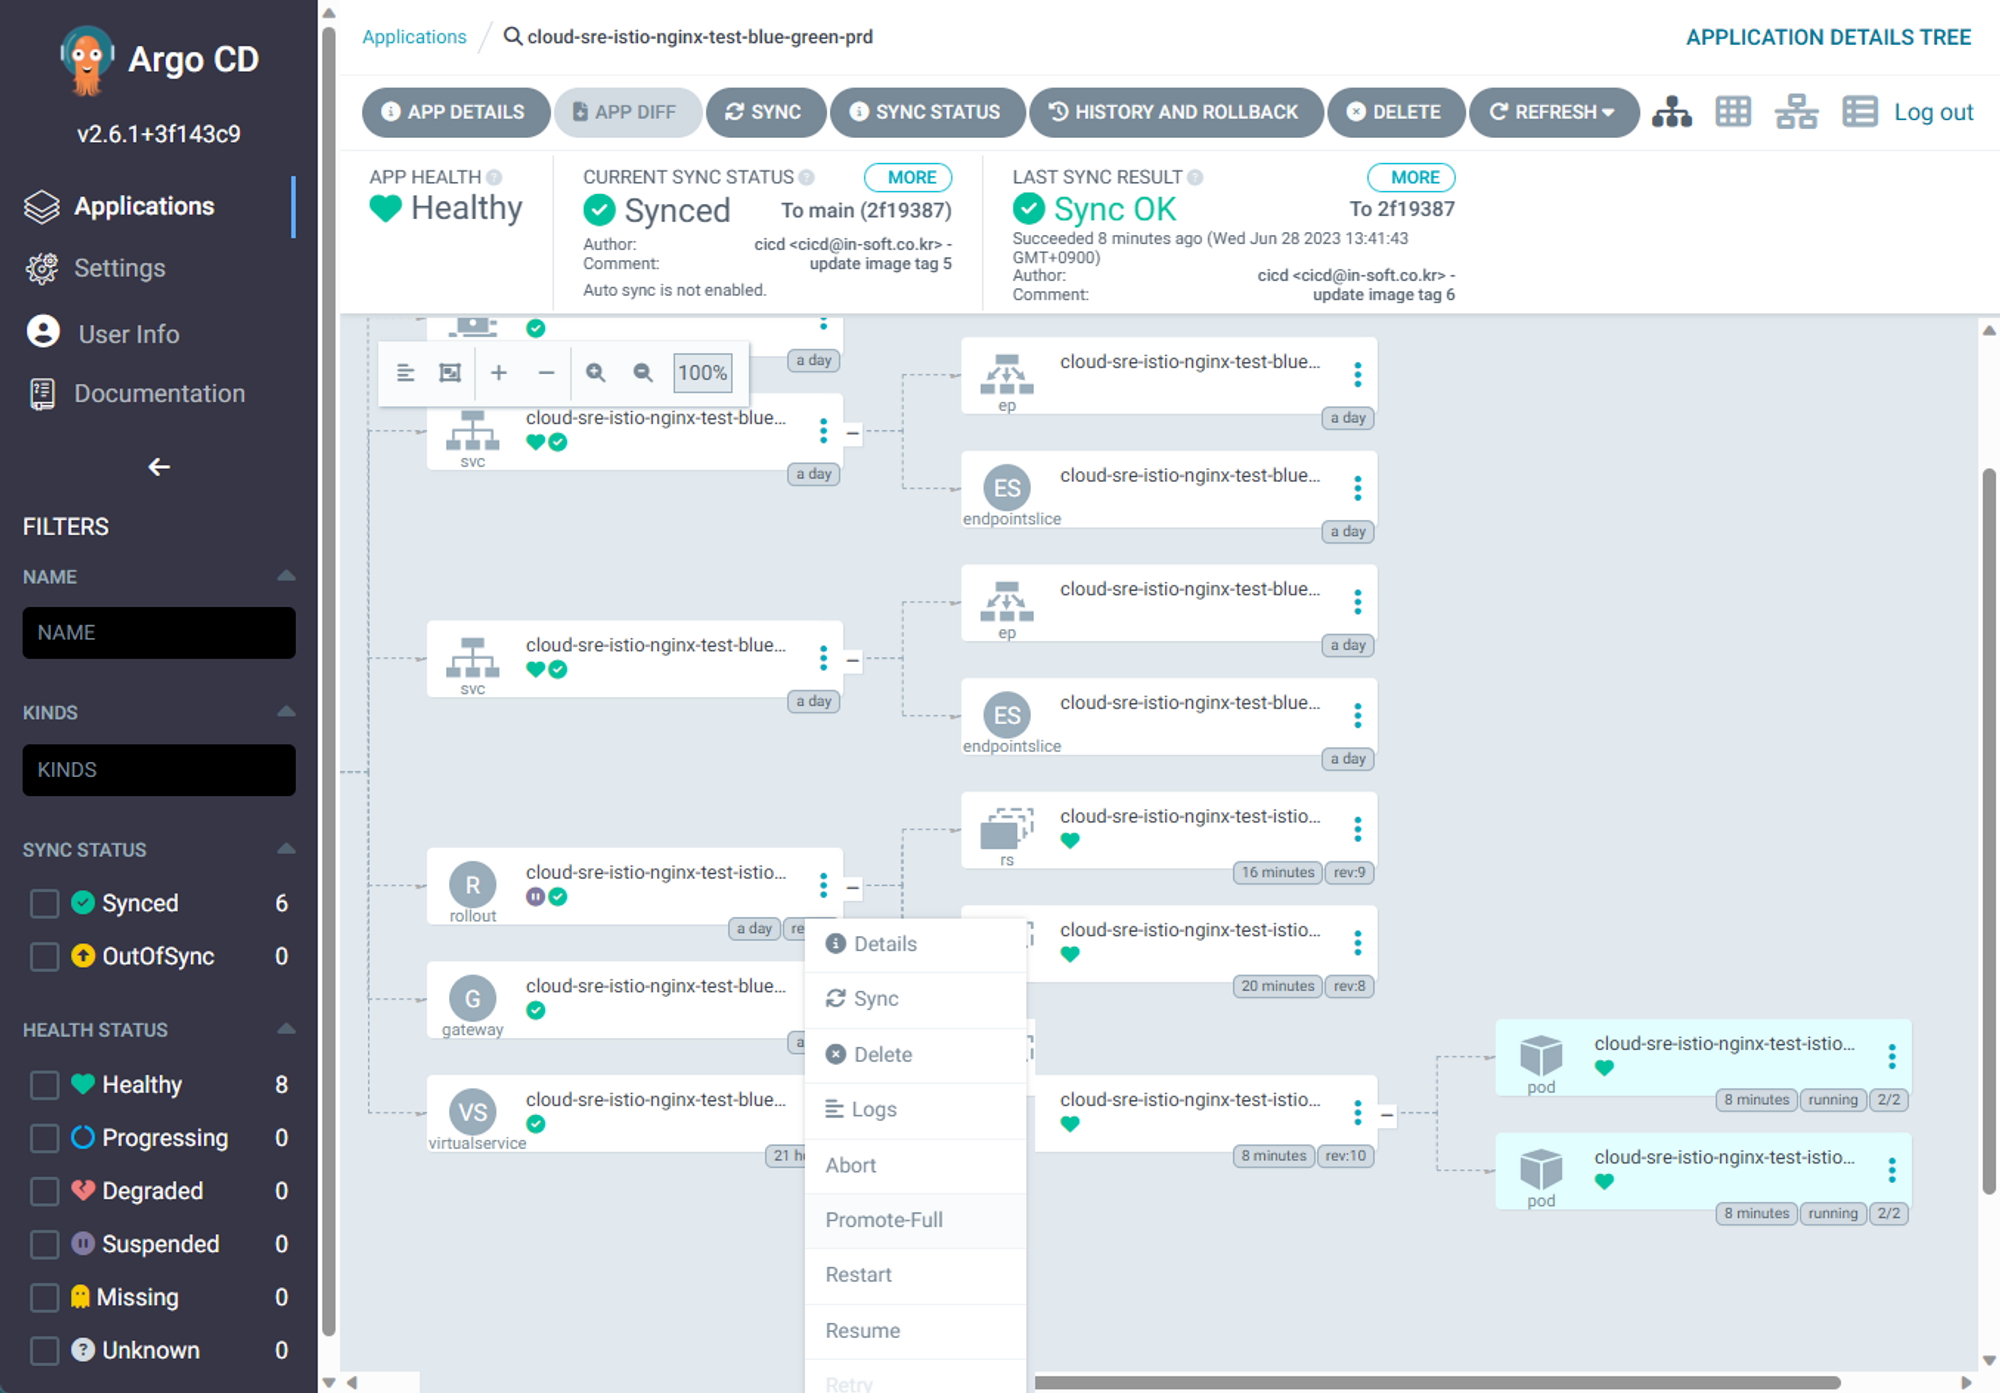
App Sync ArgoCD
Connect Blue-Green Web Page
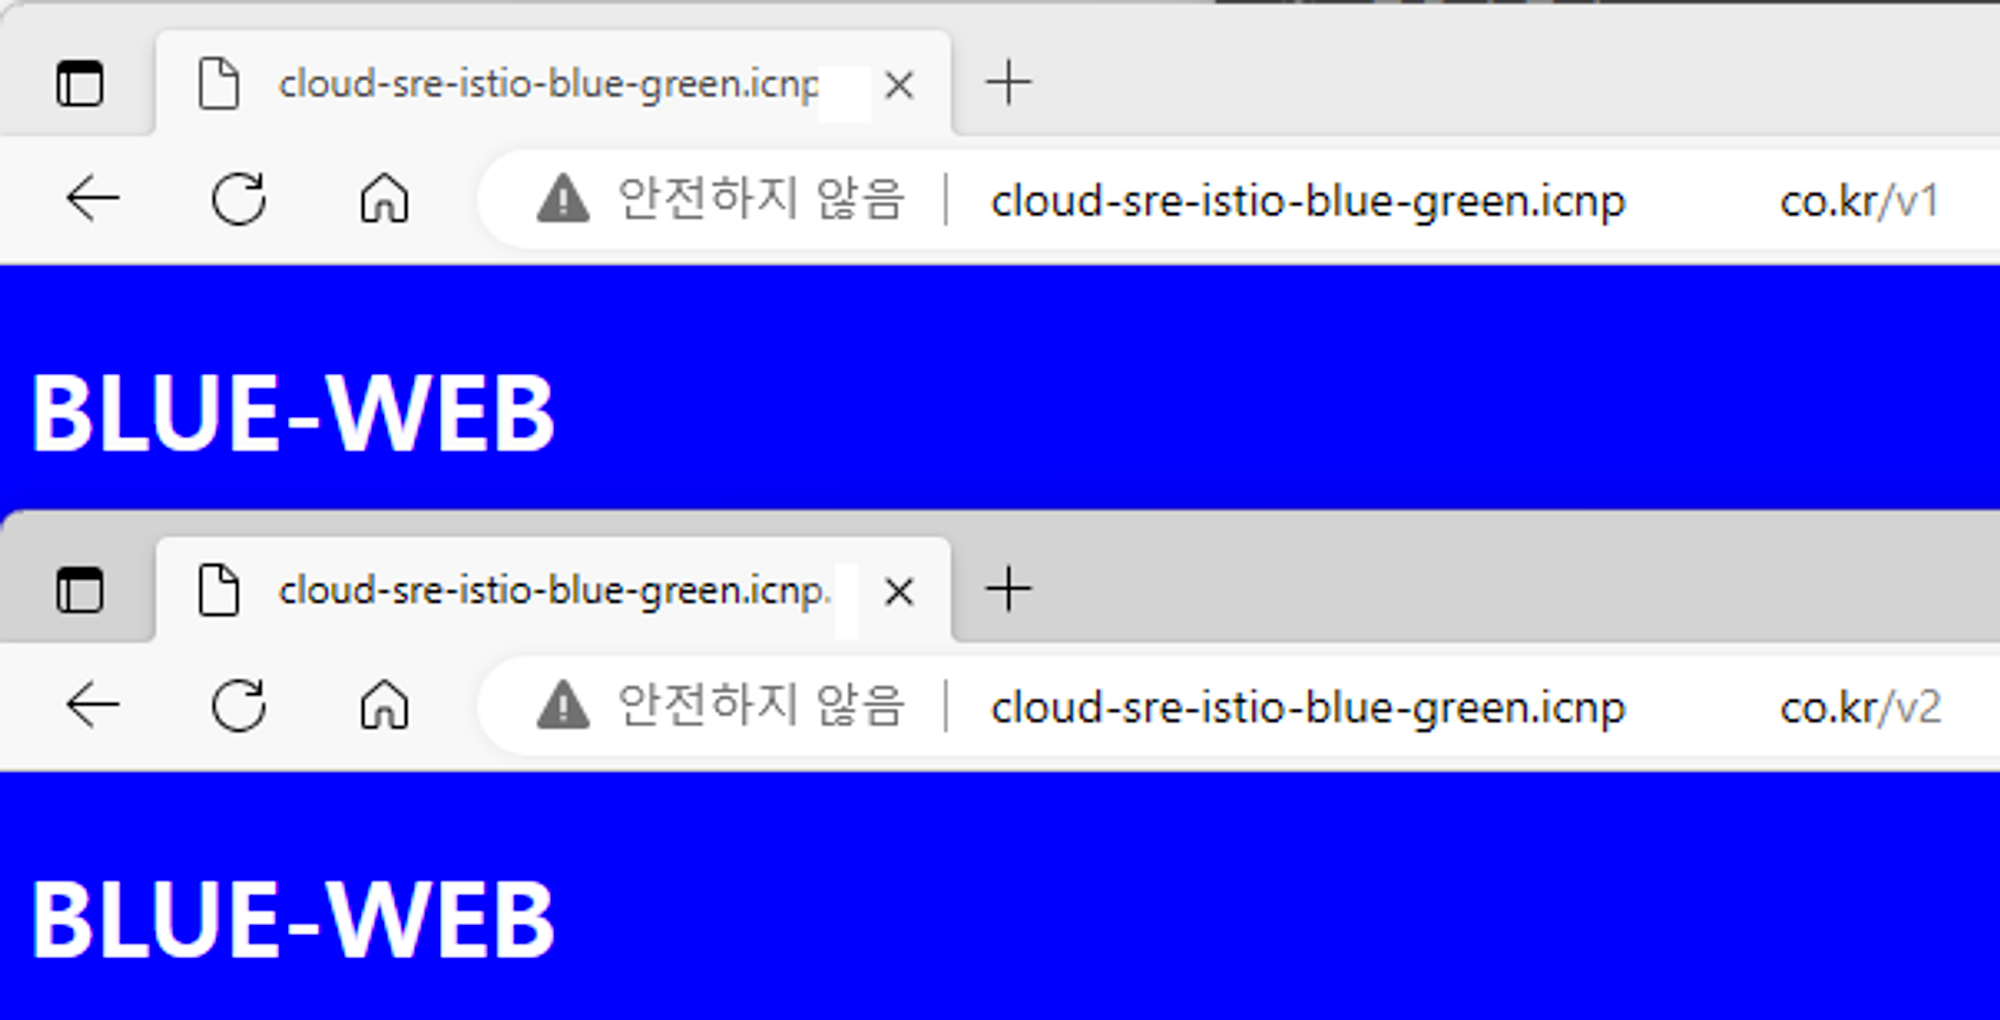
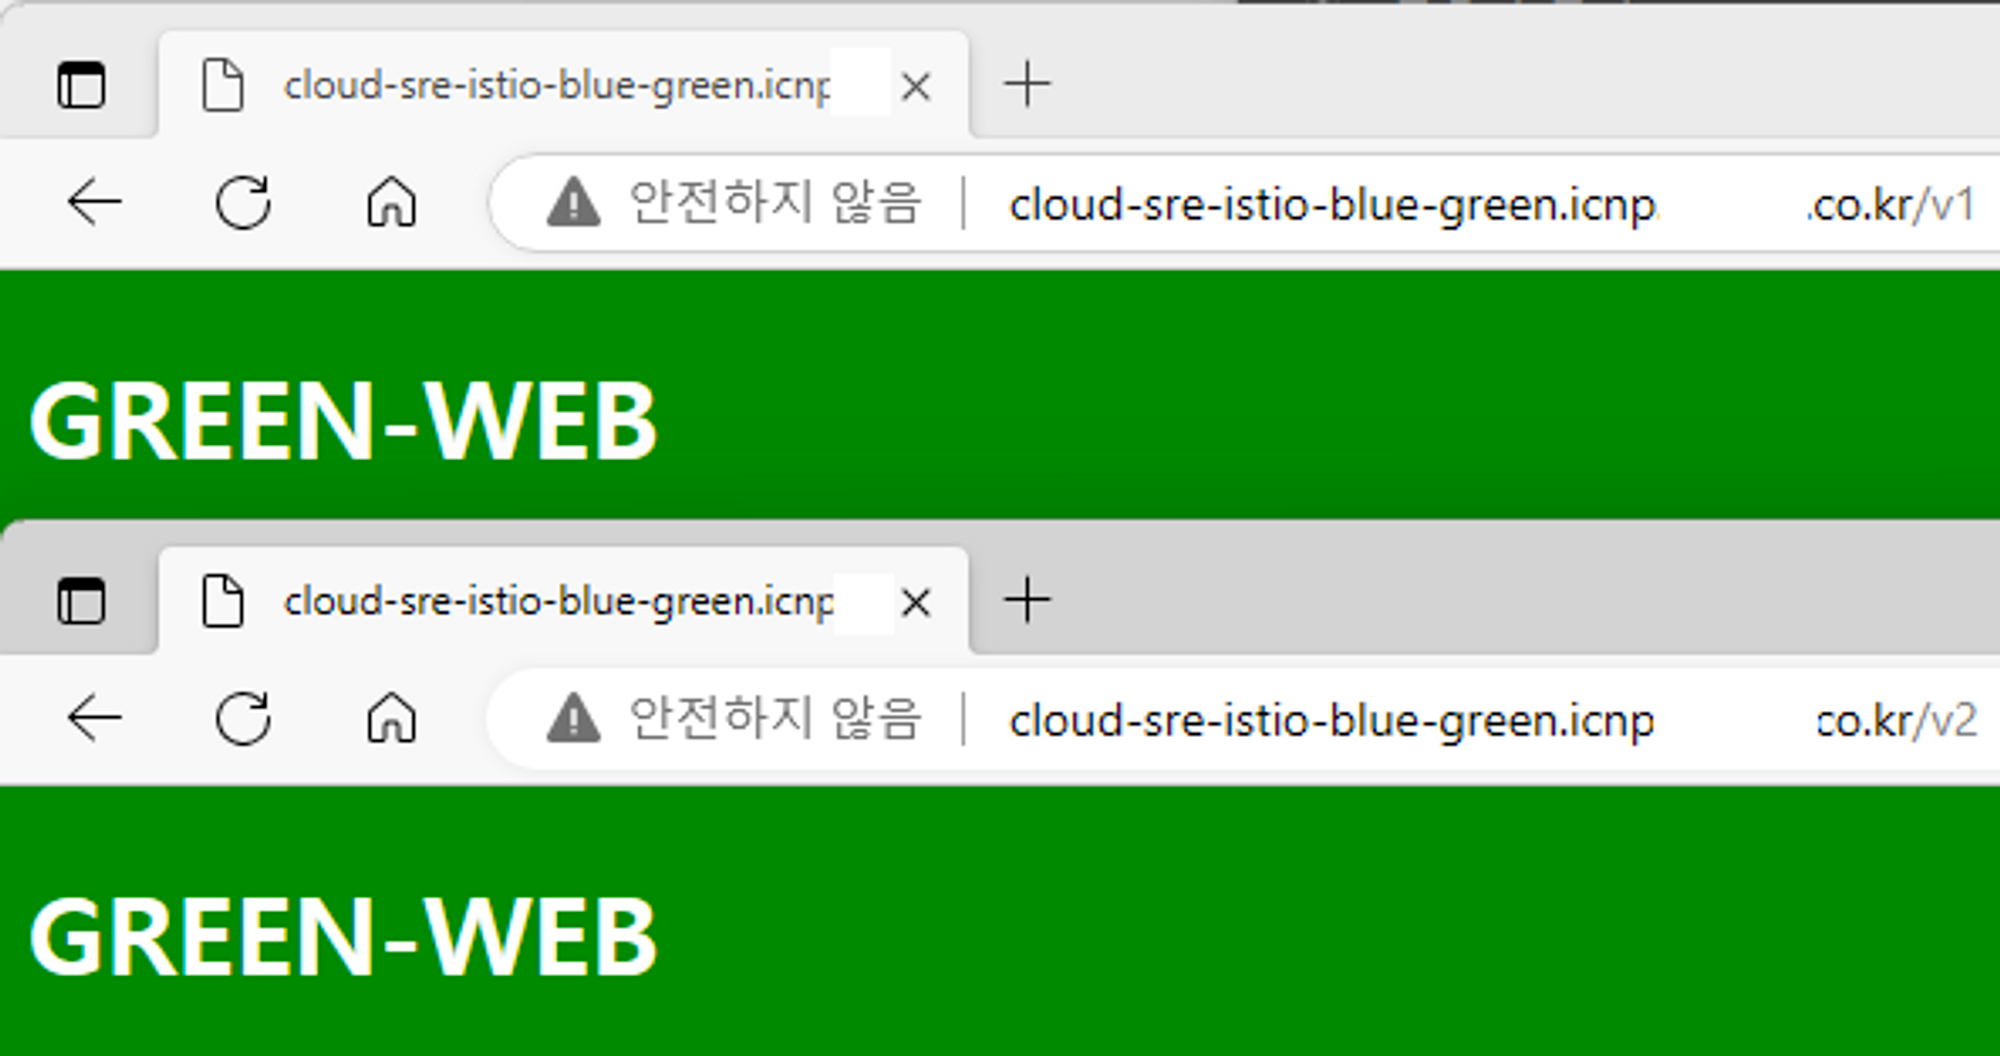
ArgoCD Rollout 에서 셋팅한 대로 Blue-Green 서비스로 접속 해본다. 현재(Active /v1)-미리보기(Preview /v2)는 모두 같은 Blue 페이지 인것을 확인 할 수 있다.
Test Update Strategy & Result (Blue-Green)
위에서 Istio Controller 의 설치는 마무리가 되었다. 이제 Isto를 적용할 Namespace와 거기에 보여줄 Application 셋팅을 진행 해본다. 파이프라인은 기존 파이프라인을 재사용 하면 될 것이고 여기서는 SideCar가 어떻게 적용이 되고 그것이 Kiali Dashboard에 어떻게 표현되는지를 중점으로 보는 것이다. 배포경우 ArgoCD 를 이용해서 배포를 할 것인데 Sample Application 은 기존에 ArgoCD를 통해서 Blue-Green을 했던 단순한 Nginx Web Pod를 기반으로 재사용해서 해보기로 하였다.
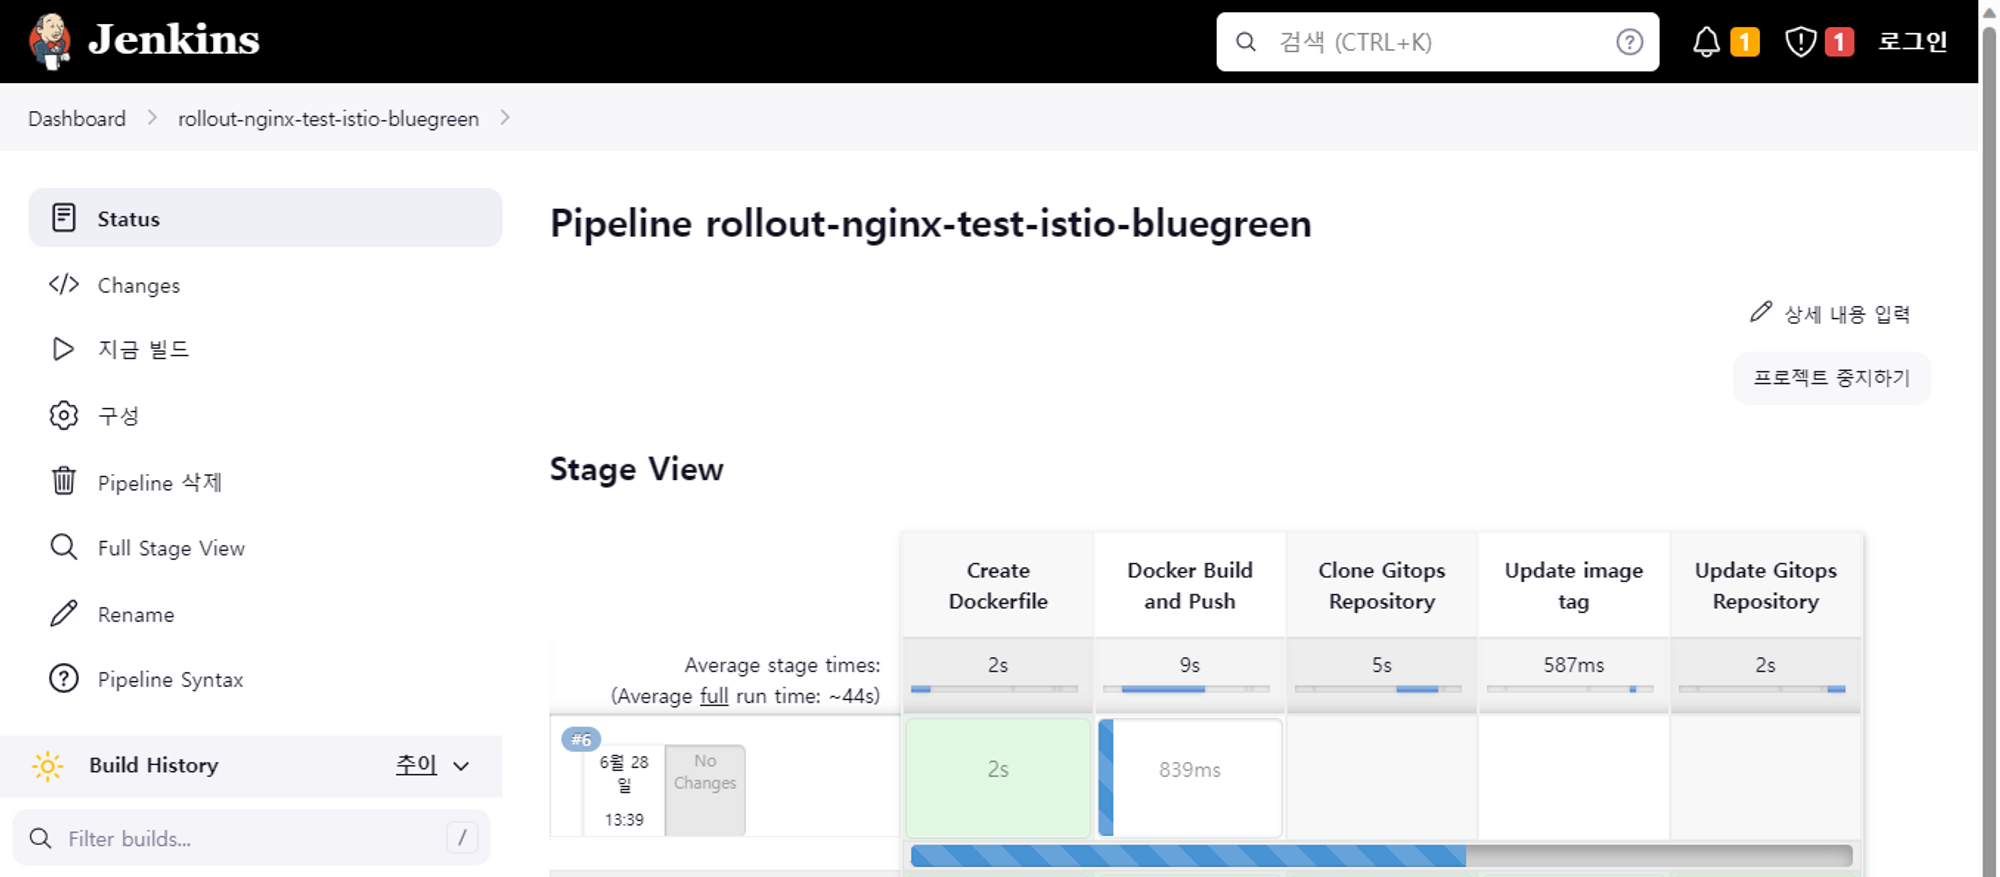
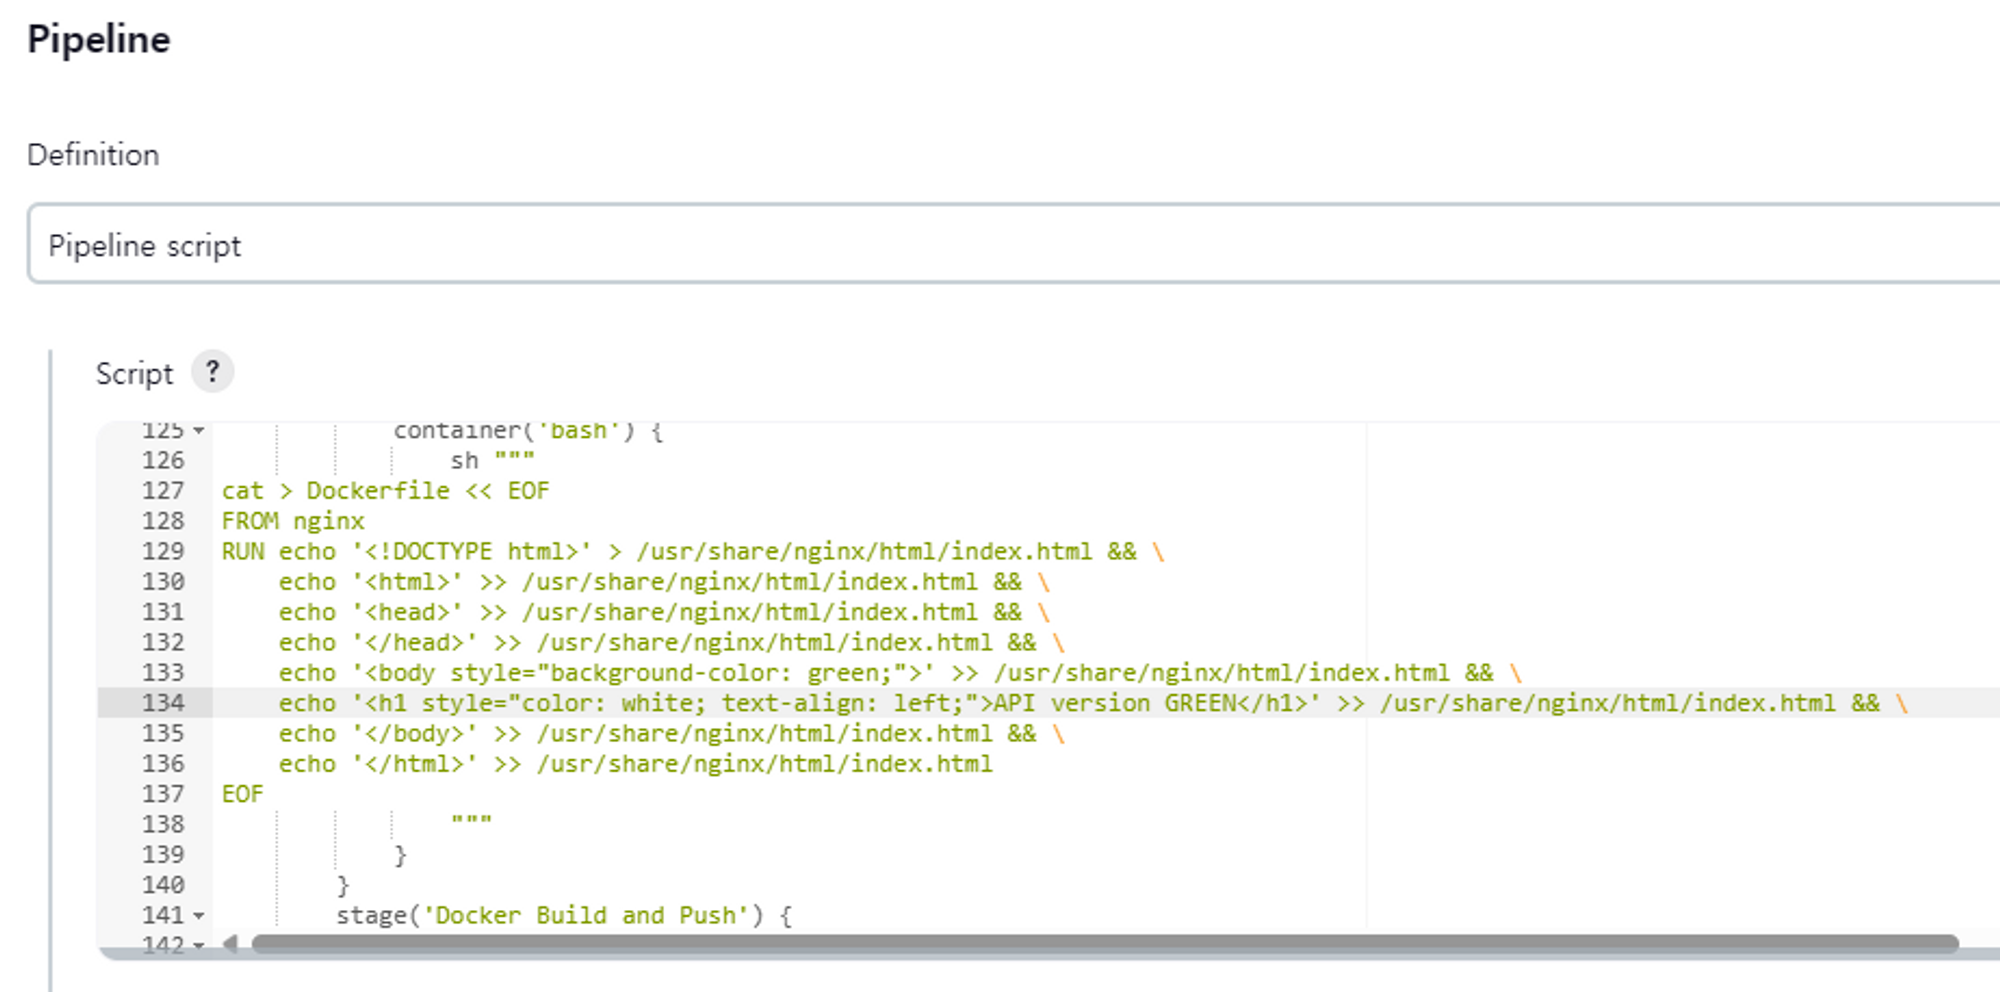
Edit & Build Sample Application Pipeline
Blue-Green 테스트를 위한 Pipeline 수정을 하였다. 특별 한 것 없이 기존 Blue 였던 배경과 글씨를 Green 으로 바꿔주고

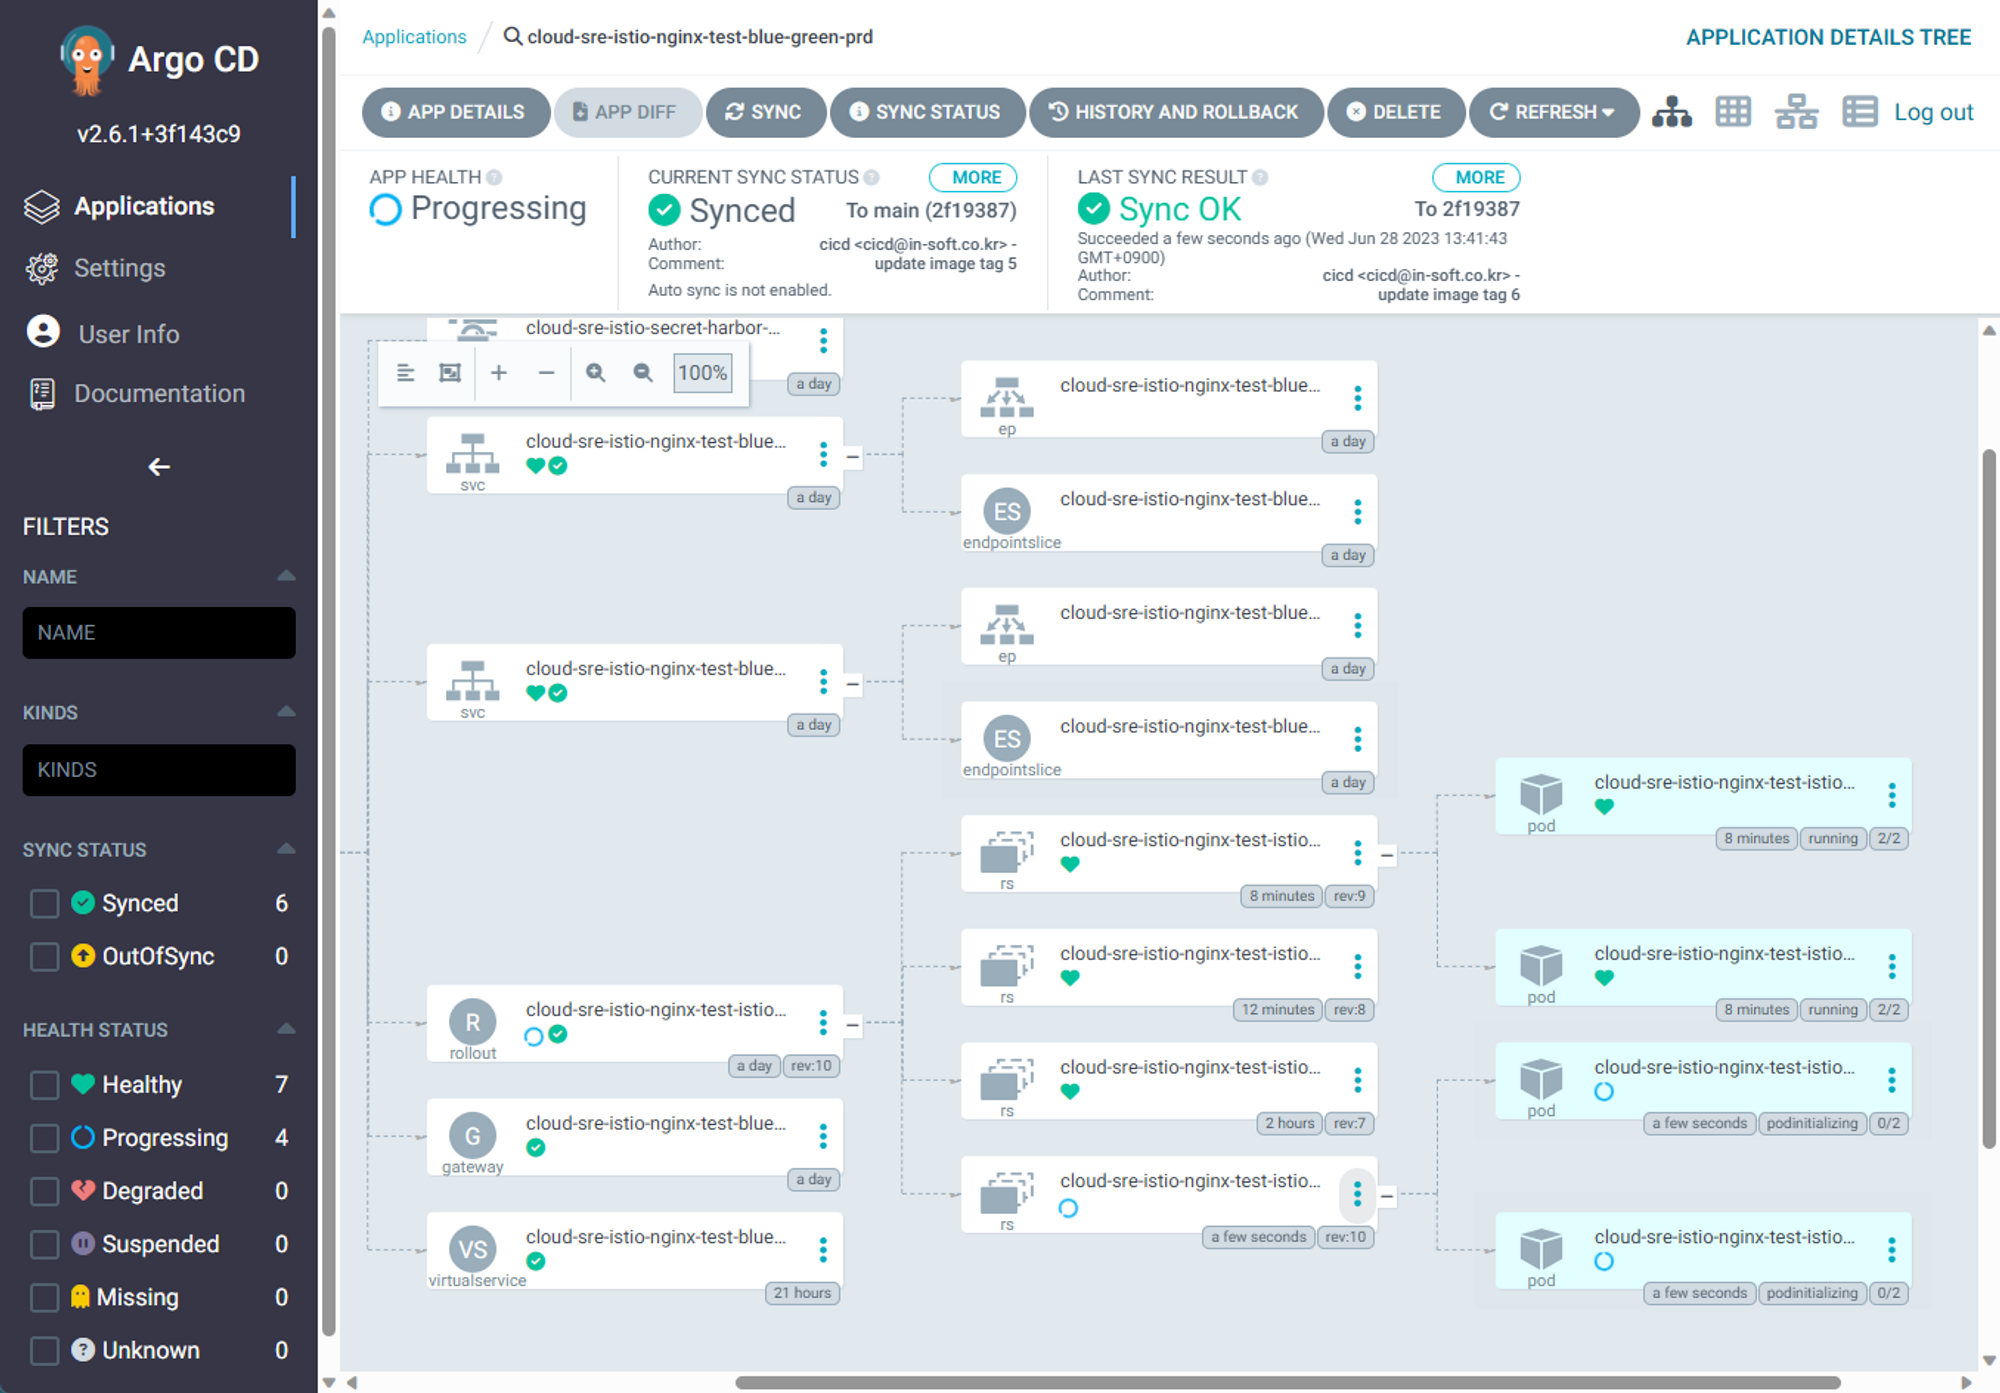
ArgoCD에 새 이미지로 그린 배포 확인
Test Result Blue Green
Check Web Page
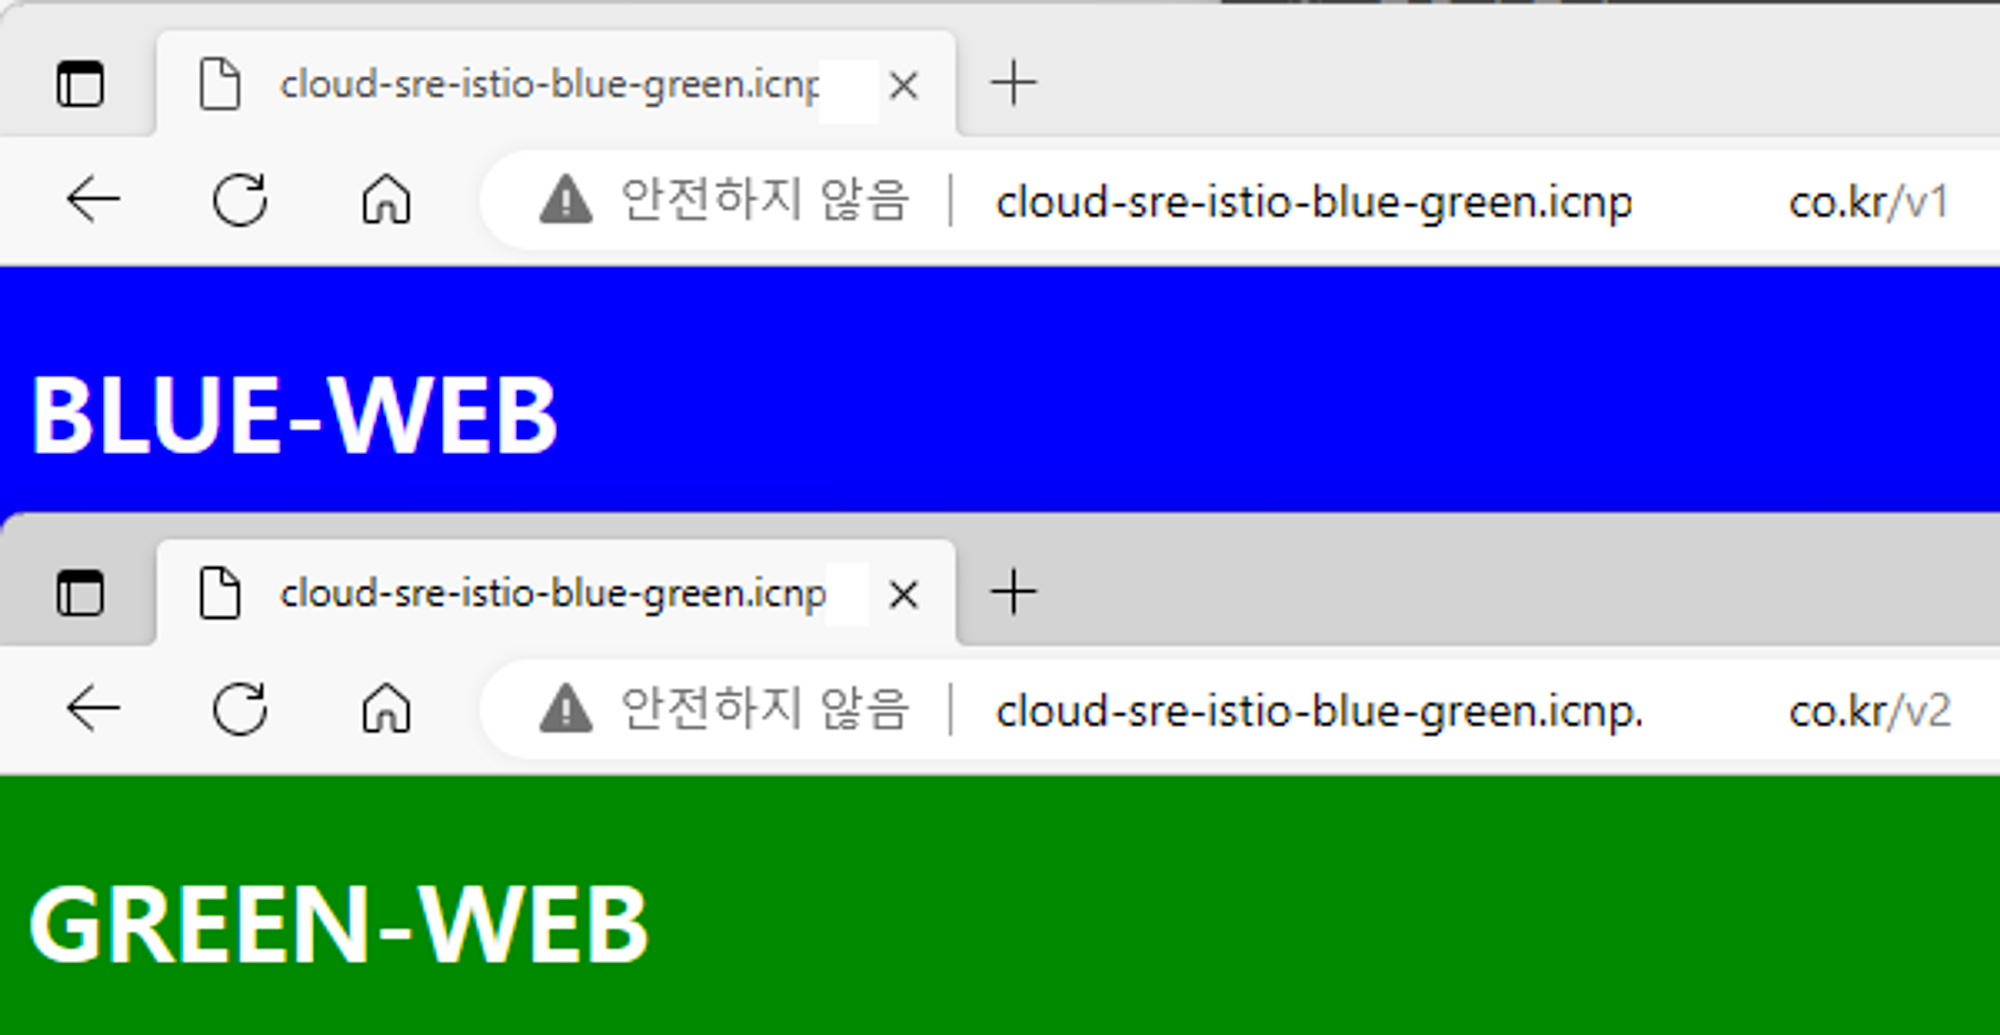
테스트 웹 화면 리프레쉬 하면 반영된 결과를 볼 수있다 Active /v1의 경우 그대로 유지하고 Preview 인 /v2 는 신규로 배포한 Green 으로 변경되었다.
Apply Promote Web Page
이제 최종적으로 Active 페이지인 /v1 페이지도 Green 페이지로 변경을 위해 Promote를 한다. Promote 하고 나면 다시 4개에서 2개로 줄어 들게 되고 v1마저 v2와 같은 이미지를 바라보게 된다.
Final Check Web Page
Promote 후 active(/v1) 페이지와 preview(/v2) 페이지 모두 새 이미지인 Green 으로 변경 된 것을 확인 할 수 있다.
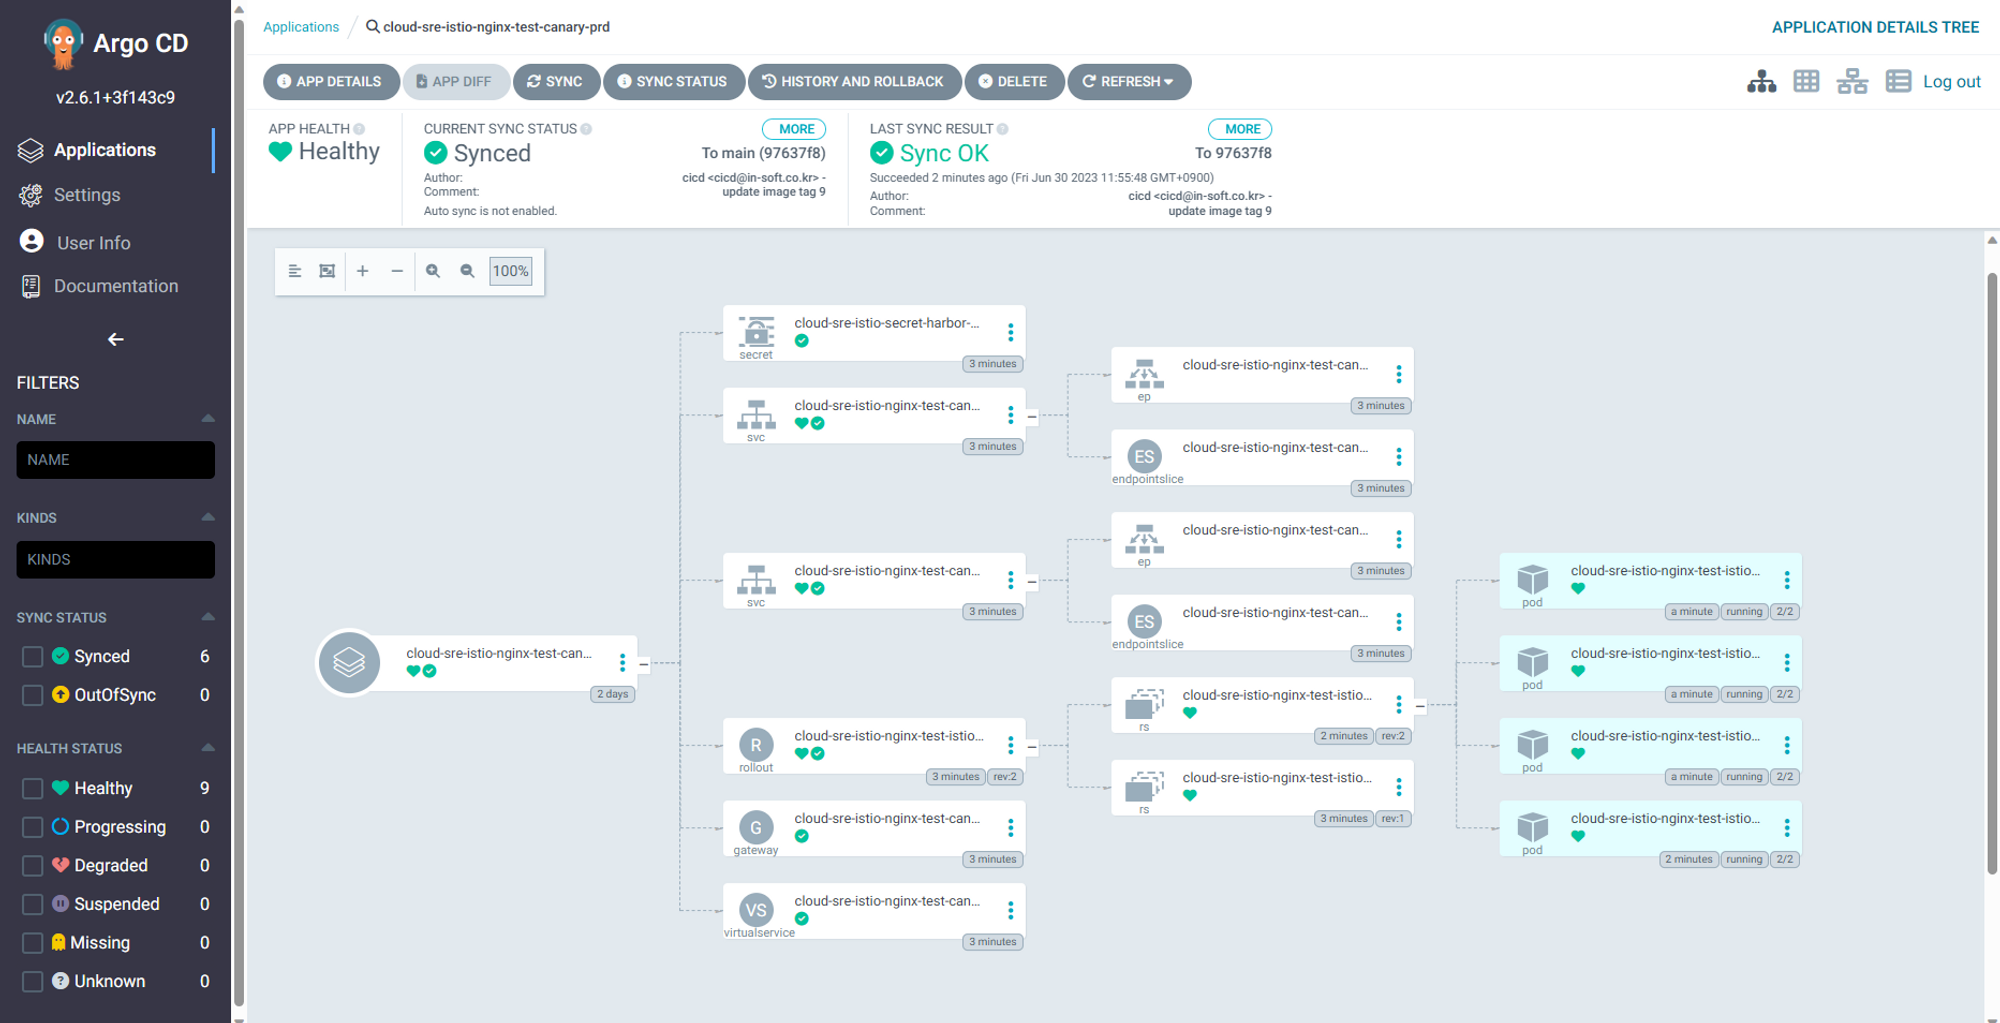
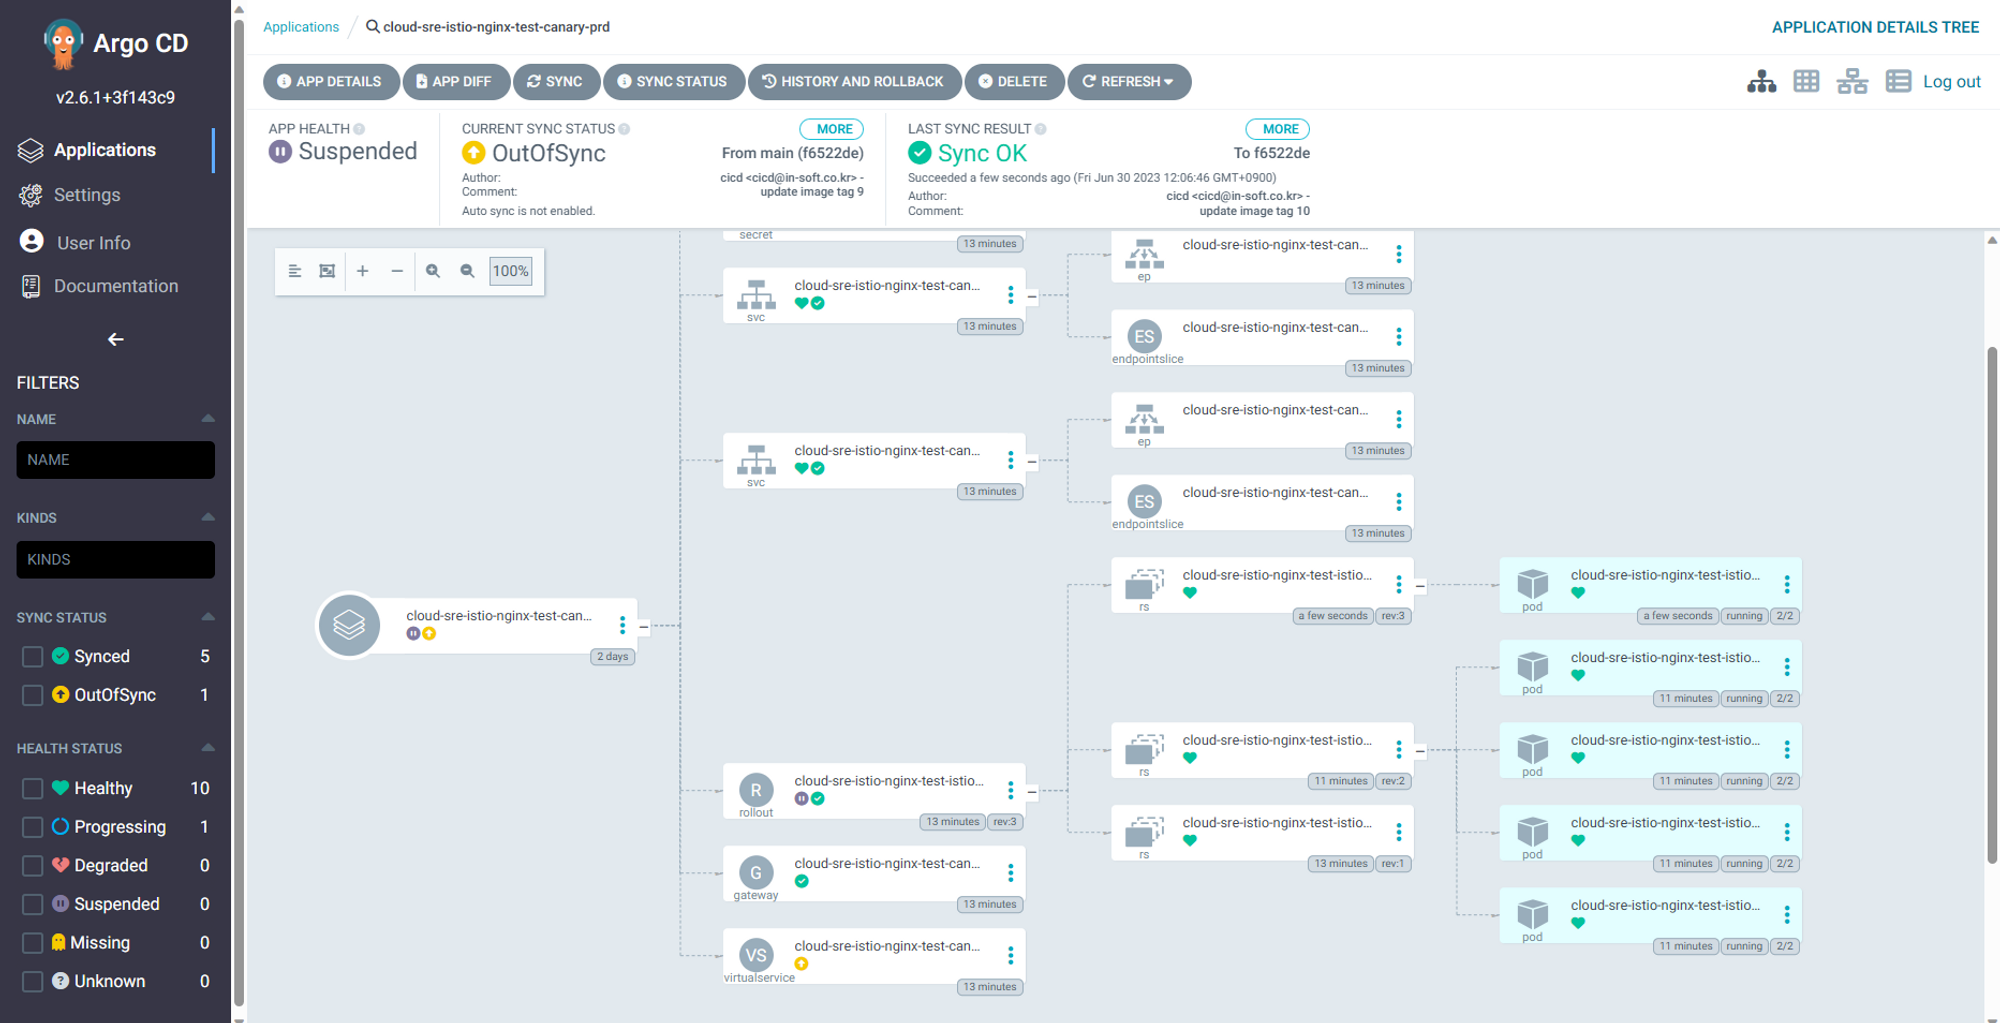
Deployment Sample Application with Update Strategy Canary
위에서 Blue-Green 테스트는 잘 되었다 이번에는 Canary를 할 것인데 버전으로 하기보다 여기서는 Header로 컨트롤하는 것을 기준으로 했다. 분명 Istio에서 Label로 하여금 version 관리를 하는데 그것은 추후에 하는 것으로 생각을 하고 Nginx Ingress에서 Header 가지고 구성 한 것과 비슷한 방식으로 했다고 생각하면 쉽다. 거기에 Istio만의 Traffic Monitoring 이 추가되었다고 생각을 하고 보자.
Create Namespace Applied Istio Injection
샘플 Application 배포를 위한 Namespace 생성 이미 Blue-Green 에서 만들었다면 안해도 된다.
# 생성
kubectl create ns cloud-sre-istio
namespace/cloud-sre-istio created
# Istio 적용을 위해 Injention Enable
kubectl label namespace cloud-sre-istio istio-injection=enabled
namespace/cloud-sre-istio labeled
# 확인 enabled
kubectl get ns -L istio-injection cloud-sre-istio
NAME STATUS AGE ISTIO-INJECTION
cloud-sre-istio Active 53s enabled
# Injection 설정 삭제 방법
kubectl label namespace cloud-sre-istio istio-injection-
Bash
복사
Copy Sample Applicaiton
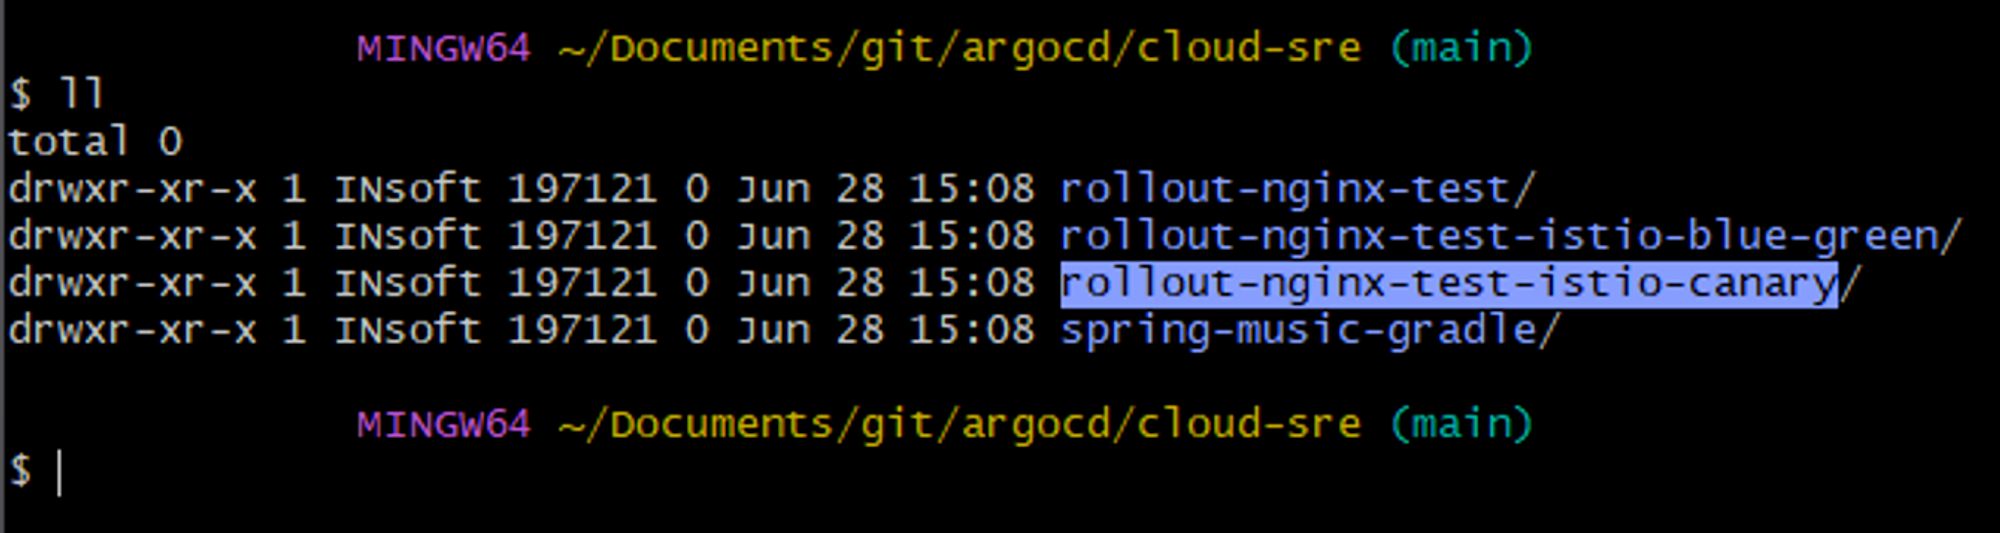
앞서 만들었던 Blue-Green 용을 그대로 복사해서 canary 라는 디렉토리로 만들었고 수정 후 Git에 그대로 업로드 했다.
Create & Modify Manifest Files
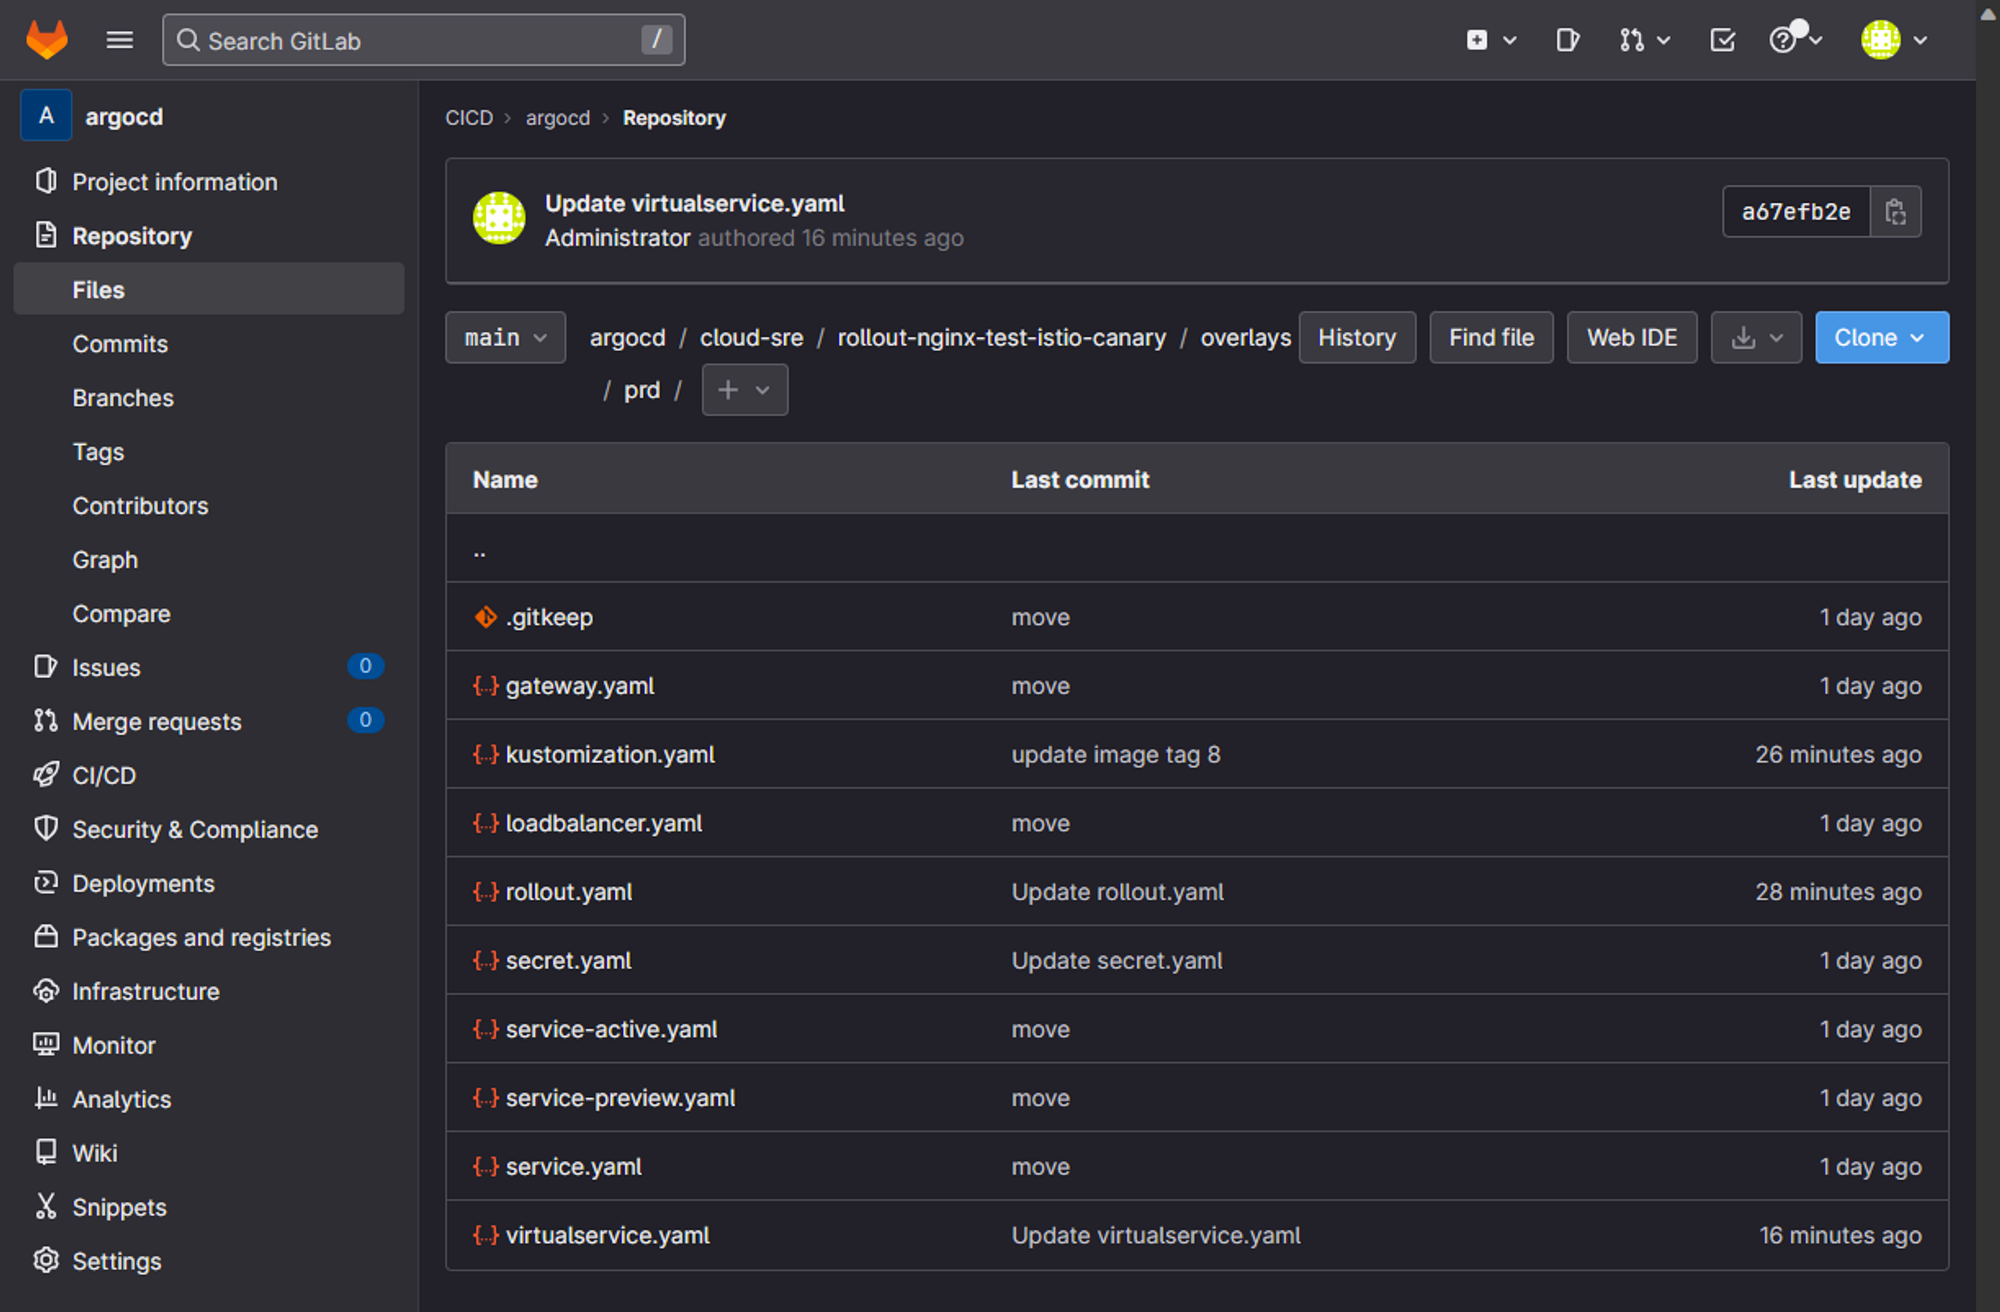
복사한 파일들중에 수정하고 생성된 파일들 있는데 생성한 파일은 gateway.yaml virtualservice.yaml 파일이다. 이며 kustomization.yaml 파일이 일부 수정이 되었고 나머지는 크게 바뀌지 않았다.
Gateway.yaml
apiVersion: networking.istio.io/v1alpha3
kind: Gateway
metadata:
name: nginx-test-canary-gateway
spec:
# The selector matches the ingress gateway pod labels.
# If you installed Istio using Helm following the standard documentation, this would be "istio=ingress"
selector:
istio: ingressgateway # use istio default controller
servers:
- port:
number: 80
name: http
protocol: HTTP
hosts:
- "cloud-sre-istio-canary.icnp.******.co.kr"
Bash
복사
위에서 만든 gateway와 연결되어지는 virtualservice.yaml 파일 생성시 상당히 에를 먹었는데 우리가 원하는 것은 header가 없으면 canary 설정 비율 대로 랜덤하게 들어가도록 하고 header를 붙여서 들어오면 반드시 canary로 가도록 하고 싶었는데 아래 설정중에 - match 가 반드시 위에 있어야 동작을 한다. stable 밑으로 destination은 반드시 두개 stable 서비스와 canary 서비스가 있어야 오류가 없다. rollout.yaml 파일을 보면 stable이라는 이름을 사용하게된다.
apiVersion: networking.istio.io/v1alpha3
kind: VirtualService
metadata:
name: nginx-test-canary-virtualservice
spec:
hosts:
- "cloud-sre-istio-canary.icnp.******.co.kr"
gateways:
- cloud-sre-istio-nginx-test-canary-gateway-prd
http:
- match: # match 조건 설정
- headers: # 헤더 값 설정
header: # 헤더 값이 header: canary 인 경우에 아래 destination 인 preview 서비스로 간다. 가중치도 100%
exact: canary
route:
- destination:
host: cloud-sre-istio-nginx-test-canary-service-preview-prd
port:
number: 80
#weight: 100 # destination이 한개인 route인 경우 weight 생략이 가능하다 한곳으로 전부 연결되기 때문 하지만 아래 처럼 2개 이상인 경우 반드시 설정해야됨
# match에 안 맞는 경우 Stable로 들어오게되고 이 이름이 Rollout.yaml 파일에 기입 된다. 반드시 rollout에 canary와 stable 연결을 위해 destination이 두개가 있어야 한다.
- name: stable
route:
- destination:
host: cloud-sre-istio-nginx-test-canary-service-preview-prd
port:
number: 80
weight: 0 # 0% 라고 적었으나 Rollout.yaml에 의해 이 값은 무시 되기도 한다 그래서 ArgoCD 에서 보면 OutofSync 라고 나오나 무시해도된다.
- destination:
host: cloud-sre-istio-nginx-test-canary-service-active-prd
port:
number: 80
weight: 100 # 100% 라고 적었으나 Rollout.yaml에 의해 이 값은 무시 되기도 한다 그래서 ArgoCD 에서 보면 OutofSync 라고 나오나 무시해도된다.
Bash
복사
Rollout.yaml
apiVersion: argoproj.io/v1alpha1
kind: Rollout
metadata:
name: nginx-test-istio-canary
spec:
replicas: 4
revisionHistoryLimit: 2
selector:
matchLabels:
app: cloud-sre-istio-nginx-test-canary-prd
template:
metadata:
labels:
app: cloud-sre-istio-nginx-test-canary-prd
spec:
containers:
- name: nginx-test
image: harbor.icnp.******.co.kr/cloud-sre/main/rollout-nginx-test-istio-canary
imagePullPolicy: Always
ports:
- containerPort: 80
imagePullSecrets:
- name: cloud-sre-istio-secret-harbor-nginx-test-prd
strategy:
canary:
canaryService: cloud-sre-istio-nginx-test-canary-service-preview-prd
stableService: cloud-sre-istio-nginx-test-canary-service-active-prd
# 하단의 steps영역은 argo rollout의 관리 영역으로 여기서 셋팅한 weight 값이 하단 istio virtualservice 에 셋팅되어 넘어가서 변경이 된다. 그럼과 동시에 out of sync가 나오지만 무시해도 상관없다.
steps:
- setWeight: 25
- pause:
{}
#duration: 1m
- setWeight: 50
- pause:
duration: 3m
- setWeight: 75
- pause:
duration: 5m
# istio canary 사용시 아래 부분이 반드시 설정되어야 한다.
trafficRouting:
istio:
virtualService:
name: cloud-sre-istio-nginx-test-canary-virtualservice-prd # 생성한 virtualservice 의 이름
routes:
- stable # 앞서 virtualservice 에 생성한 route의 이름 여기에 목적지가 두개 셋팅 된 것을 넣어야 한다.
Bash
복사
Kustomization.yaml
apiVersion: kustomize.config.k8s.io/v1beta1
kind: Kustomization
resources:
- rollout.yaml
- service-active.yaml
- service-preview.yaml
- secret.yaml
- gateway.yaml
- virtualservice.yaml
#- loadbalancer.yaml
namePrefix: cloud-sre-istio-
nameSuffix: -prd
# 배포될 객체의 네임스페이스스
namespace: cloud-sre-istio
#patches:
#- target:
#kind: Rollout
#name: cloud-sre-istio-nginx-test-rollout-prd
#patch: |-
#- op: replace
#path: /spec/template/metadata/labels/version
#value: v2
# patch하여 base와 결합될 yaml 파일 리스트트
#patchesStrategicMerge:
# 공통 적으로 들어가는 라벨로 모든 객체 service or deployment 위 metadata.labels에 들어간다. prefix나 suffix 안붙는다는것을 참고해라
commonLabels:
app: cloud-sre-istio-nginx-test-canary-prd
images:
- name: harbor.icnp.******.co.kr/cloud-sre/main/rollout-nginx-test-istio-canary
newTag: "8"
Bash
복사
Service-active.yaml
apiVersion: v1
kind: Service
metadata:
name: nginx-test-canary-service-active
spec:
#selector:
# app:
ports:
- port: 80
protocol: TCP
targetPort: 80
type: ClusterIP
Bash
복사
Service-preview.yaml
apiVersion: v1
kind: Service
metadata:
name: nginx-test-canary-service-preview
spec:
#selector:
# app:
ports:
- port: 80
protocol: TCP
targetPort: 80
type: ClusterIP
Bash
복사
Add ArgoCD Application
Connect Web Page before Canary Test
Canary 배포 전 현재 페이지 접속은 계속해서 BLUE 로 접속을 하게 되어있다.
Test Update Strategy & Result (Canary)
위에서 셋팅한 것을 기반으로 Canary 테스트를 해본다.
Edit & Build Sample Application Pipeline
Canary 테스트를 위한 Pipeline 수정을 하였다. 특별 한 것 없이 기존 Blue 였던 배경과 글씨를 Green 으로 바꿔주고
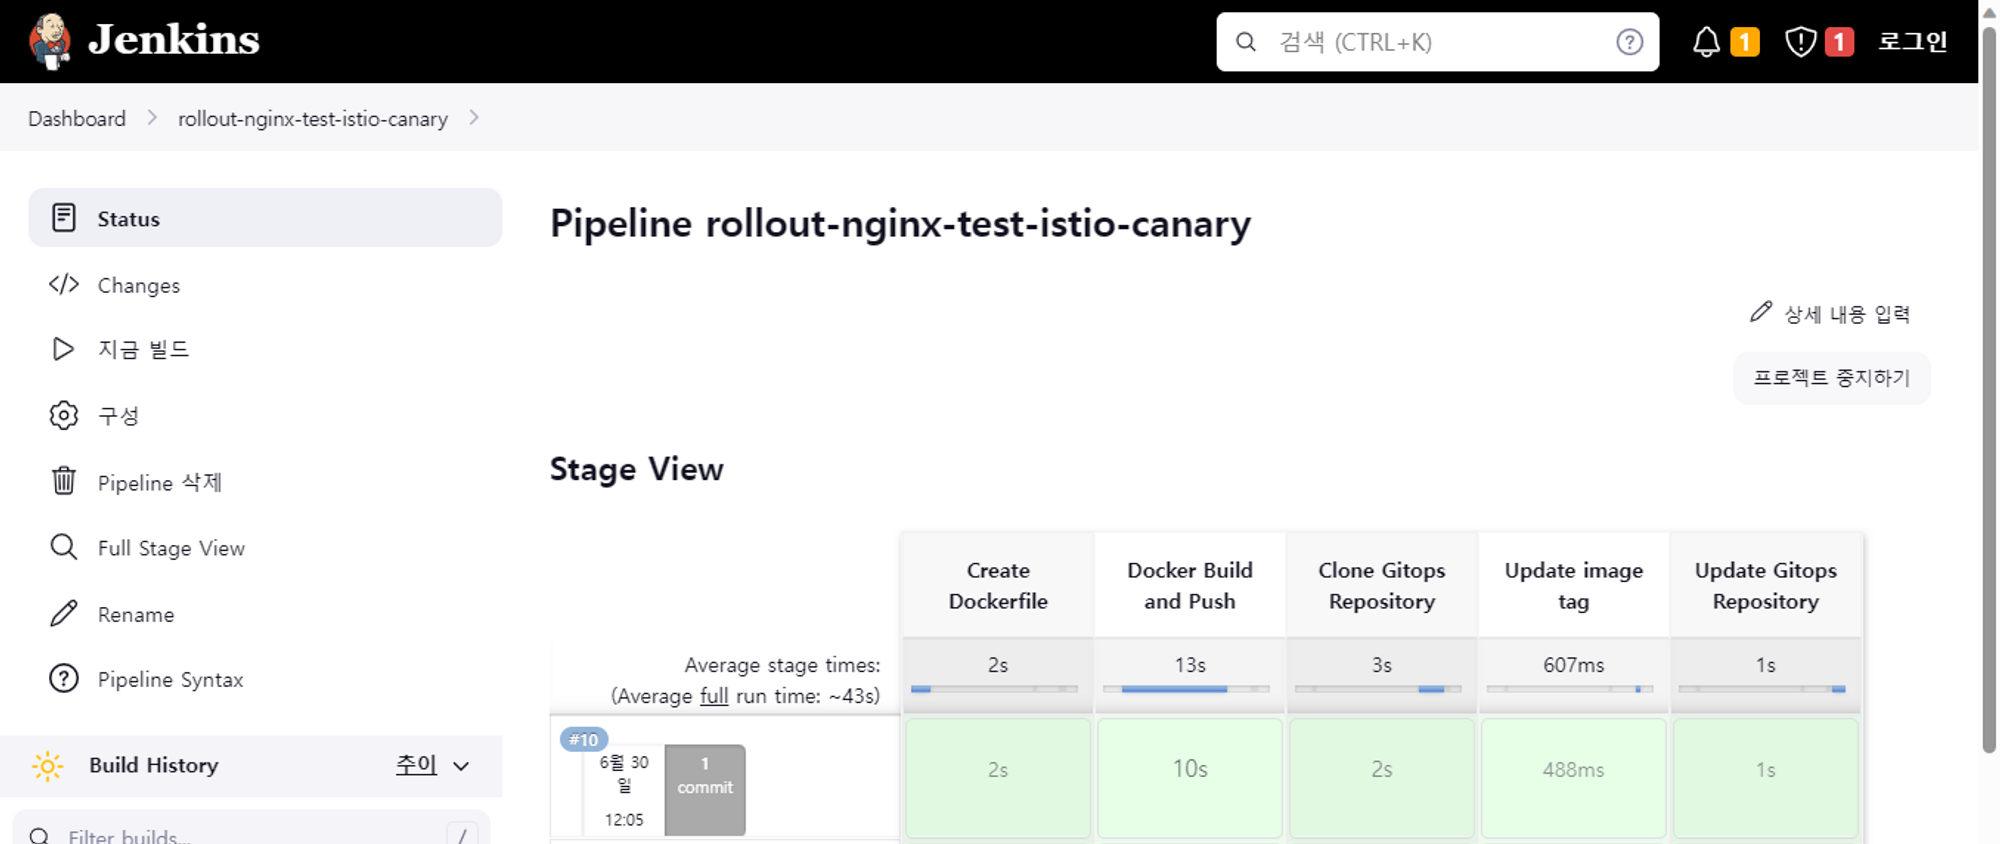
ArgoCD에 새 이미지로 4개 에서 5개로 한개 늘어난 것을 볼 수있다 1개만 늘어 난 것은 100프로중에 canary로 25%를 지정했기에 1대만 늘어 나는 것이다.
Test Result Canary
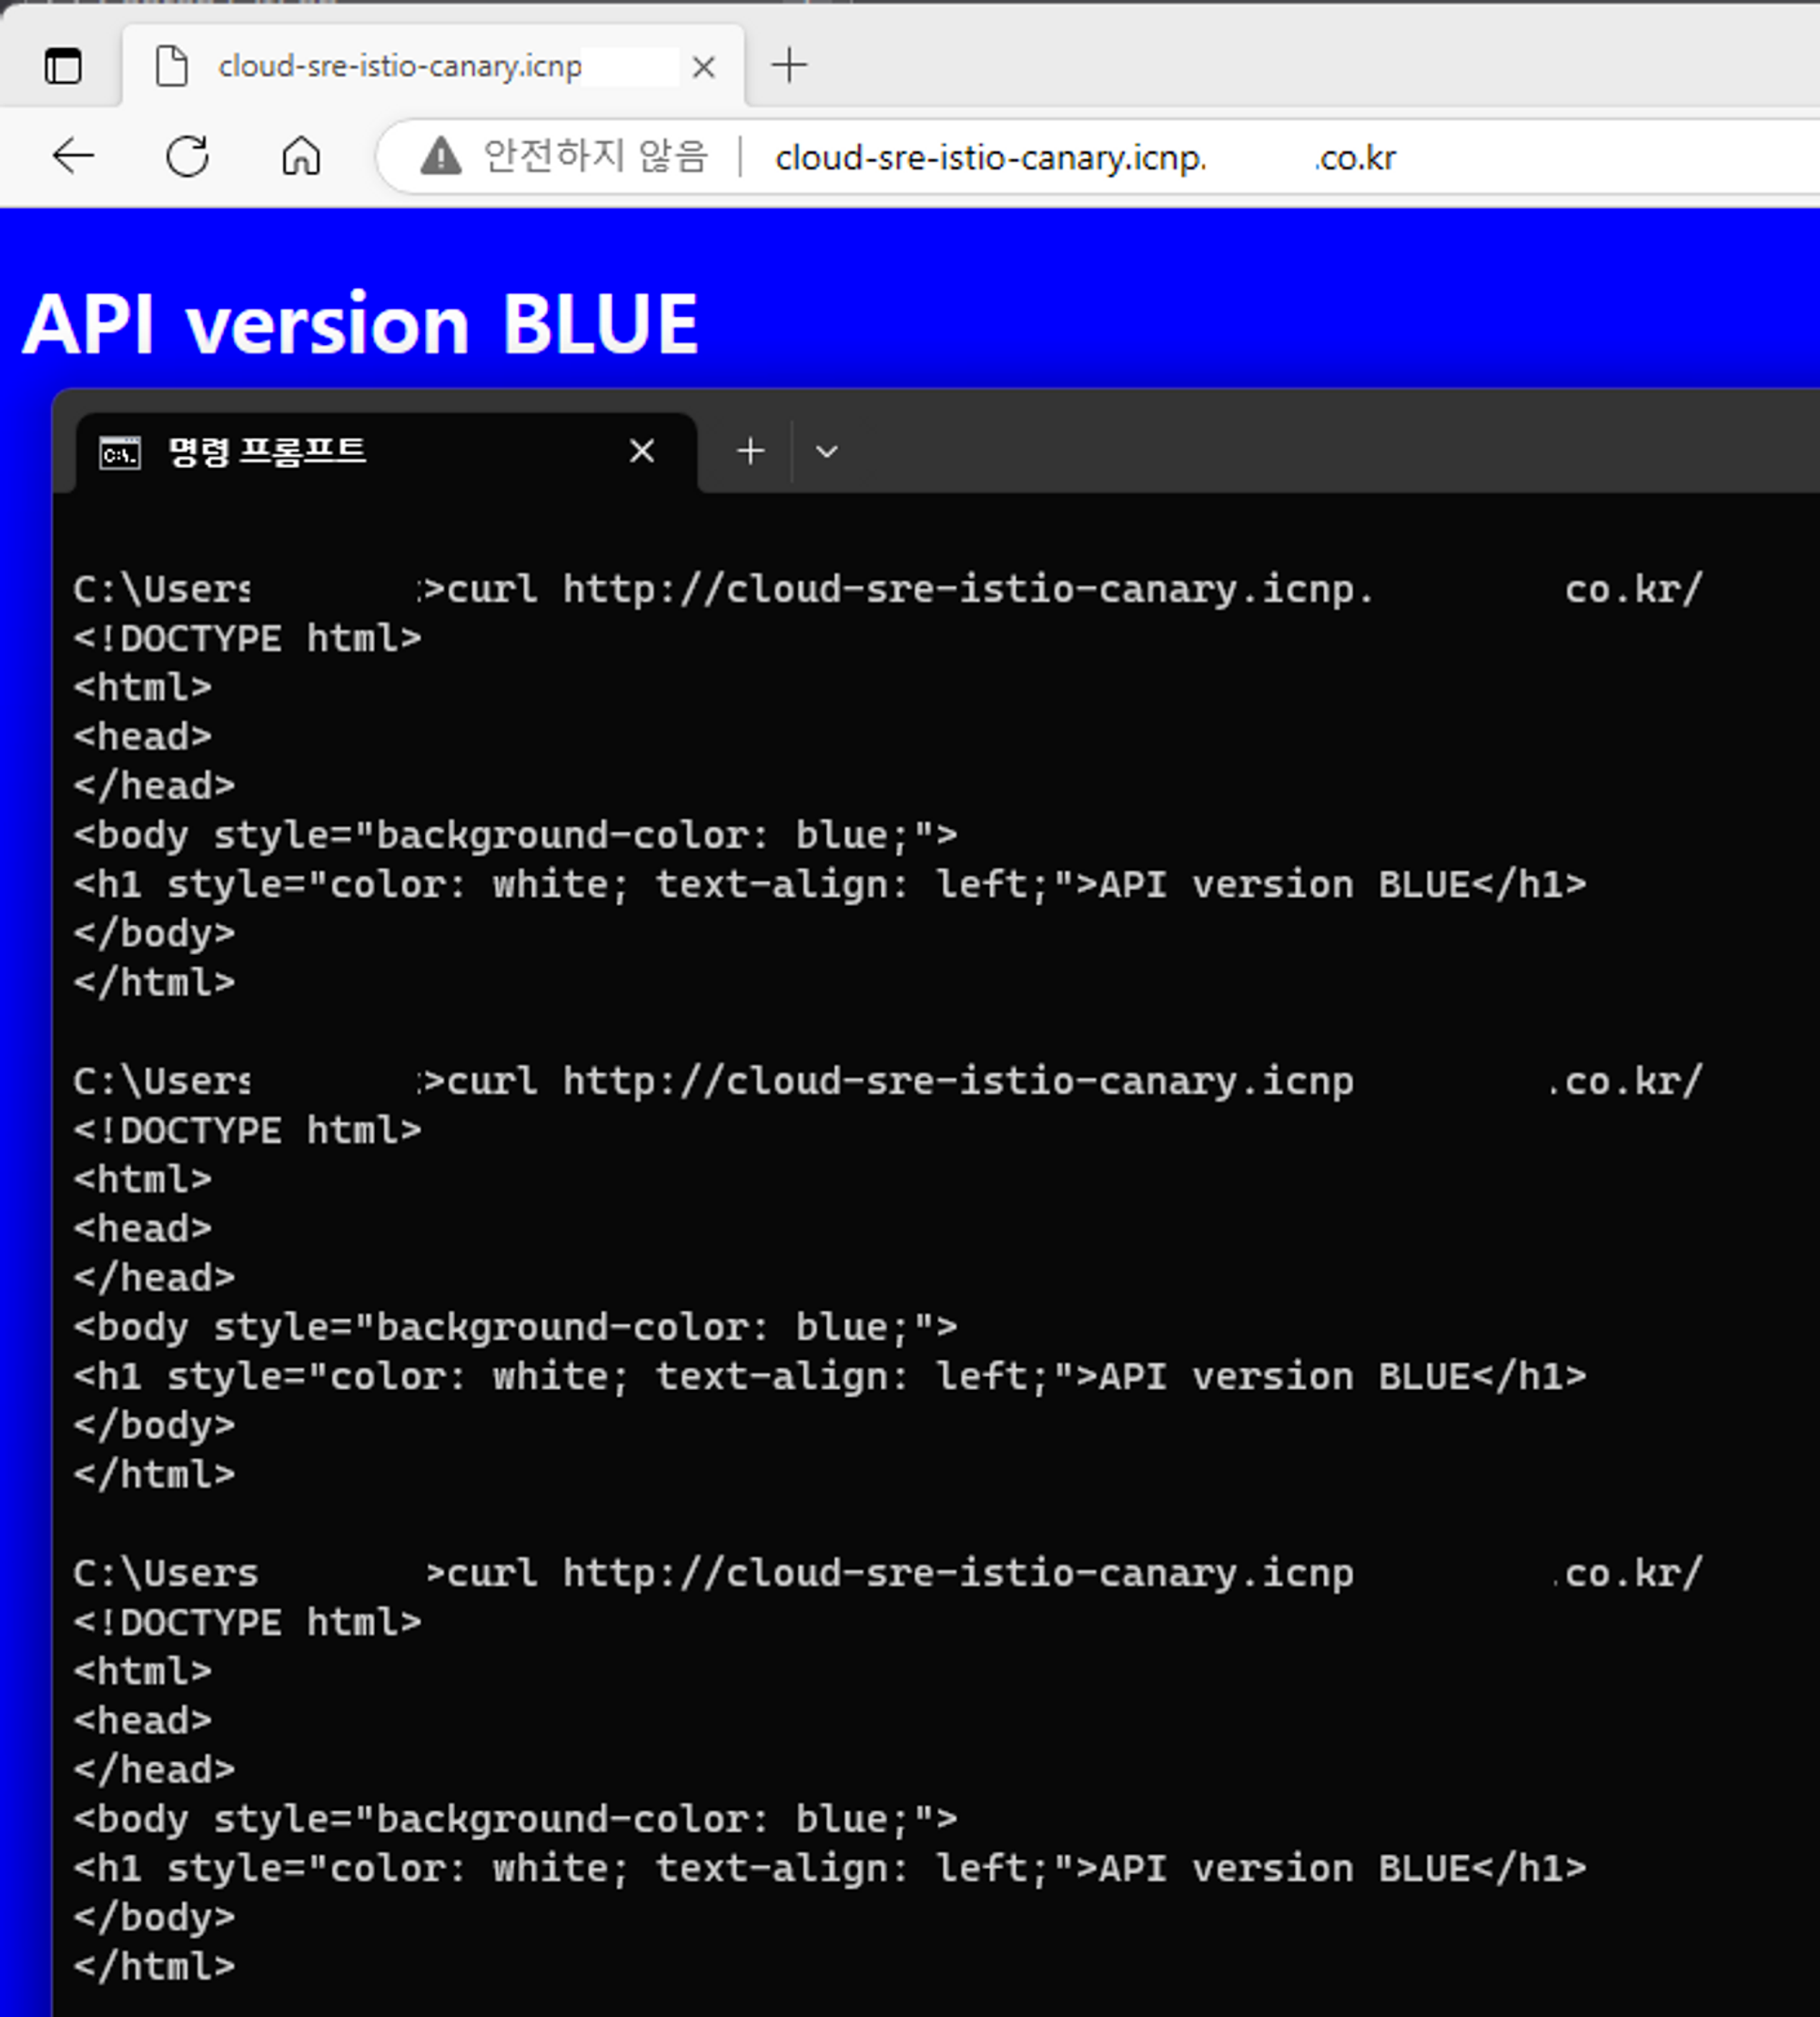
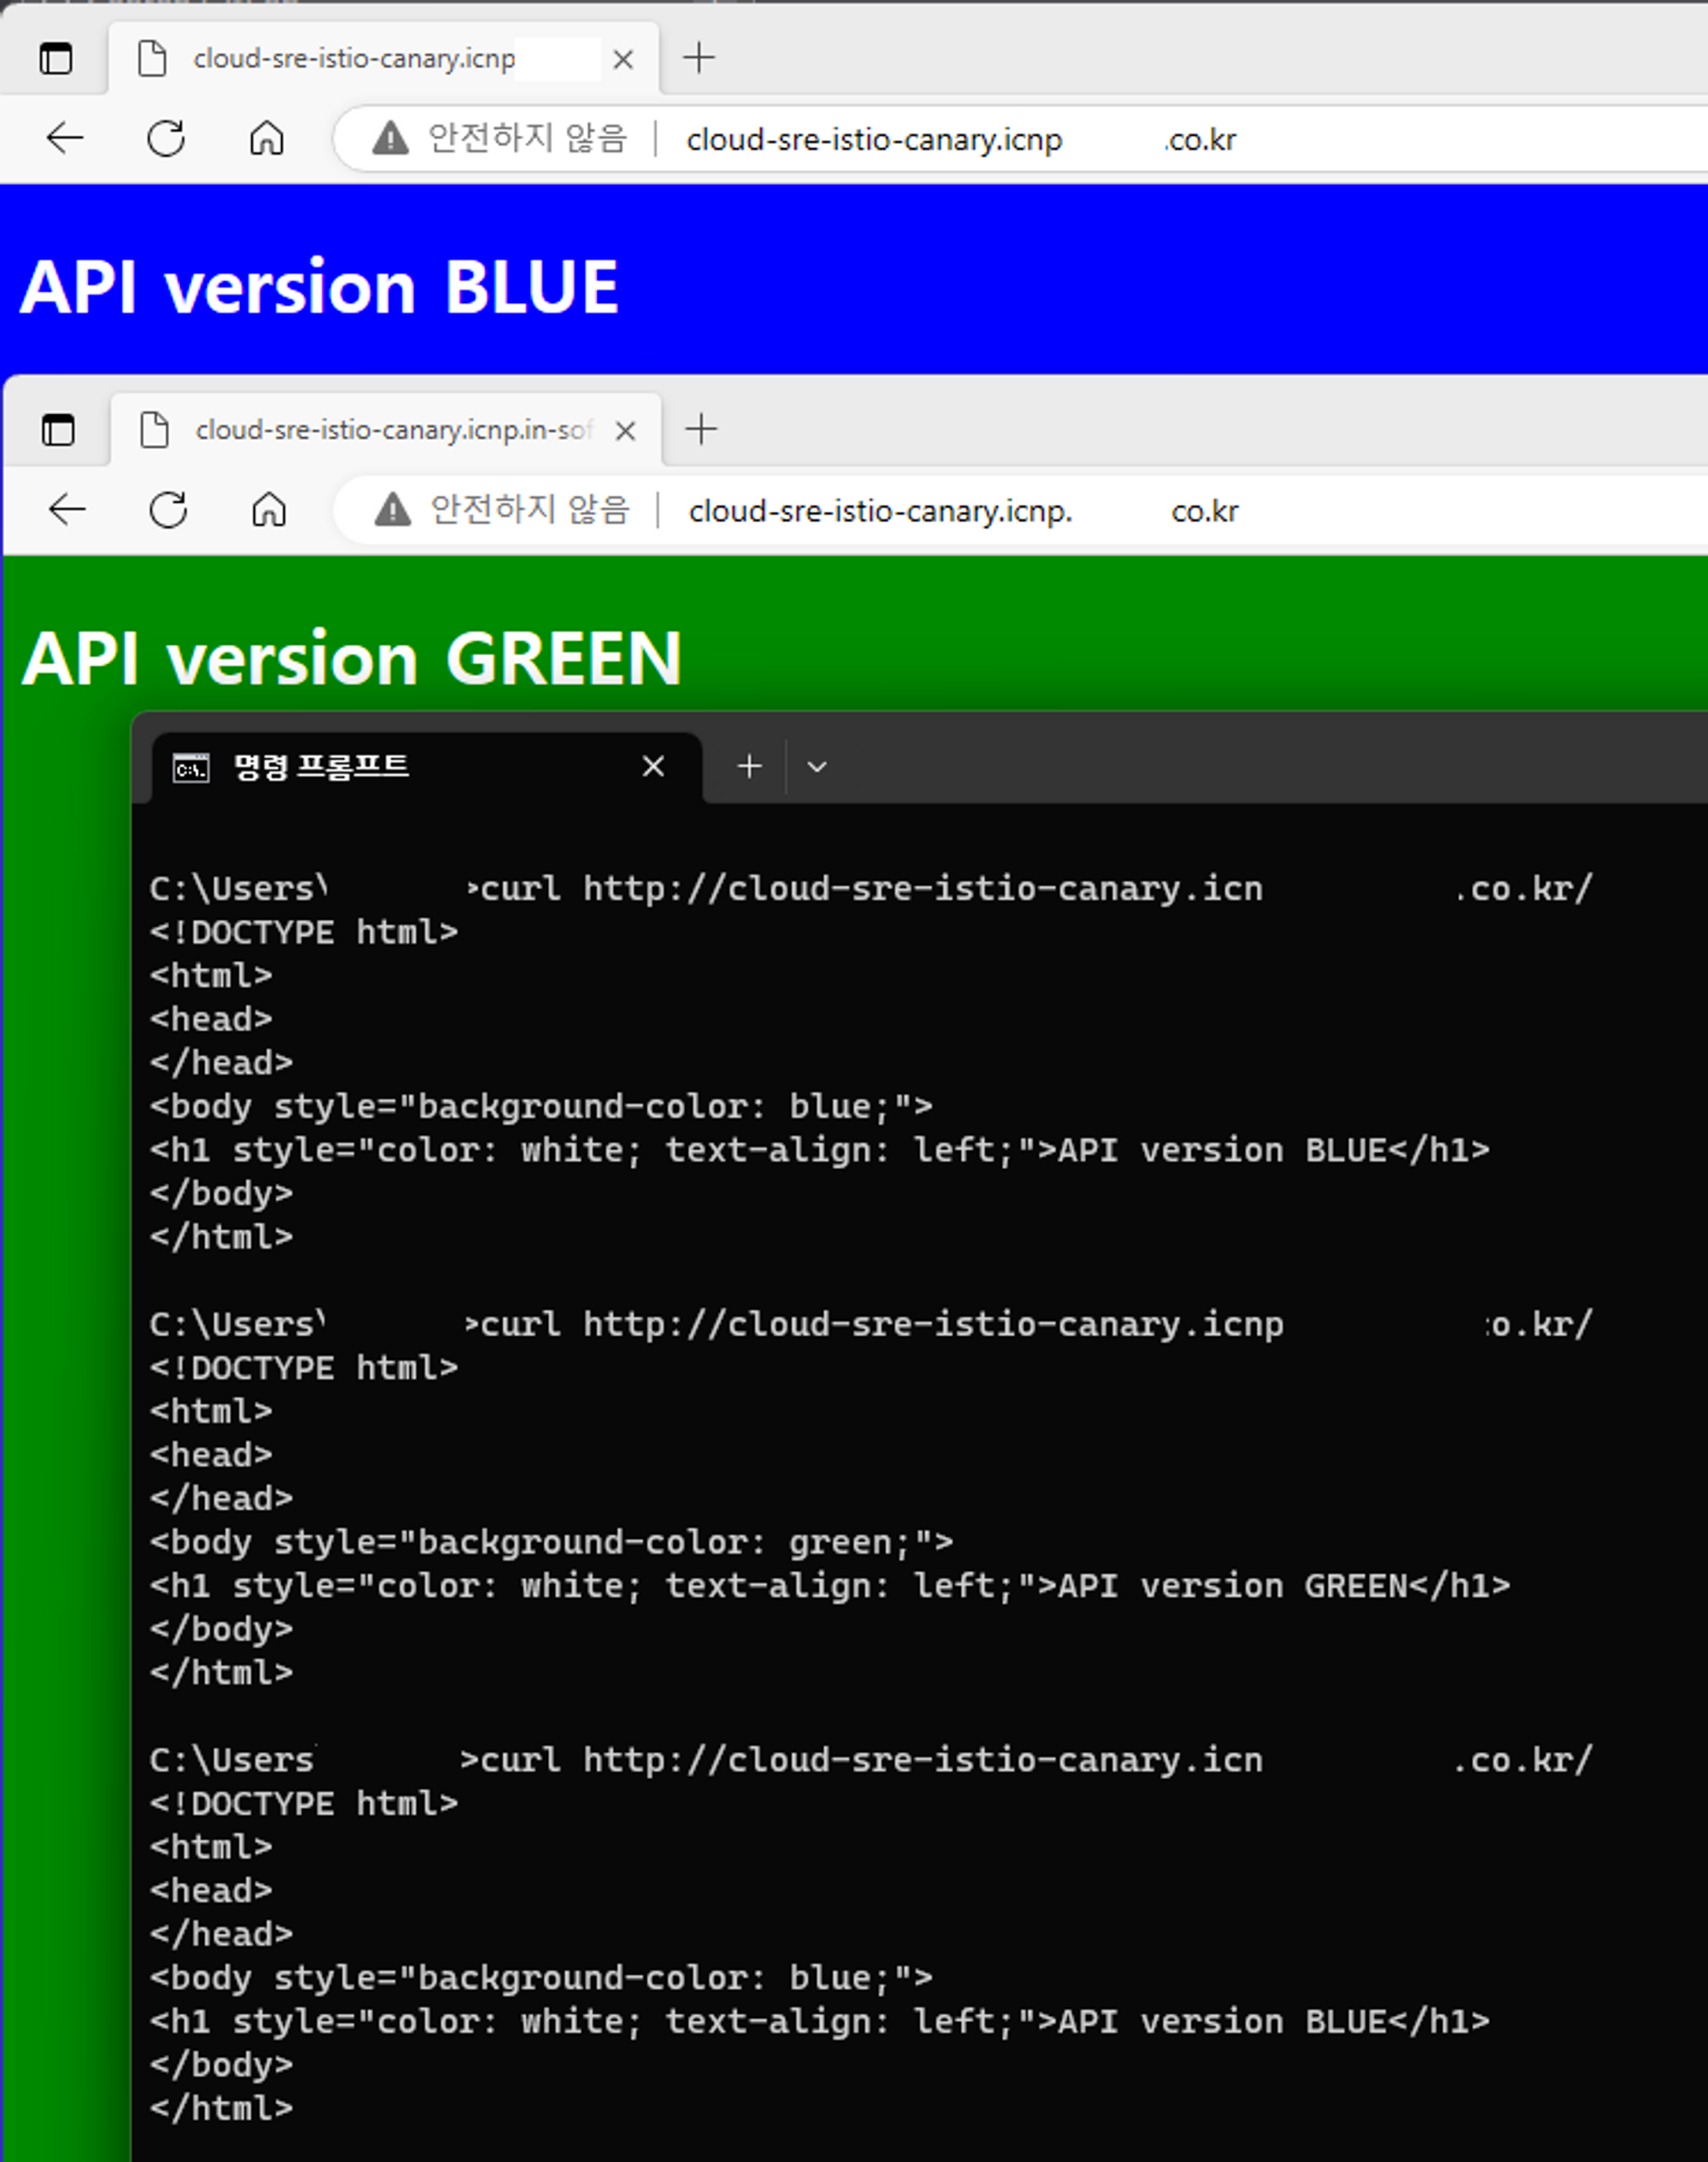
Check Web Page without Header
Canary 배포 후 헤더가 없는 기본 접속 페이지로 접속 하면 75:25 비율로 Blue 와 Green 을 랜덤하게 접속 하게 되었다.
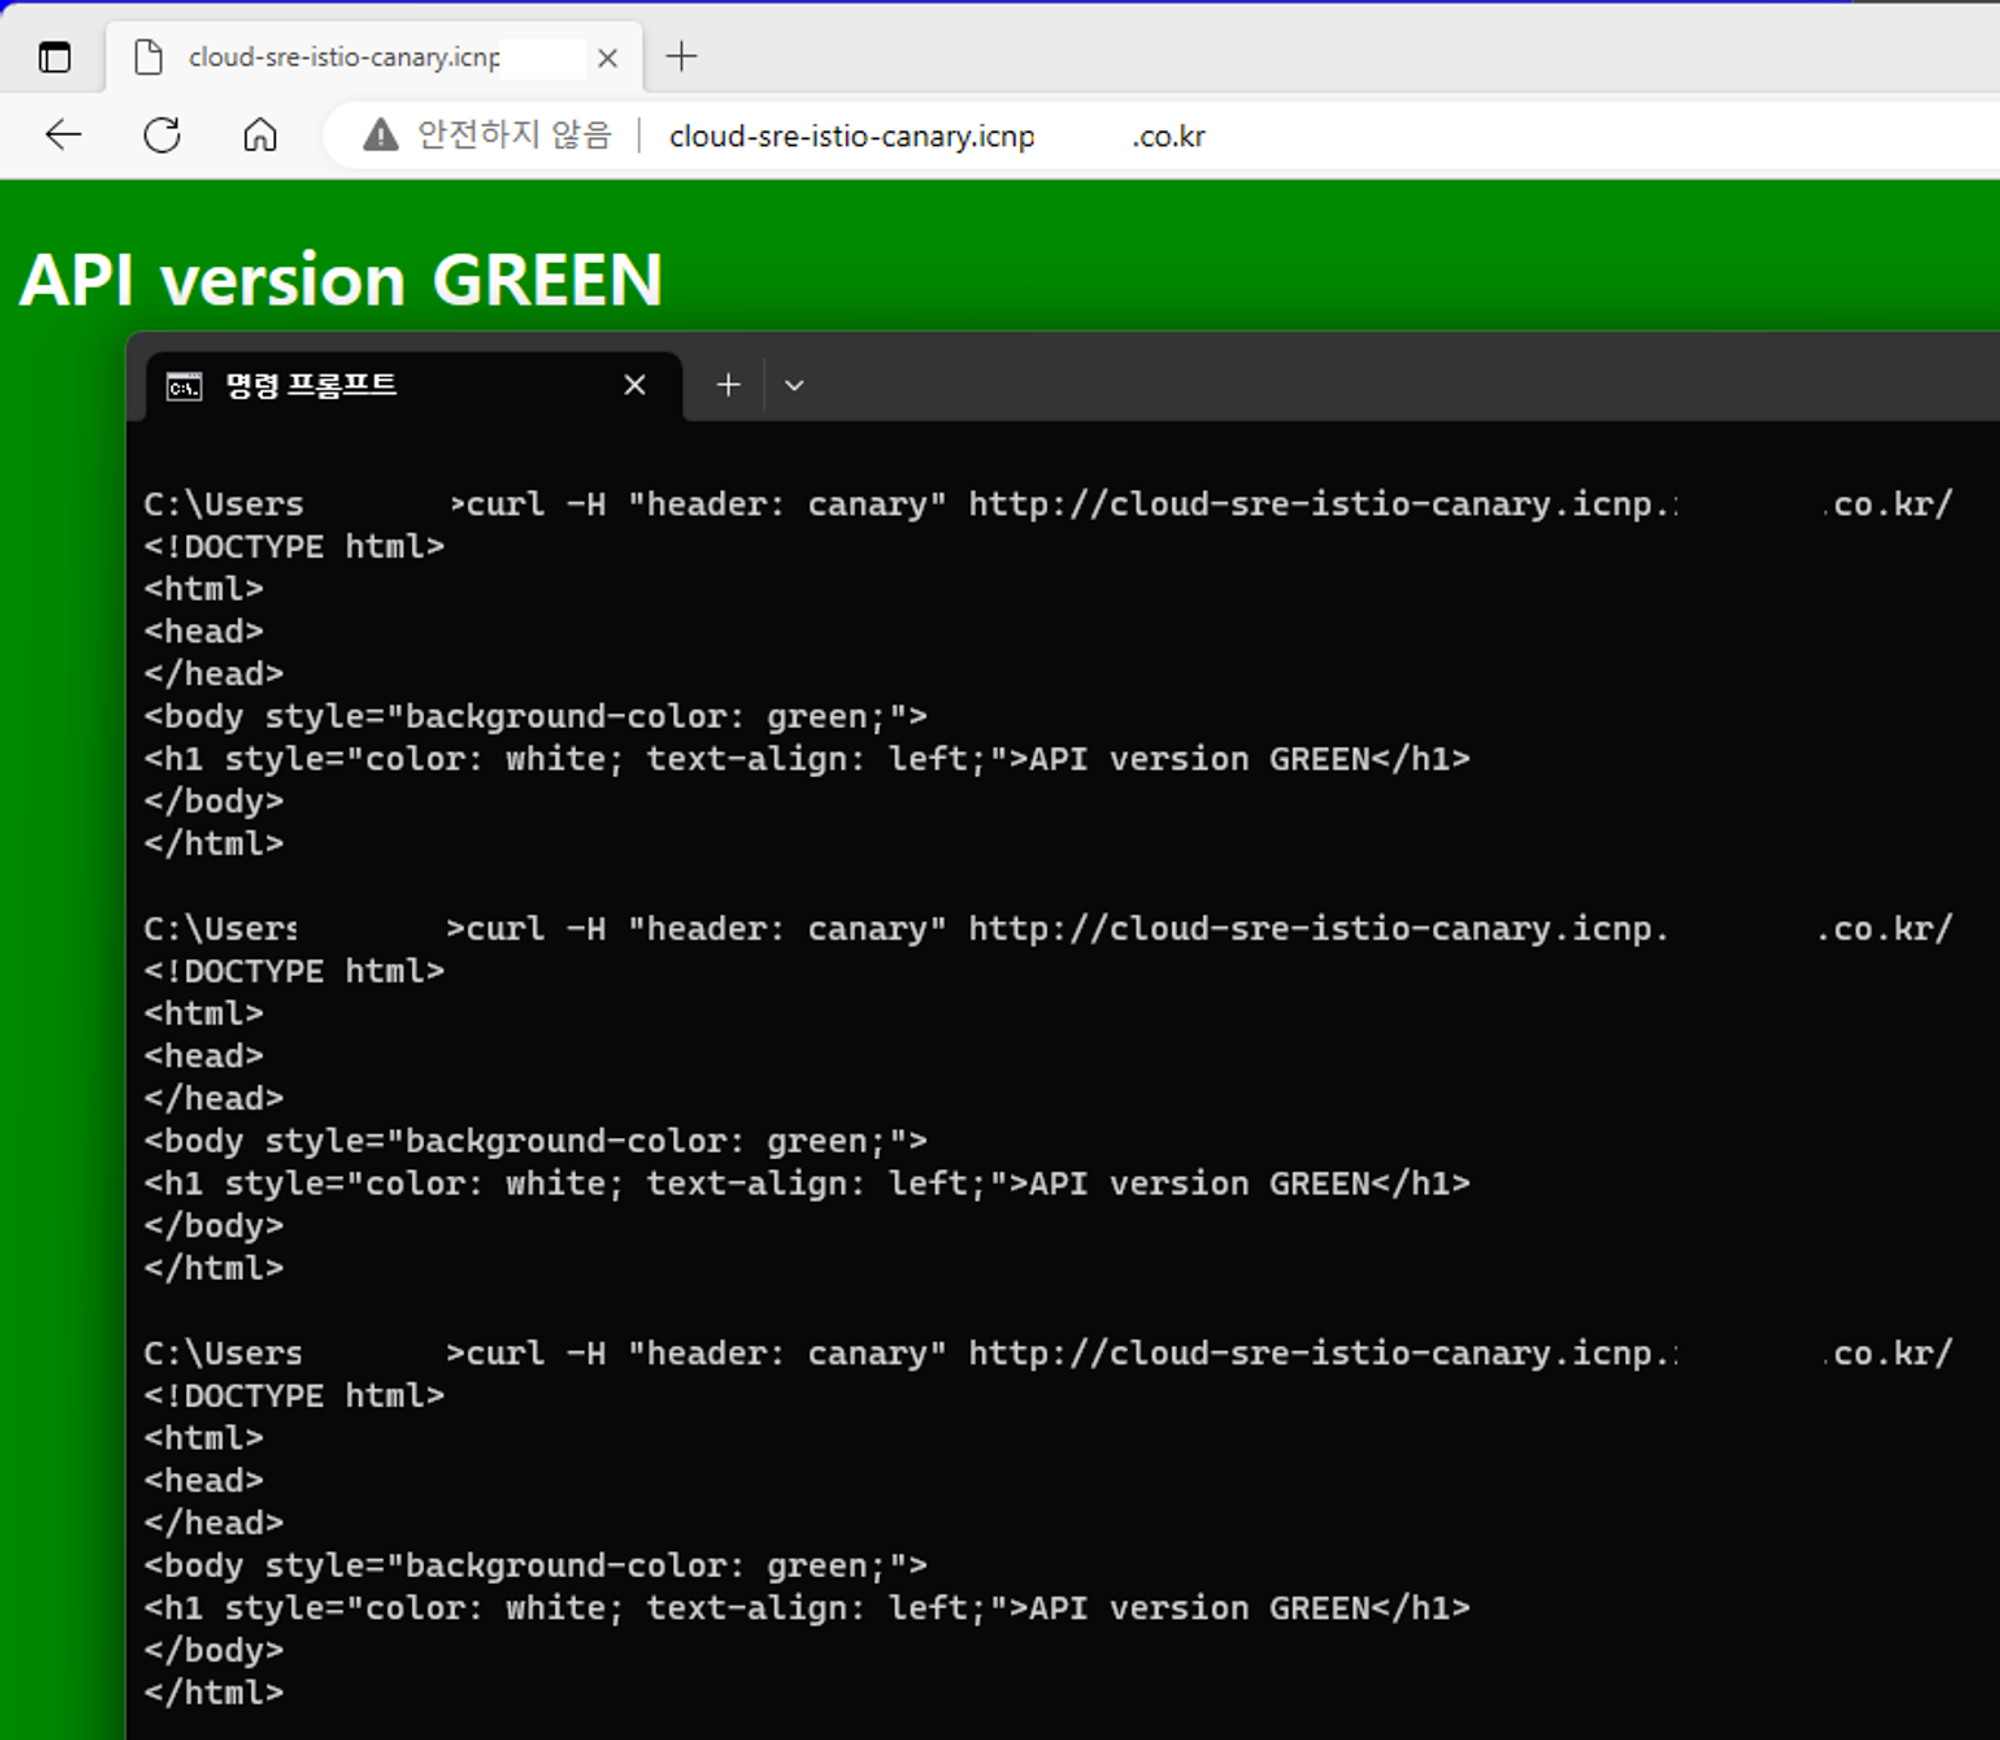
Check Web Page with Header
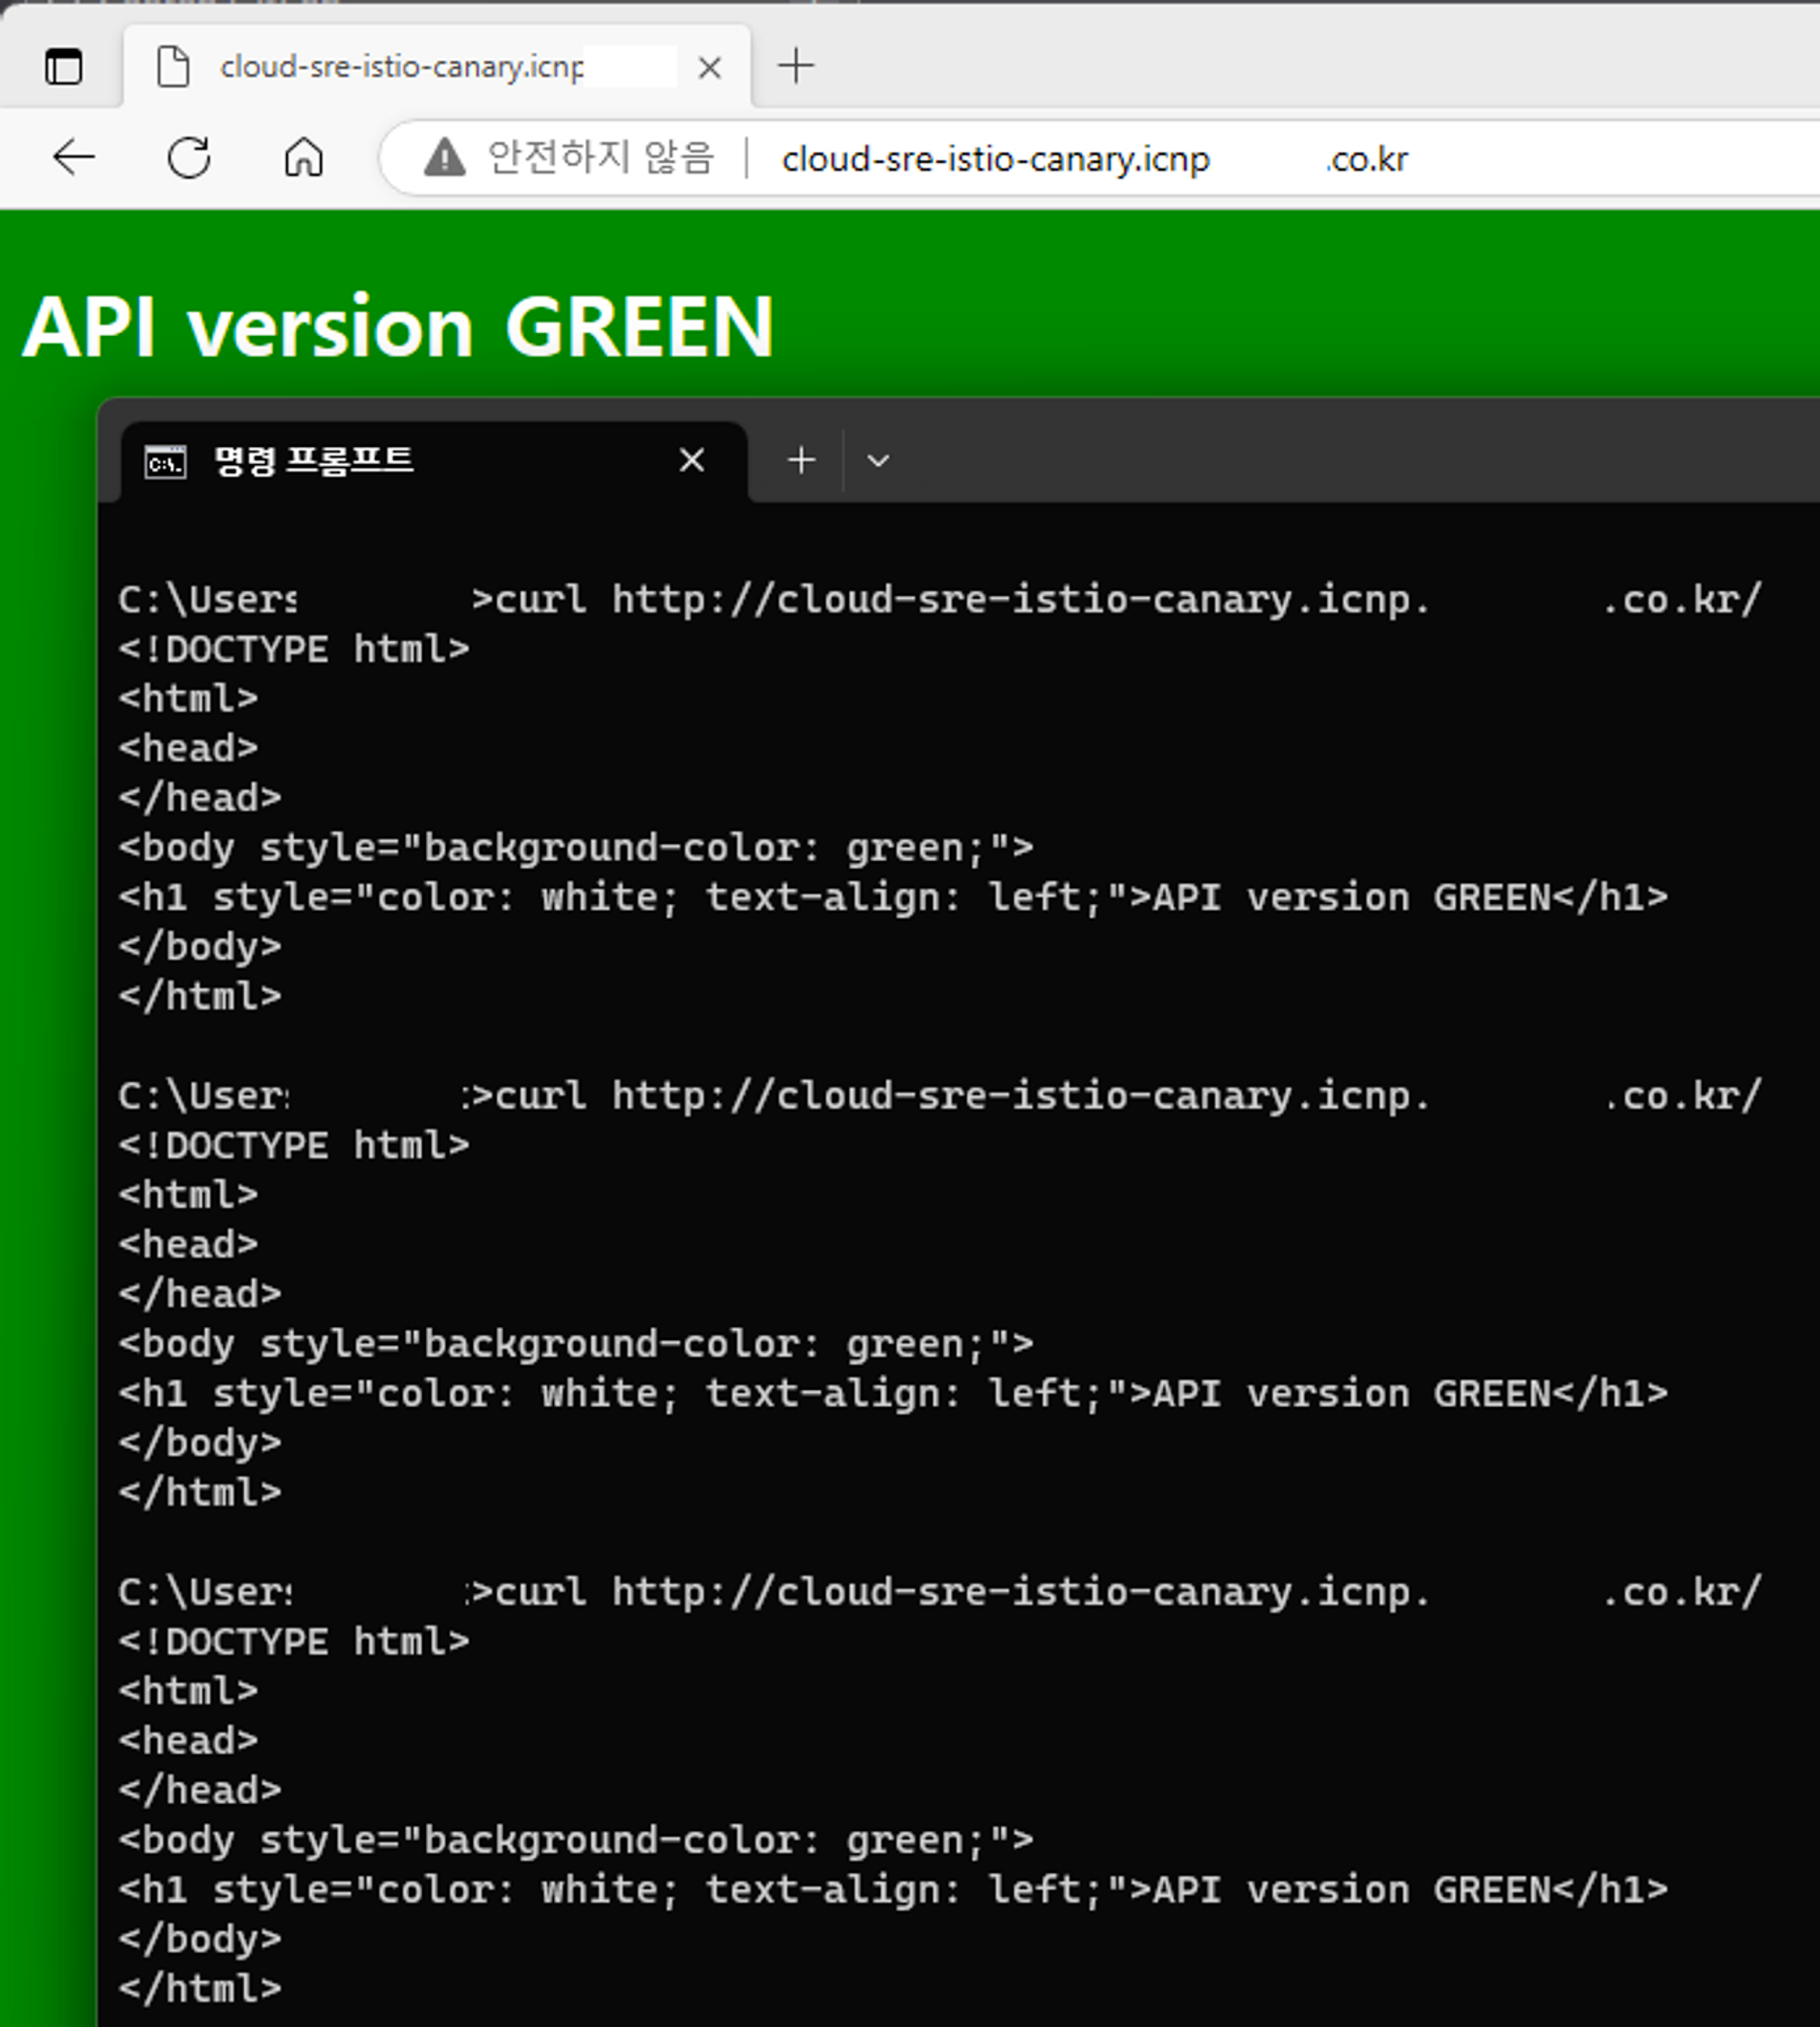
Canary 배포 후 미리 정의한 헤더를 입력해서 접속 하면 75:25 비율을 무시하고 Green 접속 페이지로 만 접속 하여 확인이 가능하게 되었다.
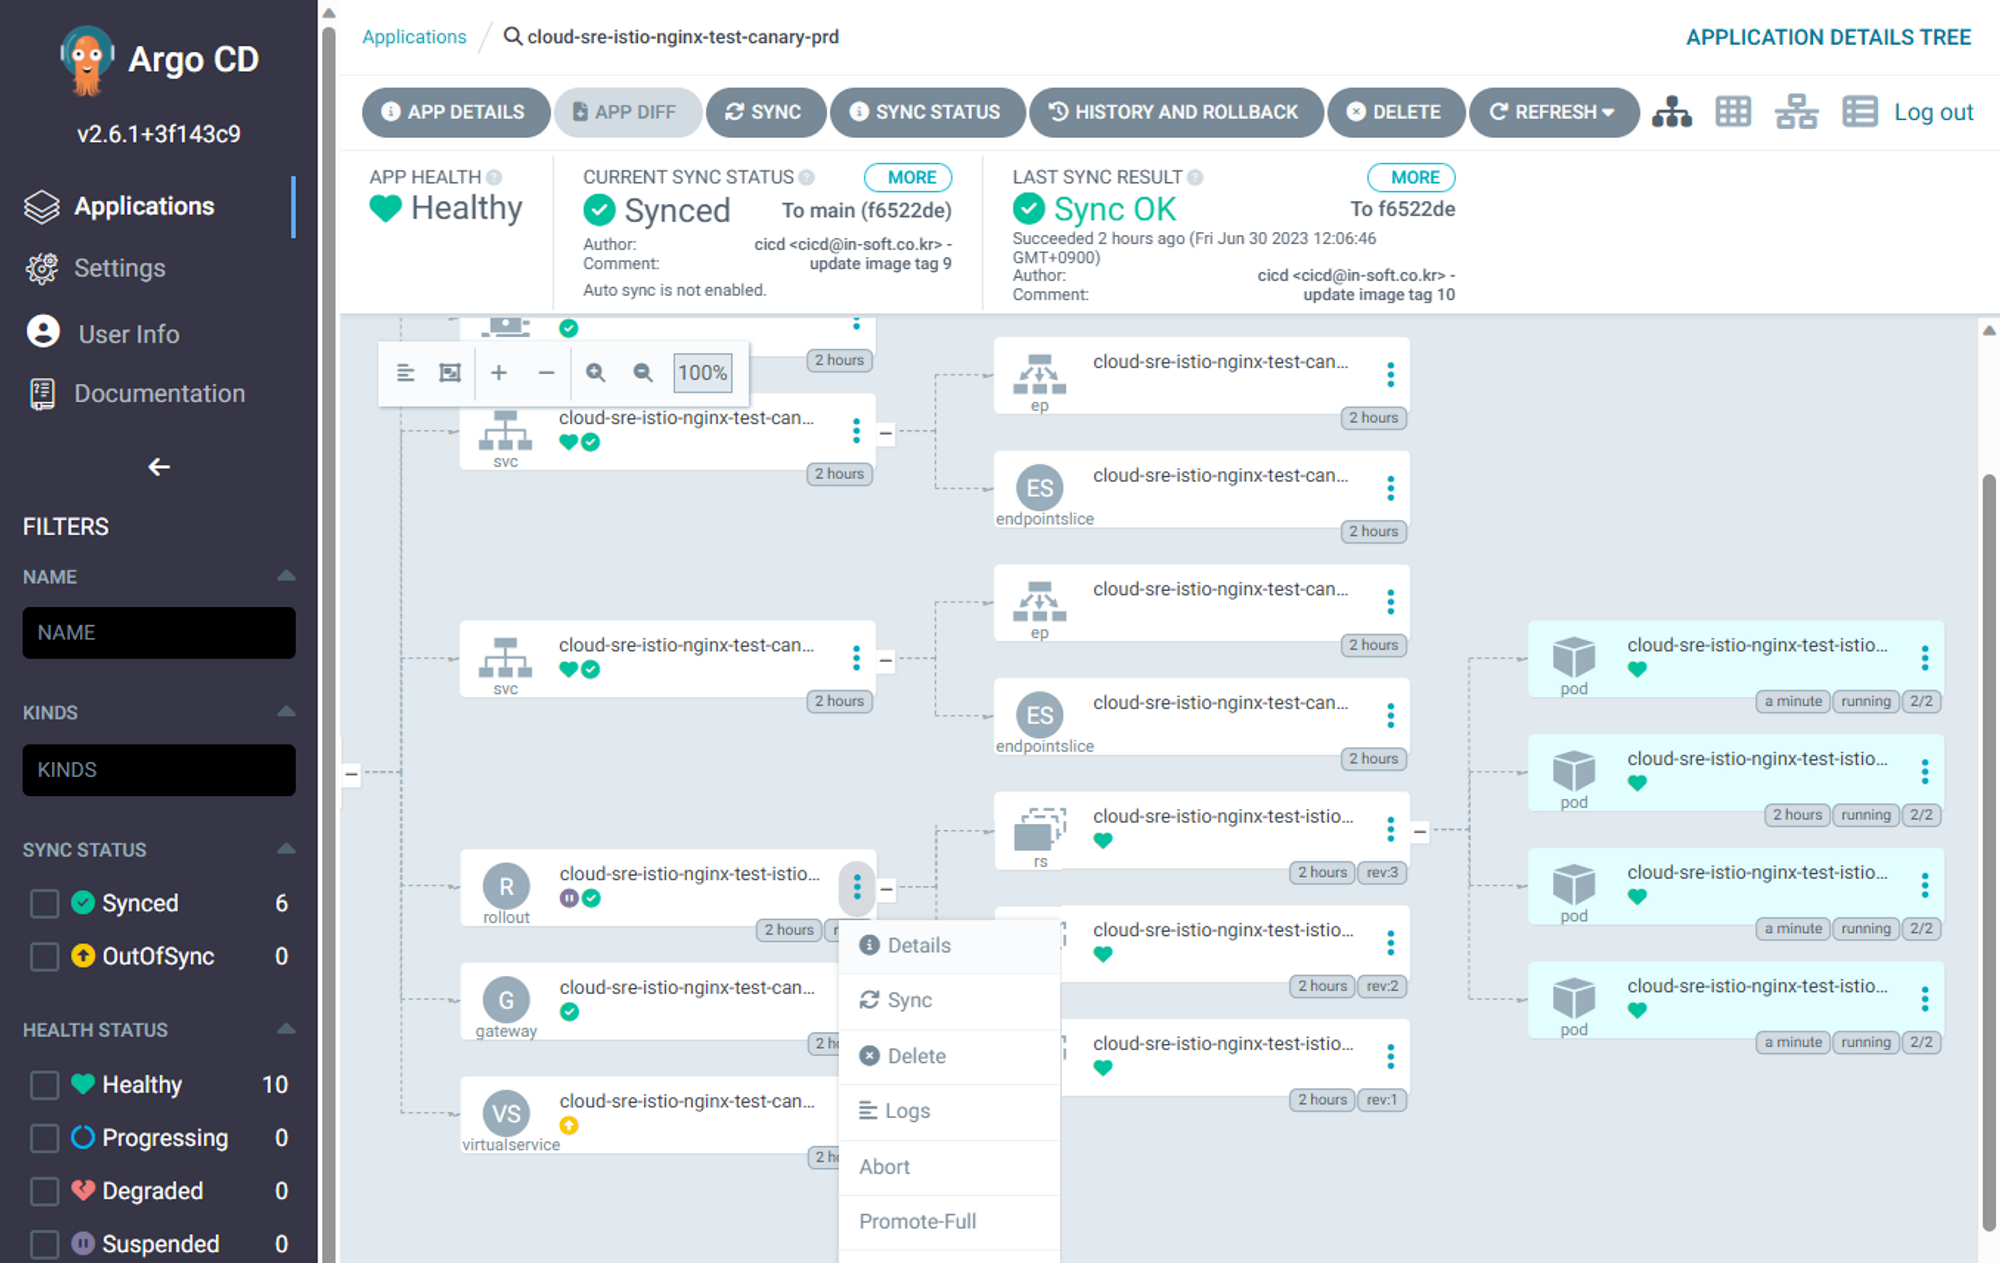
Apply Promote Web Page
이제 최종적으로 Active 페이지인 Blue 페이지도 Green 페이지로 변경을 위해 Promote를 한다. Promote 하고 나면 다시 5개에서 잠시 8개로 늘었다가 다시 4개로 줄어 들게 되고 모든 pod가 Green 이미지로 변경 되게 된다.
Final Check Web Page without Header
Promote 후 헤더가 없는 기본 접속 페이지로 접속 하면 이제는 Green 로만 접속 하게된다.
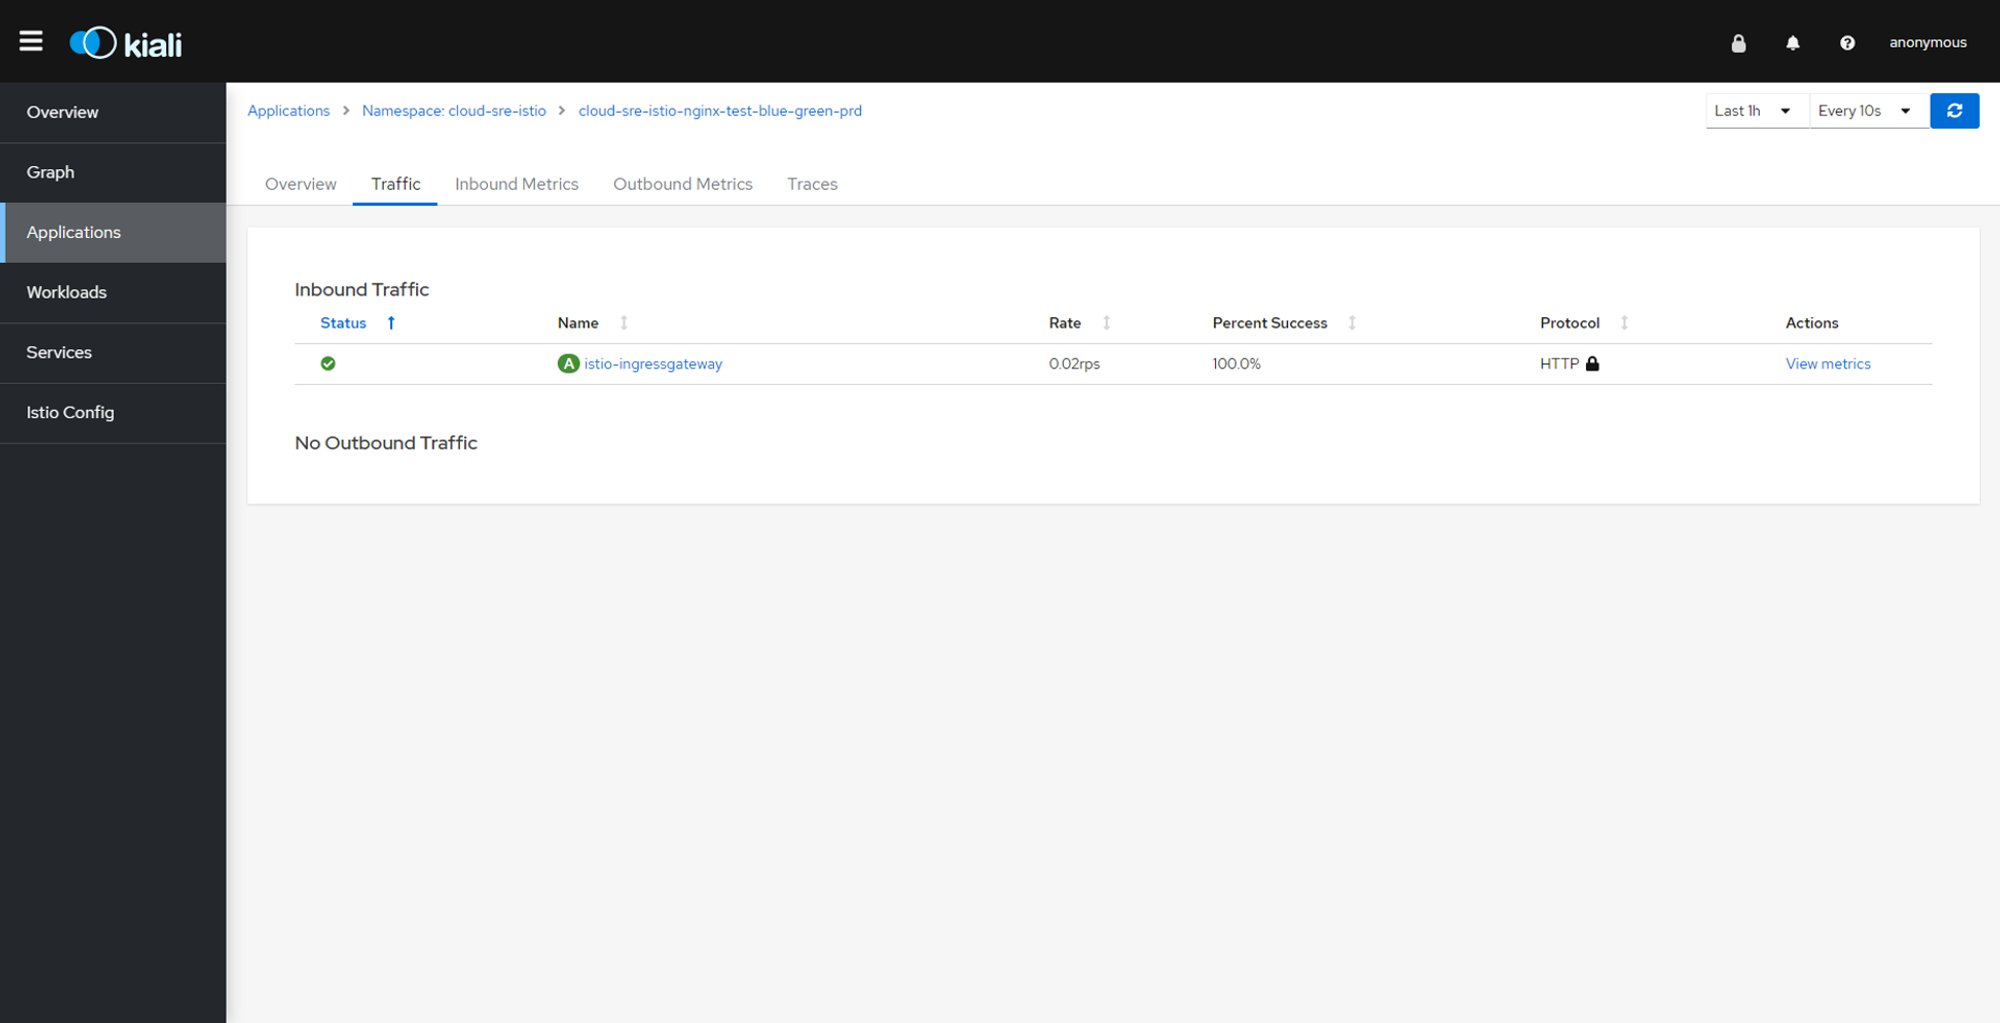
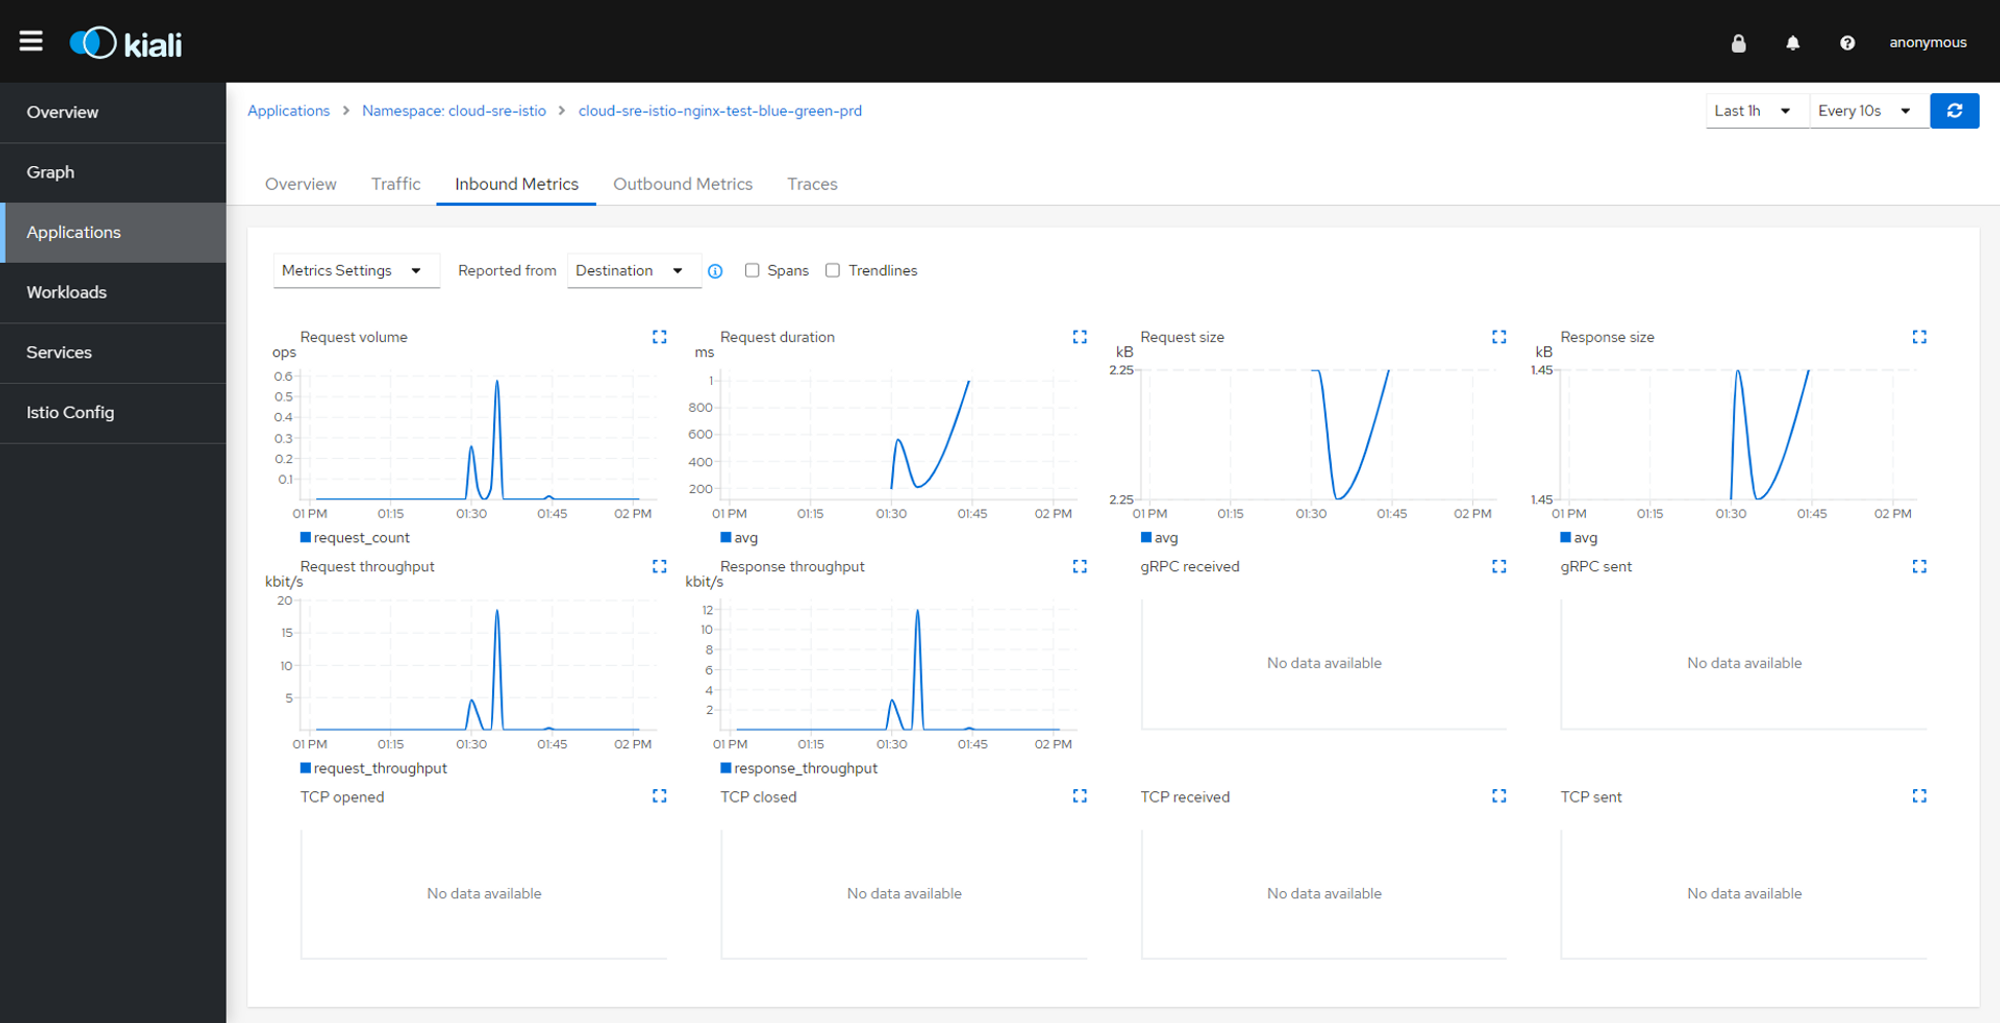
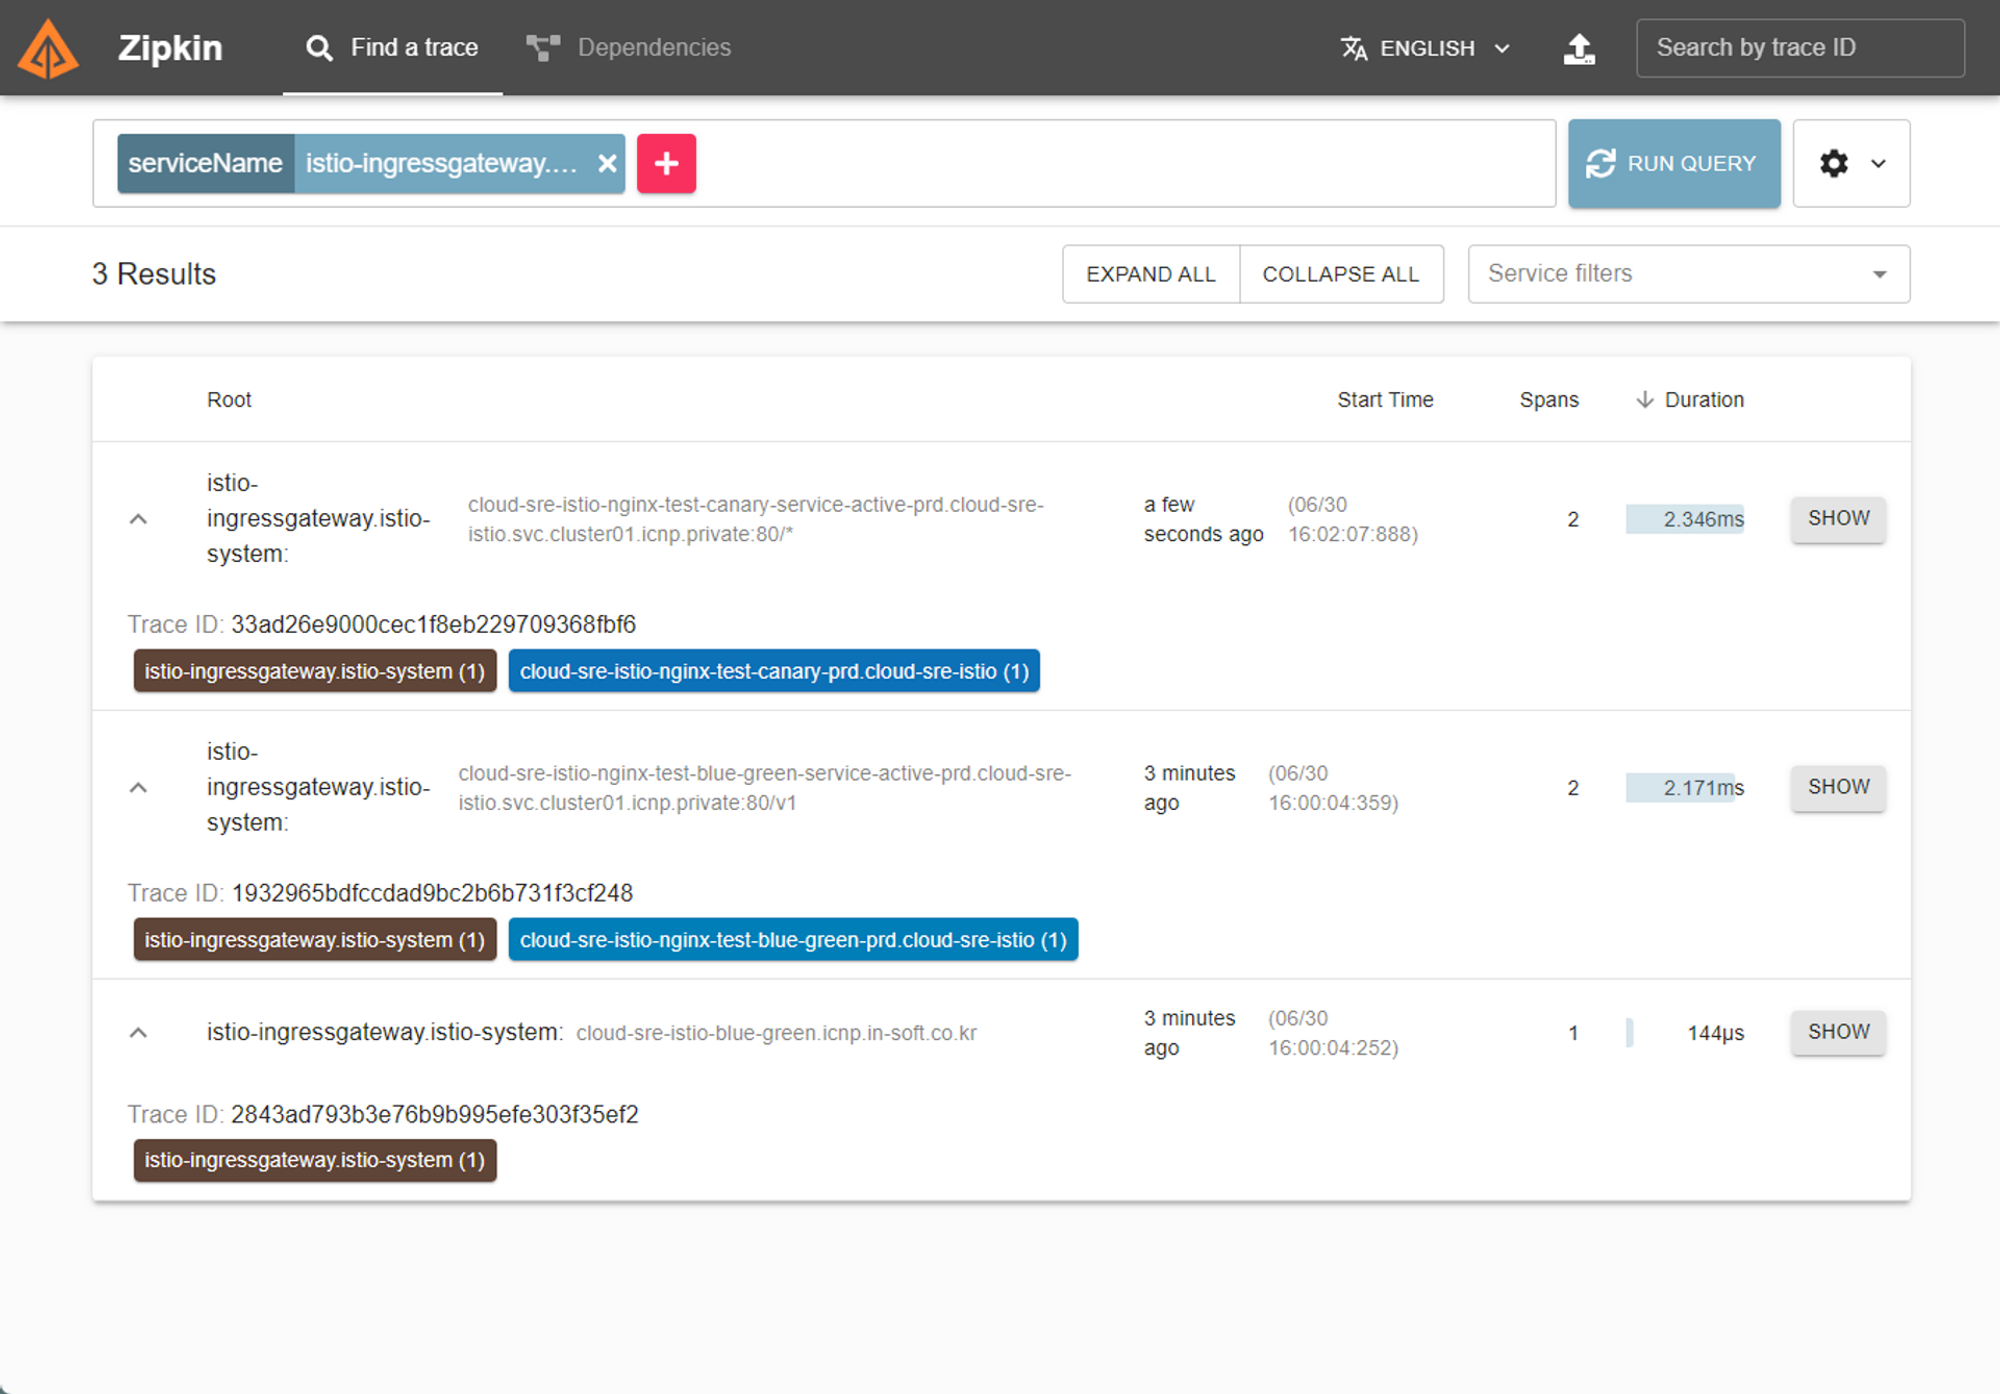
About Kiali and Zipkin
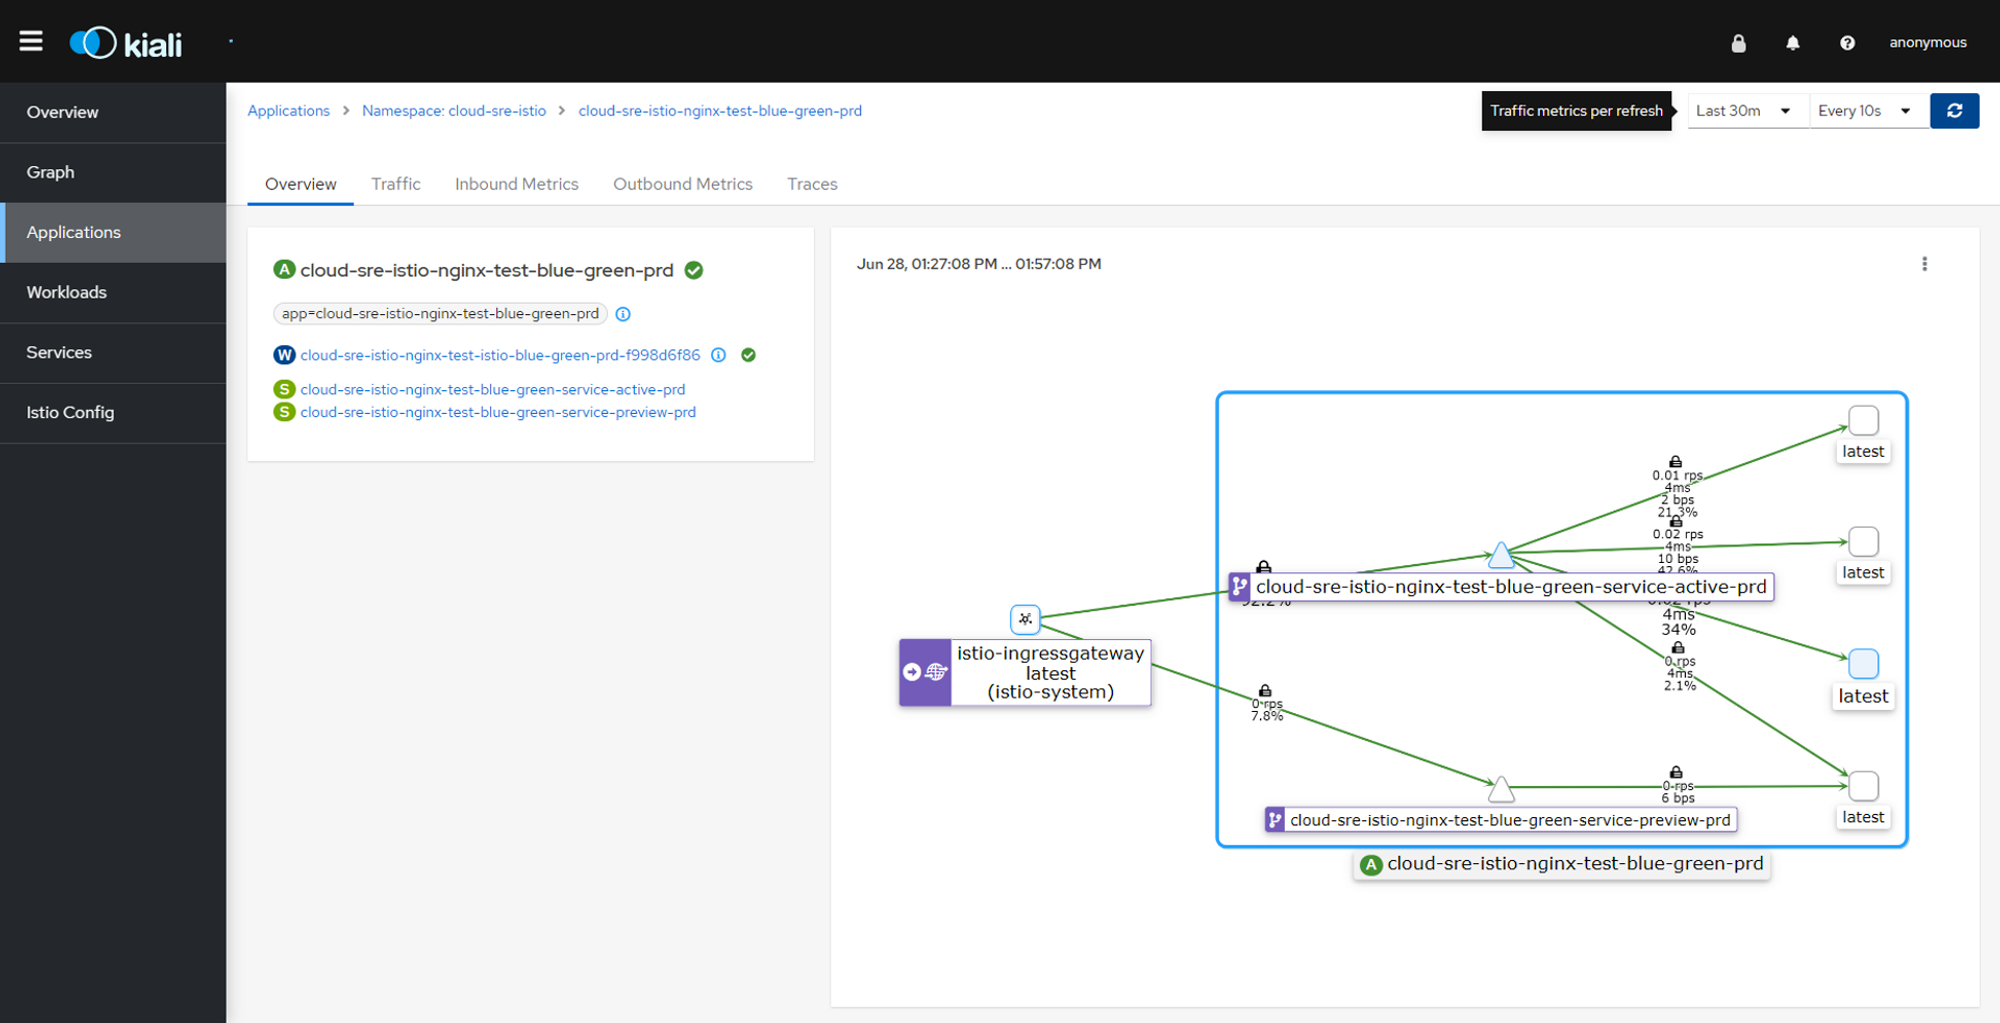
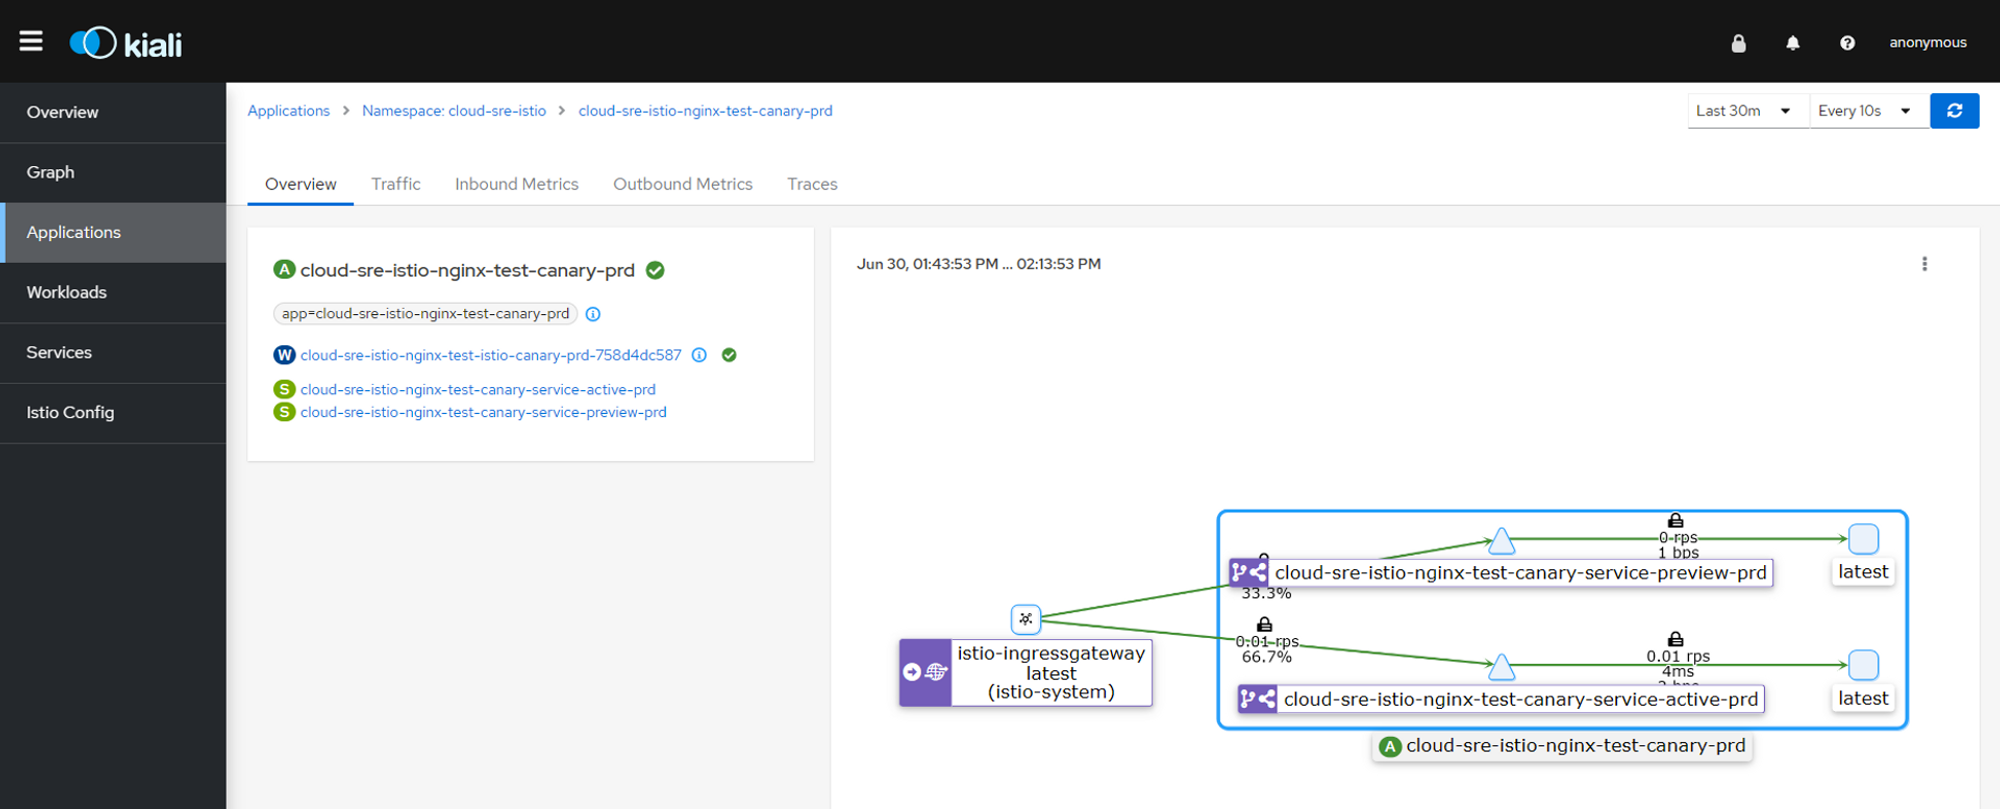
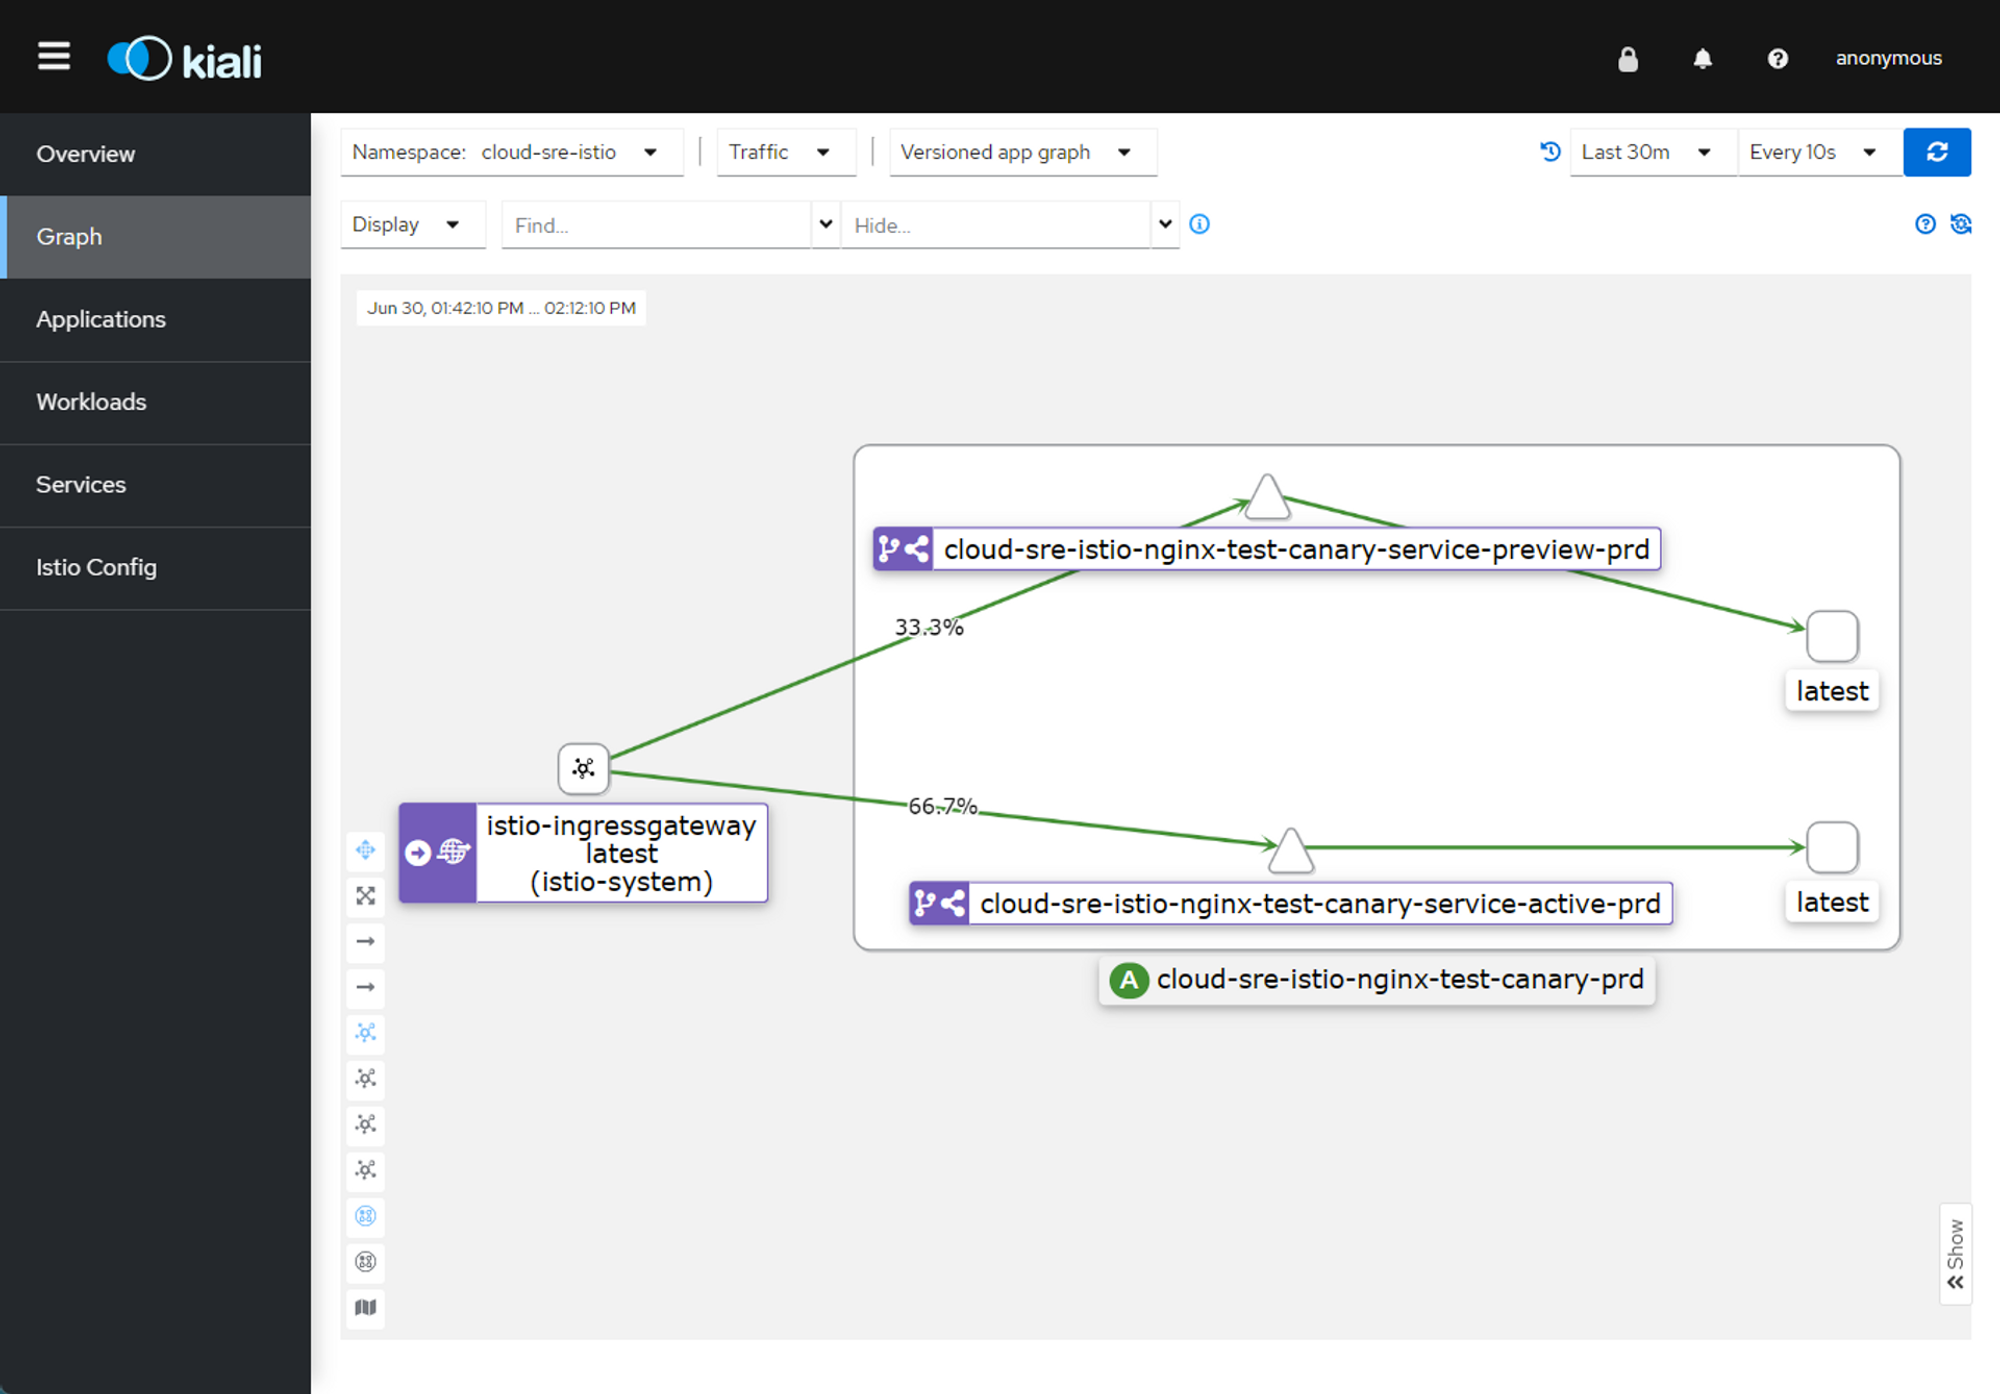
결국 위에서 무언가 한 것도 의미가 있지만 Istio 를 사용하면서 AddOn 으로 설치한 것들 중 Kiali Dashboard 로 Blue Green 테스트로 인한 트래픽의 변화를 아래와 같이 볼 수있고 어던 경로로 많이 연결이 되었는지도 확인이 가능하다.
윤종연 차장님